Elecrow Crowtail User Manual Download Page 24

22

Crowduino UNO-SD/Arduino UNO x1
Crowtail – Base Shield x1
Crowtail – I2C LCD x1

Crowtail – Temperature&Humidity Sensor x1
Crowtail – Cable x2
USB Cable x1

Required Parts

Open the downloaded folder “Crowtail-Advanced kit for Arduino demo code”, navigate to the folder 
lib-> DHT, and add DHT to the Arduino library. Open the 

P10_Temperature&Humidity_Detecting_

System 

with Arduino IDE and upload it.

STEP2: 

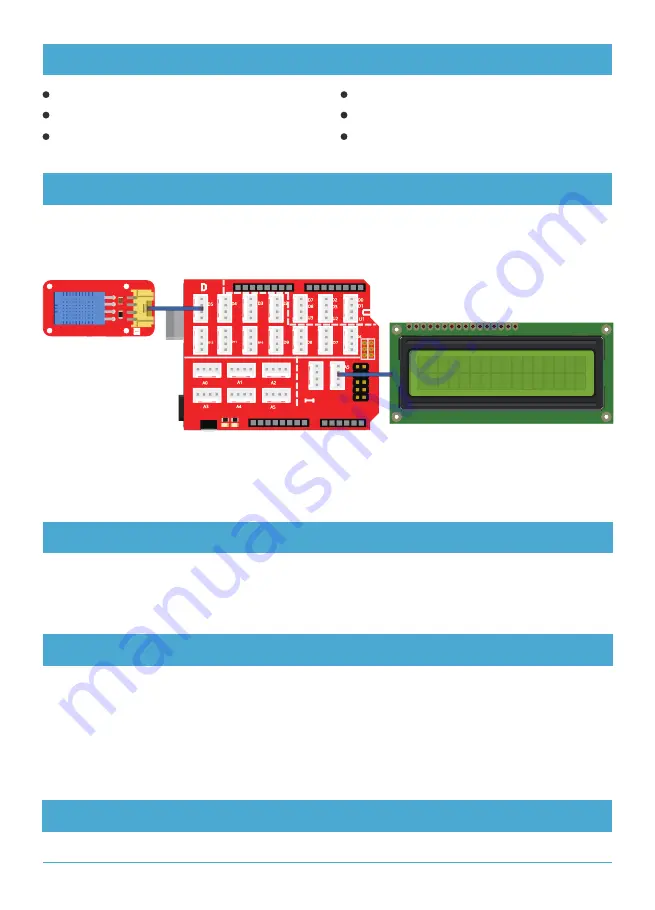
Connect Crowtail-I2C LCD and Crowtail-Temperature&Humidity Sensor to Crowtail-Base 

shield’s I port and D5 port. The complete connection is as follows:

STEP1: 

Plug the Crowtail-Base Shield onto the Arduino or Crowduino Board.

Hardware Connection

You will see that the first column of the LCD displays the humidity information of the current environment, 
and the second column displays the temperature information of the current environment. When you blow 
on the Temperature & Humidity Sensor, you will see Temperature and humidity will also change on LCD.

What will you see

1. Import the LCD and Temperature&Humidity Sensor library.
2. Macro definitions of Temperature&Humidity Sensor pin and DHT11.
3. Create a DHT instance and lcd instance.
4. Initialize the serial monitor, Temperature&Humidity Sensor and lcd. 
5. Read the humidity and temperature information from Temperature&Humidity Sensor.
6. Print humidity and temperature information on LCD.

Code overview

DHT library: #include "DHT.h".

Code usage

Summary of Contents for Crowtail

Page 1: ...www elecrow com 2020 ELECROW All Rights Reserved C Crowtail Adavanced Kit for Arduino User Guide V2 0 2020 02...

Page 2: ...esson 7 Get current time Lesson 8 LCD display Lesson 9 Electric watch Lesson 10 Temperature Humidity detecting system Lesson 11 PWM control Lesson 12 Servo control Lesson 13 Matrix display Lesson 14 G...

Page 3: ...create your own outstanding works and think and solve problems more comprehensively meticulously and confidently The Crowtail Advanced kit for Arduino includes 22 electronic modules each module has it...

Page 4: ...e Humidiy Sensor x1 Crowtail IR Receiver x1 Crowtail MOSFET x1 Crowtail Water Sensor x1 Crowtail LED Matrix x1 Crowtail 9G Servo x1 Crowtail Serial Wifi x1 Crowtail Rotary Angle Sensor x1 Crowtail 3 A...

Page 5: ...you use Crowtail your electronic project will not be a messy wiring instead it will be a simple and easy way to manage electronic project The Crowtail Base Shield is a standard IO expansion board for...

Page 6: ...e improvement over the previously troublesome jumper connections Besides there is also a 2x5 female connector of 5V and GND for customer usages Users can connect any electronic modules to the Base Shi...

Page 7: ...OW signal when released The logic high and logic low levels of the output can be detected by the Arduino controller and then you can program your Arduino to do what you want after detecting the two di...

Page 8: ...function called pinMode to make the pin corresponding to the led a digital output Digital Input We use the digitalRead function to read the value on a digital pin Check to see if an input pin is readi...

Page 9: ...on sensor When the module is stable the circuit is turned on and the output is low When the movement or vibration occurs the circuit will be briefly disconnected and output high At the same time you c...

Page 10: ...r is not vibrating the LED will light off Digital Output digitalWrite ledPin HIGH digitalWrite ledPin LOW When you re using a pin as an OUTPUT you can command it to be HIGH output 5 volts or LOW outpu...

Page 11: ...use water sensor and make a rain reminder so that it can immediately remind you to collect clothes when it starts to rain When you put the water drop on the sensor traces of the water sensor the led w...

Page 12: ...te to store the read water sensor value In the setup function we initialize the water sensor as an input to detect if there is water on the water sensor and initialize the led to output to show you th...

Page 13: ...ion detection function that returns true when the object moves otherwise return false 5 Determine the value returned by the object motion detection function in the loop function to call turnOnLED and...

Page 14: ...llows us to implement functions with simpler logic Modular programming void turnOnLED void turnOffLED boolean isPeopleDetected Lesson 5 Breathing light Introduction Crowduino UNO SD Arduino UNO x1 Cro...

Page 15: ...pValue Arduino math function map int gapValue map value fromLow fromHigh toLow toHigh For analog pin we use the analogWrite function to write the value on an analog pin Similar to digitalWrite functio...

Page 16: ...voltage levels And APDS 9002 spectrum and human eye is extremely close to It is very suitable for the field of AI applications In this lesson we will use Crowtail Luminance Sensor to obtain the light...

Page 17: ...teger Pay attention to VoutArray it will act _in array in FmultiMap function so it should have increasing values Array float VoutArray float LuxArray Unlike void function a float function will return...

Page 18: ...module is based on the clock chip DS1307 which communicates with microcontrollers with I2C protocol The clock calendar provides seconds minutes hours day date month and year information The end of th...

Page 19: ...t month through now month and get the current minutes through now minute And then years days hours and seconds RTC_DS1307 s now function DateTime now RTC now Serial print is used to print the string o...

Page 20: ...tal to the Arduino library Open the P08_LCD_Display with Arduino IDE and upload it STEP1 Plug the Crowtail Base Shield onto the Arduino or Crowduino Board Hardware Connection many pins the Crowtail I2...

Page 21: ...change the name of the instance such as LiquidCrystal I2C_LCD 0 But after changing the name of the instance object don t forget to change the instance object below Create an instance LiquidCrystal lcd...

Page 22: ...use the electronic modules RTC and LCD learned above to make an electronic watch Bring this watch to make yourself the coolest person on the street You will see the current year month and day informat...

Page 23: ...Clib h and LiquidCrystal h are the libraries of RTC module and LCD module they both provide many convenient and useful functions to use Import library include Wire h include RTClib h include LiquidCry...

Page 24: ...Arduino or Crowduino Board Hardware Connection You will see that the first column of the LCD displays the humidity information of the current environment and the second column displays the temperatur...

Page 25: ...ues The macro defines a DHT type Because DHT h contains libraries for multiple DHT sensors we need to tell the program which type of DHT sensor we need to use when we create an instance object for DHT...

Page 26: ...tion Pulse width modulation PWM is a modulation technique used to encode a message into a pulsing signal Although this modulation technique can be used to encode information for transmission its main...

Page 27: ...he condition to exit the loop testing the variable and the action on the variable each time around the loop Initialiser section The initial value of the control variable Condition Section The conditio...

Page 28: ...ort 5 Servo goes from 0 degrees to 180 degrees 6 Servo goes from 180 degrees to 0 degrees Code overview Open the downloaded folder Crowtail Advanced kit for Arduino demo code navigate to the folder li...

Page 29: ...rvo myservo Declare which pin the servo is connected to Different from the other modules which use variable to initialize which pin them should be connected to servo use ServoObject attach function to...

Page 30: ...the I2C address of LED Matrix 4 Set text display size and scroll display on LED Matrix 5 Use for statement to scroll display Hello 6 Change text display direction 7 Use for statement to scroll display...

Page 31: ...ze matrix setTextSize 1 Using matrix setTextWrap function we can set whether the text display on LED Matrix is wrapped or scroll If the parameters in the brackets are true the display text effect is w...

Page 32: ...ltitude 3 Initialize the serial monitor and set the baud rate for it and initialize the BMP180 barometer 4 Print the altitude and get the temperature and then print 5 Get the absolute pressure and rel...

Page 33: ...mperature T pressure getPressure is the function of getting BMP180 absolute pressure data Similar to pressure getTemperature function the pressure data is stored in the variable P and function returns...

Page 34: ...brary 2 Create a compass instance and a variable to store errors that occur 3 In the setup function initialize serial I2C and check errors for compass 4 Retrieve the raw values from the compass not sc...

Page 35: ...raw scaled radians and degrees Function Output compass readRawAxis is the function retrieve the raw values from the compass not scaled compass readScaledAxis is the function retrieve the scaled value...

Page 36: ...Import the IR remote library and declare some variable of the remote control button 2 Declare the pin of two color LEDs and IR Receiver and create an instance of IR Receiver 3 Initialize serial monito...

Page 37: ...Starter kit for Arduino When both of the result is 1 when both numbers are 1 otherwise 0 The computer will get values by converting hexadecimal numbers to binary numbers For example 0xF in hexadecimal...

Page 38: ...ro defines a variable DEBUG to true 2 Send the data to ESP8266 to configure access points and other connection information 3 Check if the ESP is available if yes send the connection id and webpage inf...

Page 39: ...e response from the esp8266 boolean is a basic type of data it only returns true or false when print This is slightly different from the normal string that is there are signs on both sides of the stri...

Page 40: ...pin of water sensor and LED 4 Initialize the DHT and LCD Declare modules are output or input 5 Read the humidity temperature and water state information 6 If water is detected show the temperature and...

Page 41: ...u must have thought that if you could use a simple remote control to control all of them Let s get started we will use IR receiver Infrared remote control DC motor Servo MOSFET LED to make a remote co...

Page 42: ...Initialize the servo and IR receiver Declare modules are output or input 5 Determine which button is pressed if the pressed button is the last button pressed or the newly pressed button 6 Use switch s...

Page 43: ...mal number to binary number to get the result So we use results value and 0xFFFF operation When result value is 0xFFFF press the original button resultCode is 0xFFFF When result value is not 0xFFFF pr...

Page 44: ...ot pressed LED Matrix will display nothing and servo rotate to 0 degrees Code overview This would be always the first thing to do when you need to use the external function Crowtail LED Matrix is an I...

Page 45: ...inder we made above Is it still not enough for you to master the weather Well let s make a more detailed weather station and tell you all the information about the weather that can be measured We will...

Page 46: ...pressure information What will you see 1 Import BMP180 I2C LCD and DHT library 2 Create BMP180 DHT11 and LCD instances 3 Declare the pin of modules some variable and arrays 4 Initialize the DHT LCD a...

Page 47: ...formation When the code is relatively long we will try to modularize the code that implements the same function Modularity means that it is achieved by creating functions This way the code is not easy...

Page 48: ......

Reviews: