EL-CELL ECC-Opto-10 User Manual Download Page 16


  Page 16 of 21


Release 1.21 

      User Manual


ECC-Opto-10


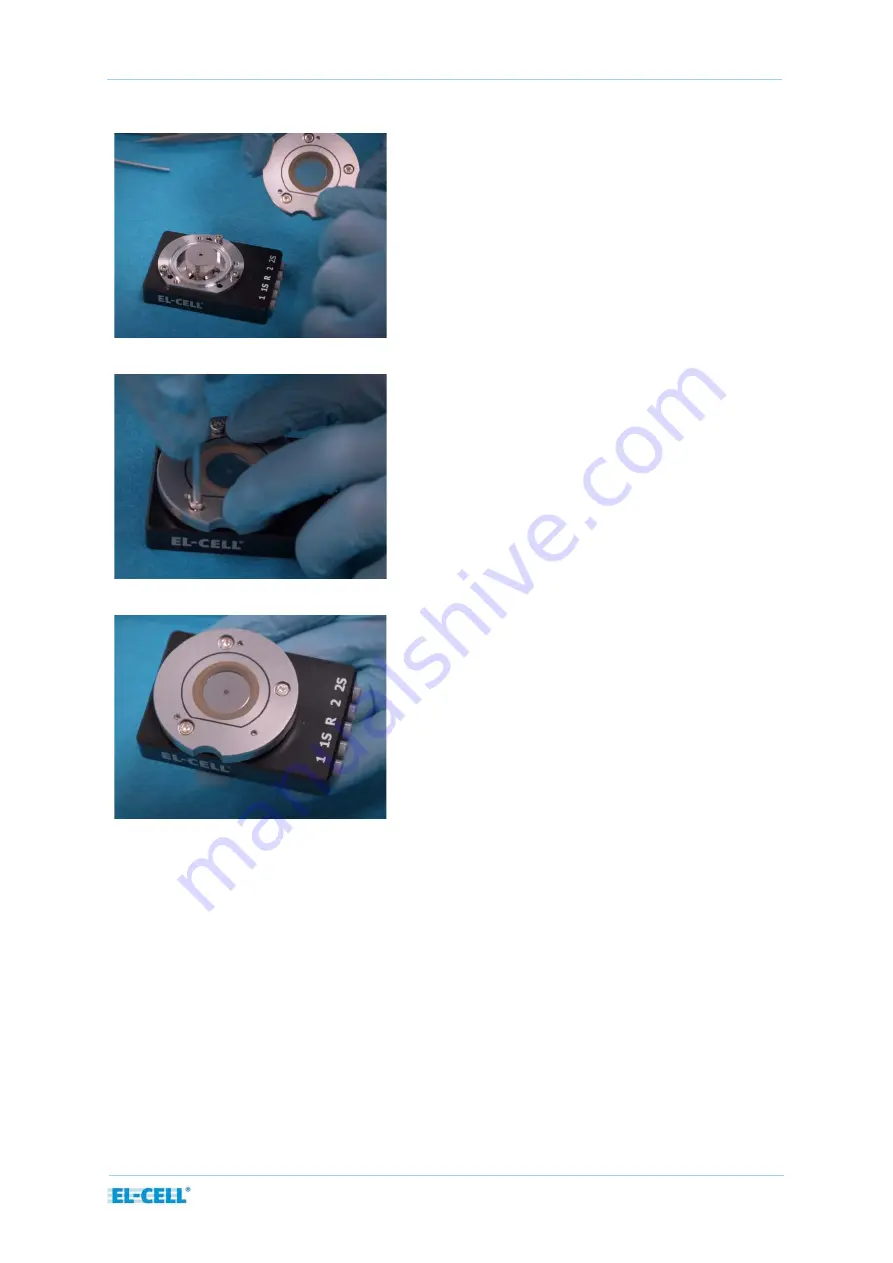
13. Put on the cell lid. Make sure that 
the flat side of the cell base and the 
straight line on the lid are parallel. 


14. Finally, screw the cover on with the  
2.5 mm hexagon screwdriver. 


15. The ECC-Opto-10 is now ready for 
testing. 

Summary of Contents for ECC-Opto-10

Page 1: ...2022 EL Cell GmbH User Manual Release 1 21 ECC Opto 10 Electrochemical test cell...

Page 2: ...ies EL Cell GmbH maintains the right to make changes without further notice to products described in this manual to improve reliability function or design EL Cell GmbH does not assume any liability ar...

Page 3: ...0 Content 1 Product Description 4 2 Technical data 6 3 Intended use 6 4 Safety Precautions 6 5 Assembly 7 6 Connecting the test cell 17 7 Disassembly and Cleaning 17 8 Unpacking 18 9 Components ECC Op...

Page 4: ...ECC Opto 10 is connected to the battery tester via a 2 mm cell cable with banana plugs It can be used with the PAT Tester x 8 as well as potentiostats and battery testers from third party manufacturer...

Page 5: ...ECC Opto 10 side by side setup of electrodes Sapphire glass window Glass fiber separator Electrode 1 Inspection area up to 18 mm Electrode 1 pin Electrode 2 Lid sealing foil PE Electrode R pin Lower p...

Page 6: ...environment It may only be used by trained personnel and only as described in this manual 4 Safety Precautions Use proper safety precautions when using hazardous electrode materials and electrolytes...

Page 7: ...several different configurations which mainly differ in the type and size of the working electrode used the charging geometry the position of the working and counter electrode relative to each other...

Page 8: ...al ECC Opto 10 5 1 Lid assembly 1 Turn the lid upside down Insert the foil sealing into the lid 2 Insert the window 3 Insert the window thrust ring 4 Attach the window flange and screw in the screws u...

Page 9: ...the cell with a side by side sample holder 1 Assemble the lid as described above Then attach the electrode strips to the sample holder 2 Use the loading tweezer to push the piston into the sleeve 3 Pu...

Page 10: ...h it down using the loading tweezer The separator must not be more than 10 mm in diameter A smaller separator may be useful to prevent the sample holder from coming into contact with the electrolyte 5...

Page 11: ...s Use only the amount of electrolyte necessary to impregnate the porous material Avoid excess electrolyte Typically around 30 l of electrolyte is suitable Note that electrolyte will be squeezed out of...

Page 12: ...o 10 11 Doublecheck the proper alignment of the electrode strips Then press down the lid and tighten the three screws firmly with the 2 5 mm hexagon screwdriver 12 The ECC Opto 10 is now ready for tes...

Page 13: ...face to face sample holder 1 Follow the lid assembly steps Then insert the lower piston into the inner sleeve 2 Use the loading tweezer to push the piston into the sleeve 3 Place the assembly into th...

Page 14: ...ain to push the cell stack further down 7 Drop the electrolyte onto the separator Use only the amount of electrolyte necessary to impregnate the porous material Avoid excess electrolyte Typically less...

Page 15: ...Opto 10 9 Push down the electrode stack using the loading tweezer 10 Insert the contact ring 11 Put the holed current collector on top Choose the hole size depending on the magnification used by the...

Page 16: ...ECC Opto 10 13 Put on the cell lid Make sure that the flat side of the cell base and the straight line on the lid are parallel 14 Finally screw the cover on with the 2 5 mm hexagon screwdriver 15 The...

Page 17: ...e disassemble the cell in the reverse order of assembly All chemicals used have to be disposed of properly All wetted parts are to be cleaned with water and or other appropriate solvents All parts are...

Page 18: ...th flat socket fully equipped for use in both 2 electrode and 3 electrode configuration Windows seal 10 pcs ECC1 05 0016 B X Separator 10 0 mm x 0 26 mm GF A 10 pcs ECC1 01 0012 R X PE Sealing foil 10...

Page 19: ...Page 19 of 21 Release 1 21 User Manual ECC Opto 10 9 Components ECC Opto 10 ECC Opto 10...

Page 20: ...Page 20 of 21 Release 1 21 User Manual ECC Opto 10 Lid OPTO 10 18 mm assy...

Page 21: ...his Limited Warranty does not cover defects damage or nonconformity resulting from abuse misuse neglect lack of reasonable care modification or the attachment of improper devices to the goods This Lim...

Reviews: