background image

15

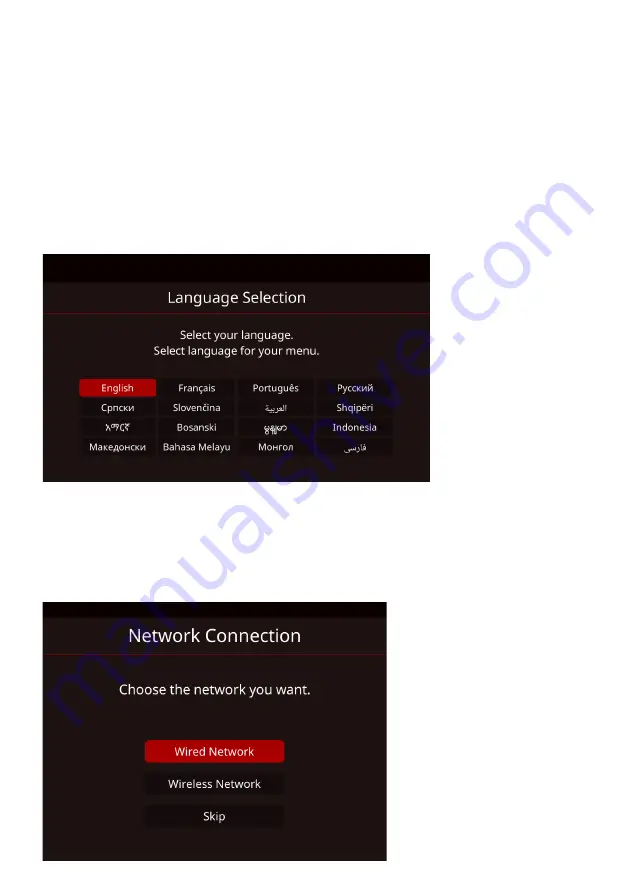
First Time Setup

WELCOME SCREEN

Please follow through with the welcome screen indications for setting up 
your TV.

COUNTRY SELECTION

Select the country you are located in (Australia), this will help all settings 
related to location and Time.

NETWORK

Search for your Wi-Fi network or make sure your ethernet cable is 
connected to the TV and select “Wired Network”. Once completed, this 
ensures you are ready to stream apps that are pre-installed in your TV.

Summary of Contents for K580USN

Page 1: ...58 4K ULTRA HD SMART TV K580USN INSTRUCTION MANUAL Please read this manual carefully before using and keep it for future reference...

Page 2: ......

Page 3: ...mote Control 12 First Time Setup 15 Smart Home 17 Input Menu 18 Menus 19 Picture 20 Sound 21 Channel 22 Time 23 Setup 24 Advanced 26 Parental Guidance 27 Network 28 EPG Electronic Program Guide 29 Rec...

Page 4: ...t The lightning flash symbol within the triangle is intended to warn you of non insulated dangerous voltage the product s enclosure that could be of sufficient magnitude to generate a risk of electric...

Page 5: ...ctric shock Unplug this TV during lightning storms or when unused for long periods of time Not doing so may result in fire or electric shock Do not cover the ventilation openings of the product with i...

Page 6: ...r the products If a television is not positioned in a sufficiently stable location it can be potentially hazardous due to falling Many injuries particularly to children can be avoided by taking simple...

Page 7: ...the product it may result in short circuit fire or electric shock Do not use or store flammable or combustible materials near the unit Doing so may result in fire or explosion Do not place any naked...

Page 8: ...hing the stand Step 1 Place a soft cushioned material on top of a flat surface to prevent damaging the screen pan el Then place the TV screen flat on top with the screen side facing down as illustrate...

Page 9: ...get another person to assist in the following task We recommend you use a professional installer as we assume no liability for any eventual damage to the product or injury to yourself if you mount th...

Page 10: ...10 CONTROLS AND CONNECTIONS TV BUTTONS...

Page 11: ...HDMI 2 2 HDMI 1 ARC 3 RF ANTENNA 4 USB 2 AND 1 5 OPTICAL 6 R L AUDIO 7 CVBS 8 RJ45 9 HDMI 3 USB connection Insert a USB storage device into the USB port to record playback of video music photo SIDE OF...

Page 12: ...12 REMOTE CONTROL...

Page 13: ...13 REMOTE CONTROL CONT...

Page 14: ...d to use the unit for a long time please remove batteries from the remote to avoid accident Keep batteries away from children and pets Never throw batteries into a fire Do not drop or impact the remot...

Page 15: ...SELECTION Select the country you are located in Australia this will help all settings related to location and Time NETWORK Search for your Wi Fi network or make sure your ethernet cable is connected t...

Page 16: ...DVB T TUNING If not on TV Source DVB T Press Source on the remote control and select DVB T T2 option Once Selecting DVB T T2 Make sure to select SEARCH to commence scanning of local TV First Time Set...

Page 17: ...17 Smart Home Press HOME on the remote control to access Smart home page Use the direction arrows to navigate and select your desired app with OK ETHERNET WIFI PRE INSTALLED APPS SOURCE SETTINGS TIME...

Page 18: ...18 INPUT Press the SOURCE button on the RC for the below menu to appear...

Page 19: ...19 MENUS To access MENU settings Press the menu button on the remote control and the menu will display on your screen MAIN MENU...

Page 20: ...e Warm and User Aspect Ratio Select the aspect ratio display proportions according to your video signal type or preference Choices are Auto 4 3 16 9 Movie Just Scan or Panorama Note The choices of asp...

Page 21: ...nd balance between the right and left speaker Auto Volume Turn on to adjust the sound volume depending on the input signal Surround Sound Help to create rich and wider sound from stereo sound sources...

Page 22: ...inue searching DTV Manual Tuning Only for DVB C T T2 or Antenna source Manually search for the DTV programs The search stops when a program is found and this program will be stored automatically Befor...

Page 23: ...nly when Auto Sync is set to Manual Sleep Timer Set to turn off the TV set automatically Choices are Off 10 20 30 60 90 120 180 and 240 minutes Auto Sleep Only for some regions Setup the timer to turn...

Page 24: ...on off the subtitle function HBBTV Only for some regions Turn on or turn off the HBBTV function Subtitle Hearing Impaired Only for some regions Turn on the function to help the deaf or hearing impaire...

Page 25: ...utomatically update the program of the scanned frequency Software Update USB Select to update Software from USB App Settings Setup for Netflix app and show the software version DATA COLLECTION AND FIR...

Page 26: ...the following three menu items Set Password Use to change the current Lock Password Block Program Setup to restrict access to specific program Press to select the desired program and press GREEN butt...

Page 27: ...sons from viewing Options to lock block live TV program viewer ratings Off PG Rated and Above M Rated and Above MA15 Rated and Above R Rated Press BACK or MENU on remote control to go back BLOCK PROGR...

Page 28: ...he network information like IP address and so on manually to connect the wired Network Wireless Network 1 Select Wireless Network and press OK button 2 Only for some regions Read to accept or decline...

Page 29: ...keys The Colour buttons at bottom of screen for additional funcitons such as Record Remind Schedule list and info Record Press Red button to record program you have selected in the guide Remind Press...

Page 30: ...ng the channel you are watching Start Timeshift Timeshift timeshift function while watching TV for a short time you can now rewind Live TV back to the point you turned on timeshift function and contin...

Page 31: ...is connected correctly Check if input settings for TV is correct Audio settings are properly set Make sure volume is not muted If earphones are connected unplug them Adjust the volume No operation ca...

Page 32: ...02 11 b g n Multimedia Playback Format under USB Mode Movie mpg mpeg mpeg2 ps mp4 mkv avi asf flv Music mp3 aac AC3 Photo jpeg bmp png Power Source 100 240V 50 60Hz Power Consumption 150W USB 5V max 5...

Page 33: ...33 THIS PAGE IS LEFT BLANK ON PURPOSE...

Page 34: ...34 THIS PAGE IS LEFT BLANK ON PURPOSE...

Page 35: ...35 THIS PAGE IS LEFT BLANK ON PURPOSE...

Page 36: ...36 CUSTOMER SUPPORT info ayonz com DISTRIBUTED BY Ayonz Pty Ltd...

Reviews: