background image

Section 4  -  

Page 3 of 8

3121-9001-0167_EN.03.00_QT_Manual

  04/2016

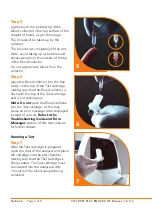
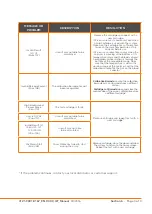
Step 5

Lightly touch the pointed tip of the 

Blood collector to the top surface of the 

droplet of blood, as per the image.
The blood will be taken up by the 

collector.
The blood must completely fill the slot.
Note: avoid taking up air bubbles and 

excess sample on the outside of the tip 

of the Blood collector.
Do not wipe excess blood from the 

collector.

Step 6

place the Blood collector into the free 

cavity on the top of the Test cartridge, 

making sure that the Blood collector is 

flush with the top of the Test cartridge 

and is not sticking out.

Note: Do not 

push the Blood collector 

into the Test cartridge, as this may 

cause an error message to be displayed 

instead of a result. 

Refer to the 

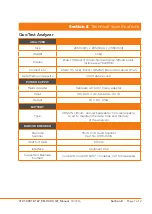
Troubleshooting Guide and Error 

Messages 

section of this User manual 

for further details. 

Running a Test

Step 7 

After the Test cartridge is prepared, 

open the door of the analyzer and place 

the cartridge into the test chamber, 

making sure that the Test cartridge is 

firmly seated. The Test cartridge must 

be inserted into the analyzer within 

1 minute of the blood sample being 

collected.

5

X

6

7

Summary of Contents for Quo-Test

Page 1: ...User Manual Quo Test Diagnostics for life ...

Page 2: ...ated into any human or computer language by any means or in any form without the prior written permission of EKF diagnostic GmbH Part Number 3121 9001 0167 Quo Test User Manual Date 04 2016 Issue EN 03 00 For use with Firmware version 2 xx Diagnostics for life EKF diagnostic GmbH Ebendorfer Chaussee 3 39179 Barleben Germany T 49 39203 511 0 info ekfdiagnostics com www ekfdiagnostics com ...

Page 3: ...s Functional Checking Section 4 Running a Test Preparing to Run a Test Running the Test Collecting the Sample Scanning Operator and Patient ID The Test Result Printing the Test Result Retrieving a Result from the Analyzer Memory Running a Quality Control Sample Section 5 Maintenance Section 6 Troubleshooting Guide and Error Messages Operational Error Messages Section 7 Customer Support Warranty Di...

Page 4: ...or recommended by the manufacturer 6 Do not use the system if it is not working properly or if it has suffered any damage for example a damage to the flexible supply cord or its plug b damage caused by dropping the system c damage caused by dropping the system into liquid or splashing liquid on to it 7 Do not let the equipment or the flexible cords come into contact with surfaces which are too hot...

Page 5: ...ollowing the Troubleshooting Guide and Error Messages section of this User Manual Place the system on a clean dry flat and level surface away from direct sunlight in a room with a temperature range of 18 to 30 C 64 to 86 F An analyzer which has been stored at a temperature above or below the working temperature will take longer to exit the Analyzer Warm Up screen when the system is first powered o...

Page 6: ...tients diagnosed with diabetes The Quo Test A1C System is designed for professional use only Quo Test Quality Controls are intended to check the correct operation of the Quo Test A1C System Quo Test System Description The Quo Test A1C System consists of the Quo Test Analyzer Quo Test A1C Test Cartridges Quo Test A1C Control Kit and Thermal Label Printer optional Quo Test A1C Test Cartridges can on...

Page 7: ...ts The analyzer performs optical electronic and mechanical checks on the test cartridge throughout the test procedure and if a problem is detected the analyzer stops the test and an error message is displayed on the screen If this happens then consult the Troubleshooting Guide and Error Messages section of this User Manual Measurement Principle The arrangement of the two light sources and associat...

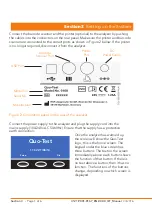
Page 8: ...anel on the rear of the analyzer Connect the power supply to the analyzer and plug the supply cord into the mains supply 100 240v AC 50 60Hz Ensure that the supply has a protective earth connection Once the analyzer has warmed up the screen will show the Quo Test logo this is the home screen The keypad under the blue screen has three buttons The text on the screen immediately above each button sho...

Page 9: ...o a different language press the Change button and use the up down arrow buttons to select the required language from the list Press the OK button to confirm the selection Setting the Time The analyzer has a clock that keeps track of the date and time Whenever a test is performed the result is recorded in the analyzer memory with the date and time that it was run Choose Change on the time screen t...

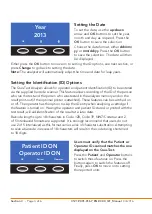
Page 10: ...emory and on the result print out if the optional printer is attached These features can be switched on or off The operator has the option to skip the ID entry when analysing a cartridge if the feature is turned on Having the operator and patient ID stored or printed with the test result will aid identification of the result at a later date Barcode lengths up to 18 characters in Code 128 Code 39 N...

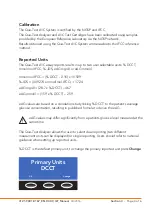
Page 11: ...l or eAG mmol l mmol mol IFCC DCCT 2 15 x 10 929 JDS 0 09274 x mmol mol IFCC 1 724 eAG mg dl 28 7 x DCCT 46 7 eAG mmol l 1 59 x DCCT 2 59 eAG values are based on a correlation study linking DCCT to the patient s average glucose concentration resulting in published formula to derive the eAG eAG values may differ significantly from a patients glucose level measured at the same time The Quo Test Anal...

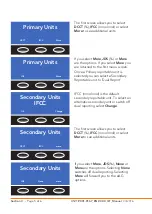
Page 12: ...st menu screen Once a Primary reportable unit is selected you can select a Secondary Reportable unit to Dual Report IFCC mmol mol is the default secondary reportable unit To select an alternative secondary unit or switch off dual reporting select Change The first screen allows you to select DCCT IFCC mmol mol or select More to see additional units If you select More JDS None or More are the option...

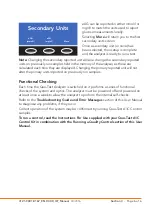
Page 13: ...imary reported unit will not alter the primary units reported on previously run samples Secondary Units mmol l eAG More mg dl eAG Functional Checking Each time the Quo Test Analyzer is switched on it performs a series of functional checks of the system and optics The analyzer must be powered off and powered on at least once a week to allow the analyzer to perform the internal self checks Refer to ...

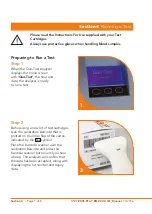
Page 14: ...libration barcode that is printed on the inner flap of the carton indicated by the symbol Place the barcode scanner over the calibration barcode and press the barcode scanner button until you hear a beep The analyzer will confirm that the data has been accepted along with displaying the lot number and expiry date Section 4 Running a Test 2 1 Please read the Instructions For Use supplied with your ...

Page 15: ...resent Collecting the Sample Step 4 The Quo Test can be used with either venous whole blood collected with EDTA or with a finger prick blood sample For fringer prick sample collection the patient s finger must be warm dry and clean including being free of substances such as hand cream Use a single use lancet not provided on the patient s finger to get a droplet of blood about the same width as the...

Page 16: ...the top of the Test cartridge making sure that the Blood collector is flush with the top of the Test cartridge and is not sticking out Note Do not push the Blood collector into the Test cartridge as this may cause an error message to be displayed instead of a result Refer to the Troubleshooting Guide and Error Messages section of this User manual for further details Running a Test Step 7 After the...

Page 17: ...ot Data Card then scan the calibration barcode see Step 2 Step 9 When the test has finished the result will be displayed on the screen and printed on the optional printer if connected Open the door and push the red slide towards the rear of the analyzer Remove the used cartridge and dispose of it as clinical waste Upon closing the analyzer door the display will return to the home screen and the an...

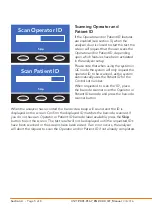
Page 18: ...e Patient ID for the Control Lot number When requested to scan the ID place the barcode scanner over the Operator or Patient ID barcode and press the barcode scanner button When the analyzer has recorded the barcocde a beep will sound and the ID is displayed on the screen Confirm the displayed ID matches the barcode scanned If you do not have an Operator or Patient ID barcode label available press...

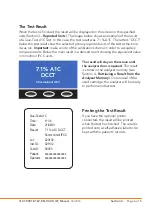
Page 19: ... results Below the main result is a derived result showing the equivalent value in mmol mol IFCC units The result will stay on the screen until the analyzer door is opened The result is stored in the analyzer memory see Section 4 Retrieving a Result from the Analyzer Memory On removal of the used cartridge the analyzer will be ready to perform another test Printing the Test Result If you have the ...

Page 20: ...idge lot number Press the Print button for a printed copy of the result if the optional printer is attached or press the Exit button to return to the home screen Press the Back button to return to the memory file The most recent 1 000 test results may be accessed using the up down arrow buttons on the result screen as shown above To find earlier test results contact your local distributor or custo...

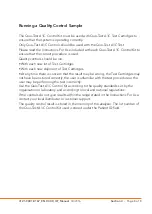
Page 21: ...ch new shipment of Test Cartridges At any time there is concern that the result may be wrong the Test Cartridges may not have been stored correctly the user is unfamiliar with the test procedure or the user may be performing the test incorrectly Use the Quo Test A1C Control Kit according to the quality standards set by the organisation or laboratory and according to local and national regulations ...

Page 22: ...perform the internal self checks To power off the system the Quo Test Analyzer should be in the home screen then either switch off at the mains supply or disconnect the power cable from the power socket on the back of the analyzer Do not clean or disinfect inside the cartridge test chamber Contact your local distributor or customer support for advice If you spill liquid inside the the cartridge te...

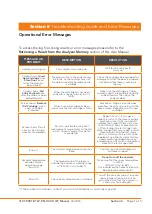
Page 23: ...the analytical measurement range Refer to the test kit IFU linearity and test range for more details Repeat the test if you get a repeat result with the same message and have successfully run control samples then report the result as less than if Result Low or greater than if Result High the test range limits Note a repeat test may report a result close to but within the test range limits in which...

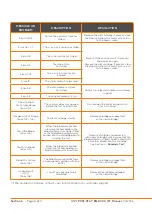
Page 24: ...ad finished Do not open the analyzer door whilst a test is running Reagent Out of Range Error 102 103 The test cartridge is faulty Remove cartridge and repeat test with a new cartridge Too Little Blood Error 104 Either the blood sample had a low level of hemoglobin the blood collector was under filled or the filled blood collector was pushed into the cartridge prior to running the test Remove cart...

Page 25: ...ollected sample fills the slot on the blood collector Invalid Barcode Format Error 108 The calibration barcode has not been recognized Calibration Barcode re scan the calibration barcode or scan a barcode from a different carton Cartridge Lot Barcode open and close the analyzer door If the error is still displayed use a different cartridge High Background Fluorescence Error 110 The test cartridge ...

Page 26: ...Section 6 Page 4 of 4 3121 9001 0167_EN 03 00_QT_Manual 04 2016 Please contact your local supplier Customer support 49 39203 511 414 support ekf diagnostic de ...

Page 27: ...nths from the date of invoice that the Quo Test Analyzer System is free from defects in materials and workmanship In the event of failure within the warranty period EKF diagnostic GmbH will repair or replace the system or part thereof at their discretion provided it has not been subjected to accident alteration misuse or abuse EKF diagnostic GmbH shall not be liable to the purchaser or any third p...

Page 28: ...fficient protective material to protect the analyzer from further damage during transit Analyzers damaged in transit are not covered by the terms of the warranty Ship to your local distributor or directly to Customer Support EKF diagnostic GmbH Ebendorfer Chaussee 3 39179 Barleben Germany Phone 49 39203 511 414 Email support ekf diagnostic de Upon receipt of the analyzer it will be investigated an...

Page 29: ...inter RS232 Barcode Scanner PS2 Data Memory Capacity 7 000 data records POWER SUPPLY Mains Adapter Separate AC to DC mains adapter Input 100 240 V AC 50 60 Hz 30 W Output 24 V DC 1 25A BATTERY Type CR1225 Lithium non rechargeable non replaceable Used to maintain the date time and memory of the analyzer BARCODE READER Barcode Scanner T8 W CCD Hand Scanner Part No 0108 0035 Width of Field 80 mm Inte...

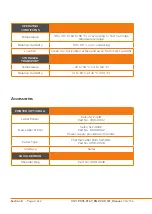
Page 30: ... Paper Type Thermal Label Rolls SLP DRL Part No 0108 0006 Interface Serial SHOULDER BAG Shoulder Bag Part No 0108 0008 OPERATING CONDITIONS Temperature 18 to 30 C 64 to 86 F or according to Test Cartridge temperature range Relative Humidity 10 to 80 non condensing Location Clean dry horizontal surface and away from direct sunlight STORAGE TRANSPORT Temperature 20 to 50 C 4 to 122 F Relative Humidi...

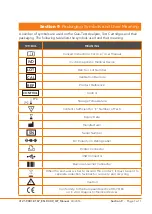
Page 31: ...o Diagnostic Medical Device Batch or Lot Number Calibration Barcode Product Reference Control Storage Temperature Contents Sufficient for Σ Number of Tests Expiry Date Manufacturer Serial Number DC Polarity on Rating Label Printer Connector USB Connector Barcode Scanner Connector When the end user wishes to discard this product it must be sent to separate collection facilities for recovery and rec...

Page 32: ...3121 9001 0167 ...

Reviews: