


- 13 -
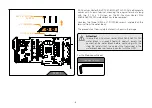
Place the active backplate on the PCB and make sure all holes are aligned.
Position an M2.5 x 8 AX1 screw into each of the six (6) mounting holes (as
shown in the image) and tighten them evenly with a Phillips head screwdriver.
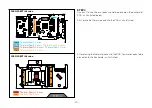
To avoid using excessive force, you can easily loosen up the three (3) M4 x 27
7984DIN screws pre-installed on the terminal, but be careful that two (2) 15 x
1 O-rings remain in their terminal slots. Also, do not forget to tighten the three
(3) loosed M4 x 27 7984DIN screws back after attaching the Active Backplate
In order to ensure that the holes in the terminal and the block line up, the
thermal pads near the terminal must be compressed. This can be achieved by
squeezing the block and active backplate together.
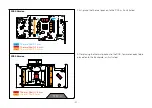
This will not damage the PCB as the mounted standoffs prevent contact at
critical locations. This is the only way to guarantee the promised performance
of the components.
Then, position the three (3) M4 x 27 7984DIN screws that were detached from
the GPU water block terminal into each of the three (3) mounting holes (as shown
in the image) and tighten them evenly with the provided 2.5 mm Allen Key.
Do not use excessive force!
CAUTION: When placing the Active Backplate on the PCB,
the two inserted 15 x 1 O-rings must remain inside their
STEP 5 terminal slots. Wrongly positioned O-rings can
cause leaks!
STEP 5
M2.5 x 8 AX1
M4 x 27 DIN7984
Allen Key 2.5 mm
For this Step, you will need:
Phillips Head Screwdriver


