background image

1 0

INTRODUCTION

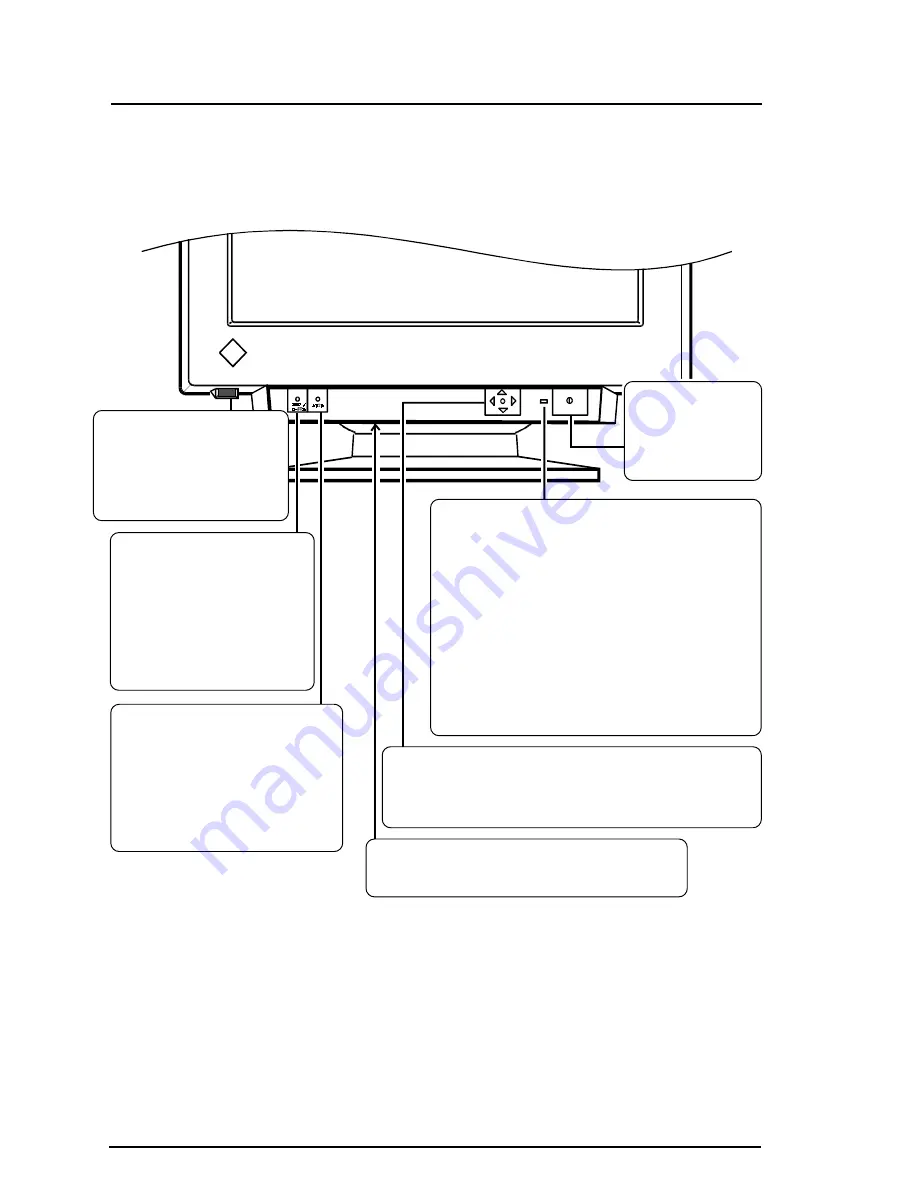
BNC/D-SUB selection
button

Selects BNC or D-Sub
connector as active input.
This feature is only used
when two computers are
connected to the monitor.

Controls & Connectors

Front

AUTO-SIZING button

Automatically centers the
displayed image, bringing the
image borders into alignment
with the monitor frame.
See page 13.

Power switch

Switches the
monitor's power
ON and OFF.

USB port with a drop
down access lid
(Downstream port x 1)

See page 40 for further
details

Power indicator

Indicates the power-on status, as follows:
Solid green:

Power is ON

(normal mode)

Flashing green: -  PowerManager Mode 1

-  Power is switching off
    within 15 minutes
   See Page 39.

Yellow:

PowerManager Mode 2

Flashing Yellow: Off Timer Mode

See Page 39.

QuickSet

 Control pad

(hereinafter “Control pad”)

Manages entering adjustments and settings.

Power terminal covers for the optional

i

·Sound sound unit

Summary of Contents for FLEXSCAN T960 -

Page 1: ...English User s Manual Color Display Monitor T960...

Page 2: ...SCREENMANAGER 16 2 1 About ScreenManager 16 How to Use the ScreenManager 16 ScreenManager Menus 17 Shortcut Keys 19 Adjustment Lock 19 2 2 Imaging Adjustment Screen Menu 20 Contrast Brightness 20 Siz...

Page 3: ...rademarks of Apple Computer Inc registered in the U S and other countries DPMS is a trademark and VESA is a registered trademark of Video Electronics Standards Association VGA is a registered trademar...

Page 4: ...cted directly to a standard wall power outlet Location of the caution statements The equipment must be connected to a grounded main outlet Jordet stikkontakt skal benyttes n r apparatet tilkobles data...

Page 5: ...s spills into the cabinet unplug the monitor immediately Have the unit checked by a qualified service engineer before using it again Place the monitor on a strong stable surface A unit placed on an in...

Page 6: ...t By not doing so may result in fire or electric shock Handle the power cord with care Do not place the cord underneath the monitor or other heavy objects Do not pull on the cord Do not attempt to rep...

Page 7: ...not block the ventilation slots on the cabinet Do not place books or any other papers on the ventilation slots Do not install the monitor in a closed space Do not use the monitor laying down or upsid...

Page 8: ...c fields for example in the vicinity of a speaker except the optional i Sound unit or a high voltage transformer Magnetic fields can cause noise image shaking and other distortions Generally for maxim...

Page 9: ...Features Auto sizing function See page 13 The adjustment of the color temperature between 4 000 K 10 000 K in 500 K increments See page 25 PowerManager to reduce power consumption See page 30 Package...

Page 10: ...r switch Switches the monitor s power ON and OFF USB port with a drop down access lid Downstream port x 1 See page 40 for further details Power indicator Indicates the power on status as follows Solid...

Page 11: ...i 15 pin input connector BNC input connector Termination switch Allows multiple monitors to be chained together Default termination is 75 USB Ports Upstream port x 1 Downstream ports x 3 See page 40 f...

Page 12: ...After connecting secure the connection with the screw in fasteners 3 Plug the other end of the cable into the video connector on the rear of the PC Refer to the figures below Standard PC graphics boa...

Page 13: ...D will light up green The monitor will warm up briefly then display an image Whenever you finish your operation turn off the PC and the monitor If an image does not appear make sure that all connectio...

Page 14: ...for use on Macintosh and IBM compatibles running Windows It may not work properly if either of the following applies An AT compatible PC running MS DOS not Windows The background color for the wallpa...

Page 15: ...to the monitor s D Sub connector and another to the BNC connector securely The BNC connection should be made with an EIZO BNC cable available as an option Contact EIZO dealers for information about o...

Page 16: ...g the Arrow keys and then press the ENTER key to display the Sub menu 2 Use the Control pad the four Arrow keys and the ENTER key to make the required adjustments and settings Save exit 1 To return to...

Page 17: ...temperature and Custom color with adjustment of color tone ScreenManager Menus ScreenManager consists of a main menu and six sub menus Screen Color PowerManager Others Information and Language Animat...

Page 18: ...Manager menu position ScreenManager menu contrast Signal filter setting 1 Signal filter setting 2 Off Timer Reset to defaults Information This menu shows the current ScreenManager settings The menu co...

Page 19: ...e disabled by holding down the AUTO SIZING button while switching on the monitor s power This will disable lock the ScreenManager and AUTO SIZING button protecting from accidental changes To unlock th...

Page 20: ...u use the white text against a black background like DOS text we reco mmend that you set the brightness to its maximum setting because a dark setting will result in eye strain due to high character co...

Page 21: ...moves the image down Parallelogram Trapezoidal curves the image s sides to the right curves the image s sides to the left Side Pin Balance Side Pincushion curves the image s sides outwards curves the...

Page 22: ...for finer adjustments Standard 1 Select the Uniformity function At Standard the icons N NE E SE S SW W and NW represent a broad direction the screen is facing Select the direction the screen is facin...

Page 23: ...corner s uniformity adjusts the lower right corner s uniformity Top Bottom Top Corners Bottom corners Custom There is the Reset icon in the Uniformity menu which resets only the uniformity function to...

Page 24: ...When adjusting vertical convergence look at the top and bottom edges of horizontal lines or characters Proper adjustment is when the effect of red and blue tinges are minimized The convergence adjust...

Page 25: ...sed for even higher precision color adjustment Each monitor is slightly different if two monitors are set to the same color temperature value i e 6 500K they may not necessarily look the same Standard...

Page 26: ...ess the ENTER key to save the data What is color temperature Color temperature is a method to measure the white color tone generally indicated in degrees Kelvin At high temperatures the white tone app...

Page 27: ...how vivid or dull they are which we call Cutoff Users should allow at least 30 minutes for the monitor to stabilize before setting the color adjustments or color matching If only a quick setting is r...

Page 28: ...t set the desired color temperature then use Cutoff Gain for fine adjustments 5 Adjust the Gain Gain The Gain adjustment has no effect on the starting point the black level It changes only the ending...

Page 29: ...he current level within the specific adjustment only They are available only as a reference tool To create a uniform white or black screen the percentages for each will probably not be the same These...

Page 30: ...ng green PowerManager Mode 2 less than 3 W Power Indicator solid yellow When the USB hub is not connected As an ENERGY STAR Partner EIZO NANAO CORPORATION has determined that this product meets the EN...

Page 31: ...m works with a screen saver software and Energy Saver for Macintosh which blanks the screen totally black screen Set the monitor to match the PC s power saving software as follows Monitor setting for...

Page 32: ...which is the interval that the monitor will wait after receiving a power saving signal from the PC before entering into Mode 1 or Mode 2 VESA DPMS power saving method VESA DPMS utilizes four signals...

Page 33: ...EnergySaver blanks the screen and the time that the monitor enters Mode 1 4 Set the Mode 1 duration time which is the user definable time 0 60 minutes before the monitor enters Mode 2 EIZO MPMS power...

Page 34: ...ngs at the monitor side What is EIZO MPMS EIZO MPMS EIZO Monitor PowerManager Signaling also enables to execute power saving at the monitor side EIZO MPMS recognizes the video signals from the PC when...

Page 35: ...s degaussing Degaussing refers to the process of removing magnetic field effects from the monitor Operation of the monitor within a magnetic field may adversely effect color purity Degaussing can be u...

Page 36: ...s front panel see note 2 1 The Input Priority function does not automatically reactivate when the monitor has been in the power saving mode 2 The Input selection button on the front panel can be used...

Page 37: ...hose of the monitor the characters and images displayed may have a slight shadow on their right side refer to figure below If these phenomenon is noticeable use the Signal Filter 1 functon Select from...

Page 38: ...active but there would be no advance notice before the monitor s power switches off The default setting for the Off Timer is disable For setup please see below Setup Procedure 1 Select the Off Timer i...

Page 39: ...sition geometry color PowerManager etc to their factory default settings Default settings are as follows Screen Contrast Brightness 100 50 Moir OFF Color Standard 9 300 K PowerManager VESA DPMS 5 sec...

Page 40: ...be controlled from a PC with a mouse or keyboard when utilizing the enclosed utility software ScreenManager Pro for USB To utilize the USB hub function or ScreenManager for USB the following system e...

Page 41: ...n be connected to the downstream ports of the monitor Please refer to the read txt file for setup too Please make sure if the proper installation is completed by following the confirmation below Confi...

Page 42: ...complied self powered hub USB Monitor Control Class Rev 1 0 complied Standard Downstream power supply 500 mA for each Max Communication speed 12 Mbps full 1 5 Mbps low USB ports Upstream port x 1 Down...

Page 43: ...wnstream ports do not operate Troubleshooting ScreenManager Pro for USB For Windows 98 The utility software ScreenManager Pro for USB is included in the enclosed utility disk It is used for controllin...

Page 44: ...any keys on the front panel The monitor may be in Advance Notice Mode Try pressing a key on the keyboard or clicking the mouse The monitor may be in a power saving mode Try pressing any keys on the fr...

Page 45: ...he manual of the graphics board Points to check with possible solutions The CRT is not warmed up Allow 30 minutes for the monitor to stabilize Degauss the screen Use the degaussing feature in the Scre...

Page 46: ...l EIZO i Sound speaker unit If so move the device or move the monitor It is sometimes possible to correct distortion and tilting by reorienting the monitor Use of the Moir Reduction feature may cause...

Page 47: ...24 Change the horizontal and vertical dimensions of the display area Change the selected desktop or wallpaper pattern to any solid color pattern For detailed information on how to change these patter...

Page 48: ...erlaced scan the image flickers more visibly when compared with a non interlaced scan Flicker The term flicker refers to noticeable shimmering that occurs when the image on the screen is redrawn refre...

Page 49: ...roperly Change the resolution of the graphics board to a higher setting Refer to the manual for the graphics board or PC A solid color screen i e red green blue may appear for an instant while perform...

Page 50: ...following procedure 1 Display a bright white field over the area where the black line s appear with a black field over the unaffected areas Do this by opening a bright white window on top of a black d...

Page 51: ...solvents abrasive cleaners or alcohol ethanol methanol or isopropyl alcohol as these may cause damage to the cabinet or CRT Periodic cleaning is recommended to keep the monitor looking new and to pro...

Page 52: ...in and BNC 5 switchable Recommended Resolution 1600 dots 1200 lines Input Signal Sync H V Separate TTL Positive Negative H V Composite TTL Positive Negative Sync on Green 0 3 Vp p Negative Video Analo...

Page 53: ...i...

Page 54: ...ment Pin Belegung Affectation des Broches D Sub mini 15 pin connector Pin No Signal Pin No Signal 1 Red video 9 No pin 2 Green video 10 Ground 3 Blue video 11 shorted 4 Ground 12 Data 5 No pin 13 H Sy...

Page 55: ...us ont t enregistr s en usine dans le microprocesseur du moniteur Dimensions Abmessungen Dimensions mm iches FRONT VIEW VORDERANSICHT VUE DE FACE SIDE VIEW SETENANSICHT VUE DE C T TOP VIEW DRAUFSICHT...

Page 56: ...f personal computers The labelling scheme was developed as a joint effort by the TCO The Swedish Confederation of Professional Employees Svenska Naturskyddsforeningen The Swedish Society for Nature Co...

Page 57: ...lour generating layers of certain computer displays Cadmium damages the nervous system and is toxic in high doses The relevant TCO 99 requirement states that batteries the colour generating layers of...

Page 58: ...ie Ergonomie nach EK1 59 98 EK1 60 98 mit dem Videosignal 1600 Punkte x 1200 Zeilen RGB analog 0 7 Vp p und mindestens 85 0 Hz Bildwiederholfrequenz non interlaced Weiterhin wird aus ergonomischen Gr...

Page 59: ...arantee that interference will not occur in a particular installation If this equipment does cause harmful interference to radio or television reception which can be determined by turning the equipmen...

Reviews: