background image

Chapter 2  Settings and Adjustments

-10  Screen Size Selection


To change screen size [Screen Size]

The image with the resolution other than the recommended resolution is 
displayed in full screen automatically. You can change the screen size by using 
<Screen Size> from <Others> menu.

Menu

Function

Full Screen 
(default setting)

Displays an image in full screen. Images are distorted in 
some cases because the vertical rate is not equal to the 
horizontal rate.

Enlarged

Displays an image in full screen. In some cases, a blank 
horizontal or vertical border appears to equalize the vertical 
rate and the horizontal rate.

Normal

Displays images with the specified resolution.

Example: Image size 1280 x 1024 in case of S2432W

Full Screen
(Default setting)

Enlarged

Normal

(1920 x 1200)

(1500×1200)

(1280×1024)

(1)  Choose <Others> from the Adjustment menu, and press 

.

(2)  Choose <Screen Size> from the <Others> menu, and press 

.

The screen size setting window appears.

(3)  Select “Full Screen,” “Enlarged,” or “Normal” with 

 or 

, and 


press 

.

The screen size setting is completed.


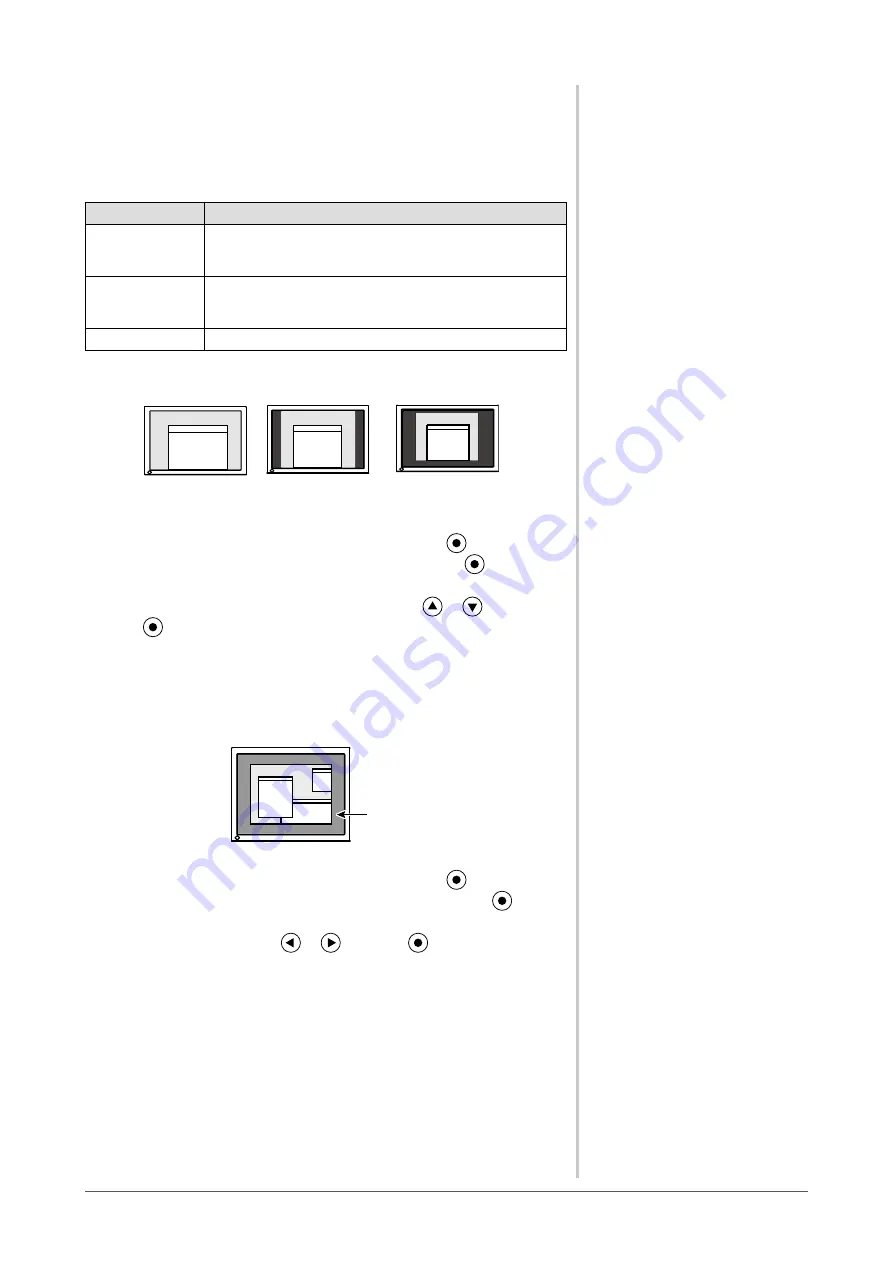
To adjust brightness of non-display area [Border Intensity]

A border (black area with no image) around the image appears in the “Normal” 
or “Enlarged” mode.

Border

(1)  Choose <Others> from the Adjustment menu, and press 

.

(2)  Choose <Border Intensity> from the <Others> menu, and press 

.

The <Border Intensity> menu appears.

(3)  Adjust border intensity with 

 or 

, and press 

.

The border intensity adjustment is completed.

Summary of Contents for FLEXSCAN S2232W -

Page 1: ...User s Manual and Setup Guide separate volume carefully to familiarize yourself with safe and effective usage Please read the Setup Guide separate volume The latest User s Manual is available for dow...

Page 2: ...to EIZO NANAO CORPORATION s receipt of said information Although every effort has been made to ensure that this manual provides up to date information please note that EIZO monitor specifications are...

Page 3: ...ods of time Periodic cleaning is recommended to keep the monitor looking new and to prolong its operation lifetime Refer to Cleaning on the next page The LCD panel is manufactured using high precision...

Page 4: ...ns cleaning paper Remove persistent stains gently with a cloth dampened with a little water and then clean the LCD panel again with a dry cloth for better finishing Cabinet Clean the cabinet with a so...

Page 5: ...ONTENTS 5 Chapter 1 Features and Overview 7 1 1 Features 7 1 2 Controls and Functions 8 1 3 Compatible Resolutions Frequencies 9 1 4 Functions and Basic Operation 10 Chapter 2 Settings and Adjustments...

Page 6: ...an Arm 34 5 2 Folding the EZ UP stand 35 5 3 Specifications 36 5 4 Glossary 45 5 5 Preset Timing 47 TCO 03 48 FCC Declaration of Conformity 49 Hinweise zur Auswahl des richtigen Schwenkarms f r Ihren...

Page 7: ...wer consumption reduction by taking consideration in the ratio of power saving 2 9 Displaying the level of power saving by EcoView Index page 22 FineContrast function 2 3 To select the display mode Fi...

Page 8: ...plays the brightness adjustment menu page 10 8 Power button Turns the power on or off 9 Power indicator Indicates monitor s operation status Blue Operating Orange Power saving Off Power off 10 Speaker...

Page 9: ...VT VESA CVT RB 1 3 1920 1200 60 Hz VESA CVT VESA CVT RB Digital Input Resolution Frequency Mode S2232W S2242W S2432W Dot Clock 120MHz Dot Clock 162MHz 640 480 60 Hz VGA 720 400 70 Hz VGA TEXT 800 600...

Page 10: ...htness Contrast Temperature Gamma Saturation Hue and Gain can be set for each mode Custom sRGB Text Picture Movie Settable functions vary with the FineContrast mode Resuming the default settings To re...

Page 11: ...Border Intensity see page 23 To set input signal selection Input Signal see page 29 To update menu settings Menu Size Menu Position Menu Off Timer Translucent see page 24 To set the orientation of th...

Page 12: ...with and press The adjustment setting menu appears 4 Adjust the selected item with and press The setting is saved Exiting Adjustment menu 1 Choose Return from the Sub menu and press The Main menu appe...

Page 13: ...ng the mouse and keyboard Connect the monitor to the PC with the supplied USB cable before installation Regarding the adjustable items refer to the Parameter Adjustment Items WindowMovie is a function...

Page 14: ...adation automatically Range 2 Prepare the display pattern for the analog display adjustment For Windows PC Load the EIZO LCD Utility Disk to your PC and then start the Screen Adjustment Utility from t...

Page 15: ...Choose Clock from the Screen menu and press The Clock menu appears 2 Adjust the clock with or and press The adjustment is completed To remove flickering or blurring Phase Adjustable range 0 to 63 1 C...

Page 16: ...Smoothing When a image is displayed with a resolution other than the recommendation the characters or lines of the displayed image may be blurred Adjustable range 1 to 5 1 Choose Screen from the Adjus...

Page 17: ...1 Press The FineContrast mode name appears at the lower left of the screen 2 One of five modes is displayed in turn each time is pressed Custom sRGB Text Picture Movie NOTE The Adjustment menu and th...

Page 18: ...data later Refer to Chapter 4 Color Adjustment on the User s Manual for ScreenManager Pro for LCD Attention Wait 30 minutes or more from monitor power on before starting the color adjustment Perform t...

Page 19: ...ble range 128 to 127 1 Choose Color from the Adjustment menu and press 2 Choose Saturation from the Color menu and press The Saturation adjustment menu appears 3 Adjust the saturation of the color wit...

Page 20: ...the Adjustment menu and press 2 Choose Power Save from the Sound menu and press The Power Save setting menu appears 3 Select On or Off with or and press The setting is completed Attention This functio...

Page 21: ...ode in five seconds in connection with the PC setting PC Monitor Power Indicator Operating Operating Blue Power saving Power saving Orange NOTE Be careful not to block the sensor on the lower side of...

Page 22: ...r Off time with or 4 Press The setting is completed 2 9 Displaying the level of power saving by EcoView Index This function allows you to display the power saving level by green indicator The power sa...

Page 23: ...te Normal Displays images with the specified resolution Example Image size 1280 x 1024 in case of S2432W Full Screen Default setting Enlarged Normal 1920 x 1200 1500 1200 1280 1024 1 Choose Others fro...

Page 24: ...setting is completed Menu Off Timer Set the menu display time using the following procedure Adjustment range Disable Enable 15 30 45 60s 1 Choose Others from the Adjustment menu and press 2 Choose Men...

Page 25: ...rmation 1 3 Input signal status D Sub DVI Digital resolution and H V frequency Information 2 3 Enable Disable setting for DDC CI Information 3 3 Model name serial number and usage time 1 Choose Inform...

Page 26: ...ting is completed 2 17 Setting Language Language This function allows you to select a language for the adjustment menu or displaying message Selectable languages English German French Spanish Italian...

Page 27: ...rs 3 Select Reset with or and press The color adjustment values revert to the default settings To reset all adjustments to the factory default settings Reset all adjustments to the factory default set...

Page 28: ...ction examples D Sub mini 15 pin Connector DVI D connector Signal cable supplied FD C39 Signal cable supplied MD C87 To PC 1 To PC 2 D Sub mini 15 pin Connector DVI D connector Analog Digital To switc...

Page 29: ...ss The Input Signal menu appears 3 Select Auto or Manual with or and press The setting is completed 3 2 Adjusting the DVI Input Level DVI Input Level This function allows you to adjust the DVI signal...

Page 30: ...connection of the USB cable Attention This monitor may not work depending on PC OS or peripheral devices to be used For USB compatibility of peripheral devices contact their manufactures Devices conne...

Page 31: ...pear because some PCs do not output the signal soon after power on Check whether the PC is turned on Check whether the signal cable is connected properly Switch the input signal with When using the lo...

Page 32: ...osition 10 Vertical bars appear on the screen or a part of the image is flickering Adjust using Clock see page 15 11 Whole screen is flickering or blurring Adjust using Phase see page 15 12 Upper part...

Page 33: ...ripheral devices works correctly by changing the USB port contact your local dealer Refer to the manual of the PC for details Reboot the PC If the peripheral devices work correctly when the PC and per...

Page 34: ...anufacturer s arm or stand confirm the following in advance and select one conforming to the VESA standard Clearance between the screw holes 100 mm 100 mm Thickness of plate 2 6 mm Strong enough to su...

Page 35: ...touches the stand base and attach the lock metal fitting Adjust the monitor angle so as the monitor screen not to touch the stand base Hinge Stand Base Lock metal fitting 3 Fall the monitor screen ba...

Page 36: ...able is not connected Input Signal Manual Power button Off 1W or less without USB load when stereo mini jack cable is not connected Main Power switch Off 0W Input Signal Connector D Sub mini 15 pin DV...

Page 37: ...ent Downstream Max 500mA 1 port S2242W LCD Panel 22 0 inch 560 mm TFT color LCD with anti glare Viewing angle Horizontal 178 Vertical 178 CR 10 or more Dot Pitch 0 247 mm Horizontal Scan Frequency Ana...

Page 38: ...ing Height adjustable stand Approx 9 6 kg 21 2 lbs Main unit including Tilt stand Approx 7 6 kg 16 8 lbs Main unit including EZ UP stand Approx 11 4 kg 25 1 Ibs Main unit without stand Approx 6 6 kg 1...

Page 39: ...negative Composite TTL positive negative Analog Input Signal Video Analog Positive 0 7Vp p 75 Digital Signal Transmission System TMDS Single Link Video Signal Memory Analog signal 45 preset 22 Digital...

Page 40: ...tion Pressure Operating 700 to 1 060 hPa Storage 200 to 1 060 hPa USB Standard USB Specification Revision 2 0 Port Upstream port 1 Downstream port 2 Supply current Downstream Max 500mA 1 port Main def...

Page 41: ...5 325 12 8 528 20 8 272 5 10 7 82 3 23 208 5 8 2 20 0 79 106 4 2 264 5 10 4 40 481 5 19 439 521 17 3 20 5 90 491 19 3 8 0 31 14 6 0 57 PIVOT SWIVEL 17 45 0 69 17 99 0 67 3 9 S2232W S2242W Tilt stand u...

Page 42: ...53 279 9 11 13 4 0 53 185 7 3 351 5 13 8 350 13 8 165 6 5 27 5 1 08 307 5 12 1 481 5 1 9 94 5 3 72 90 17 5 0 69 SWIVEL PIVOT S2432W Height adjustable stand unit mm inch 456 538 18 21 2 35 35 40 90 PI...

Page 43: ...33 9 2 133 5 5 3 100 3 9 133 5 5 3 13 4 0 53 64 3 2 53 Connector Pin Assignment DVI D connector Pin No Signal Pin No Signal Pin No Signal 1 T M D S Data 2 9 T M D S Data1 17 T M D S Data0 2 T M D S Da...

Page 44: ...nd 10 Ground 15 Clock SCL NC No Connection USB port Upstream Series A connector Series B connector Upstream Contact No Signal Remarks 1 VCC Cable power 2 Data Serial data 3 Data Serial data 4 Ground C...

Page 45: ...An LCD monitor displays the color by the light passing through the panel color filter Red green and blue are the three primary colors All the colors on the screen are displayed by combining these thr...

Page 46: ...net users to closely match colors as a simple color matching means for the Internet use Temperature Color temperature is a method to measure the white color tone generally indicated in degrees Kelvin...

Page 47: ...960 60Hz 108 0 MHz Horizontal 60 00 Positive Vertical 60 00 Positive VESA 1280 1024 60Hz 108 0 MHz Horizontal 63 98 Positive Vertical 60 02 Positive VESA 1280 1024 75Hz 135 0 MHz Horizontal 79 98 Posi...

Page 48: ...nergy saving mode after a certain time beneficial both for the user and environment Electrical safety Emissions Electromagnetic fields Noise emissions Ecology The products must be prepared for recycli...

Page 49: ...l interference to radio communications However there is no guarantee that interference will not occur in a particular installation If this equipment does cause harmful interference to radio or televis...

Page 50: ...nten 5 e Der Standfu mu die M glichkeit zur Drehung des Bildschirmger tes besitzen max 180 Der maximale Kraftaufwand daf r mu weniger als 100 N betragen f Der Standfu mu in der Stellung verharren in d...

Page 51: ......

Reviews: