background image

35

Chapter 6 Reference

6-3.  Detaching / Attaching the Cable Cover


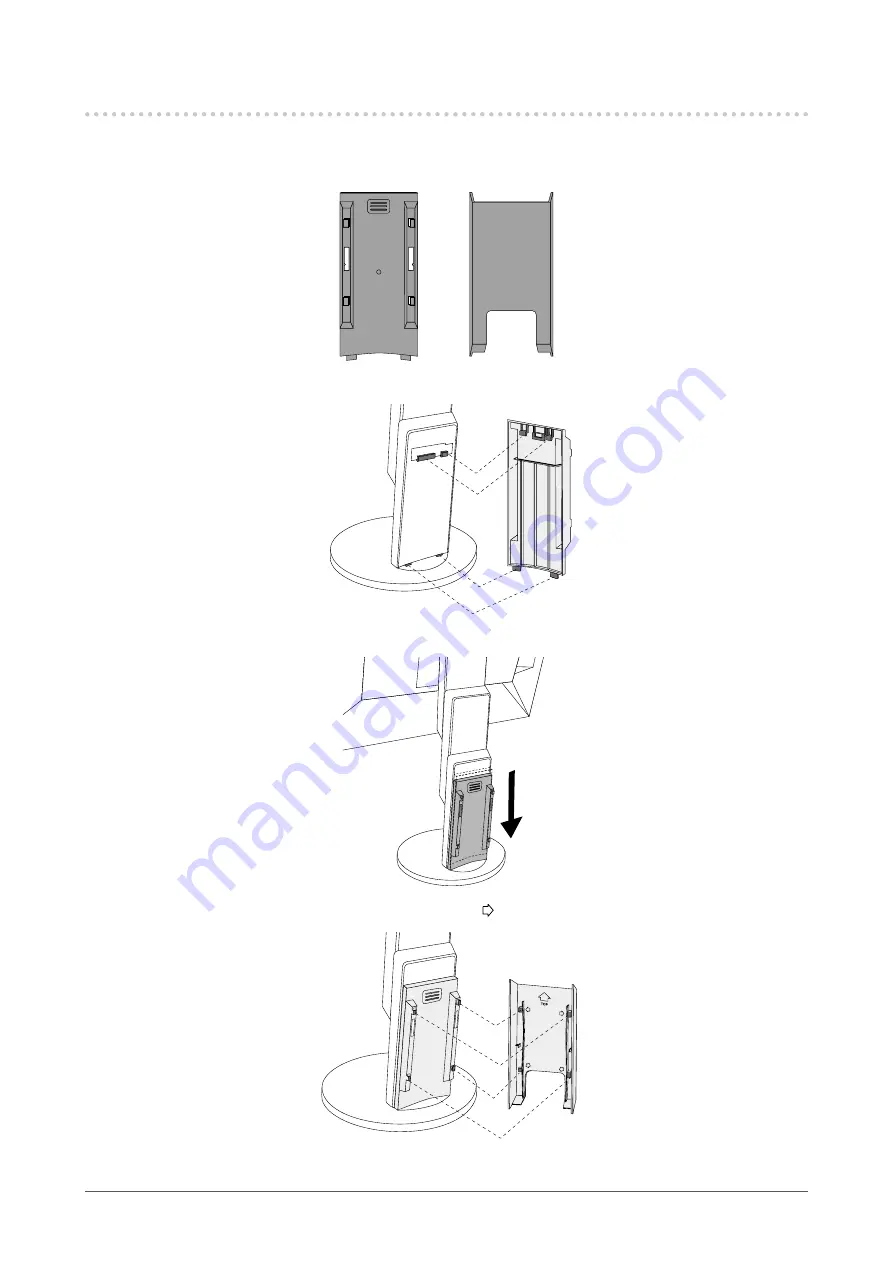
Attaching the cable cover

A

B

1.  Align the tabs of (A) with the attachment parts of the stand.

A

2.  Slide (A) downward to secure the tabs to the attachment parts of the stand.

3.  Check the tabs of (B) (four locations indicated by  ) and the attachment locations of (A).

B

A

4.  Pass the cables between (A) and (B), and align (B) with (A) to fit in.

Summary of Contents for FLEXSCAN EV2456

Page 1: ...iliarize yourself with safe and effective usage Please refer to the Setup Guide for basic information ranging from connection of the monitor to a PC to using the monitor For the latest product informa...

Page 2: ...al system or transmitted in any form or by any means electronic mechanical or otherwise without the prior written permission of EIZO Corporation EIZO Corporation is under no obligation to hold any sub...

Page 3: ...may adhere to the bottom of the stand due to the composition of the rubber Check the desk surface before use It takes about 30 minutes for the performance of electrical parts to stabilize Please wait...

Page 4: ...aces of the monitor In that case do not turn the monitor on Instead wait until the dew condensation disappears otherwise it may cause some damage to the monitor Cleaning Attention Chemicals such as al...

Page 5: ...e Settings 24 Language 25 Information 25 Chapter 4 Administrator Settings 26 4 1 Basic Operation of the Administrator Settings Menu 26 4 2 Functions of the Administrator Settings Menu 27 Chapter 5 Tro...

Page 6: ...as an external monitor of a notebook computer This product can be used in a multi monitor configuration in which multiple monitors are connected to a single PC Mounting the monitor on an arm enables t...

Page 7: ...er consumption while maintaining the brightness specified by the input signal 1 Reference values Maximum power consumption 44 W when a USB device is connected speaker working standard power consumptio...

Page 8: ...dicator Indicates the monitor s operation status White Screen display Orange Power saving mode OFF Main power power off 1 For details on usage see 3 1 Basic Operation of the Setting menu page 17 Atten...

Page 9: ...m port Connects to a peripheral USB device 10 USB upstream port Connects to the USB cable when using software that needs a USB connection or when using the USB Hub function 11 Headphone jack Connects...

Page 10: ...72 19Hz 75Hz Progressive 800 600 VESA 60 32Hz Progressive 1024 768 VESA 60Hz Progressive 1024 768 VESA 70 07Hz 75 03Hz Progressive 1280 720 CEA 861 50Hz Progressive 1280 720 CEA 861 59 94Hz Progressiv...

Page 11: ...menu 5 Click the OK button 6 When a confirmation dialog box is displayed click Keep changes OS X Mountain Lion 10 8 or later 1 Select System Preferences from the Apple menu 2 When the System Preferenc...

Page 12: ...Switch Operation Method 1 Displaying the operation guide 1 Touch any switch except The operation guide appears on the screen 2 Adjusting setting 1 Touch a switch for adjustment setting The Adjustment...

Page 13: ...effect It is suitable for displaying images from media such as books and documents Movie This mode displays moving images brightly and with a clear cut three dimensional appearance It is suitable for...

Page 14: ...Description Auto EcoView On Off The ambient light sensor on the front of the monitor detects the ambient brightness to automatically adjust the screen brightness to a comfortable level using Auto Eco...

Page 15: ...te level of the input signal This function can reduce power consumption while maintaining the brightness specified by the input signal Note The setting is turned Off in the following cases When Movie...

Page 16: ...16 Chapter 2 Basic Adjustment Setting 2 6 Adjusting Volume The volume of the speakers and headphones can be set individually Setting Range 0 to 30...

Page 17: ...ch except The operation guide appears 2 Select The Setting menu appears 2 Adjusting setting 1 Select a menu to adjust set with and select The Sub menu appears 2 Select an item to adjust set with and s...

Page 18: ...ay be observed in different colors on multiple monitors due to monitor specific characteristics Make fine color adjustments visually when matching colors across multiple monitors Function Setting Rang...

Page 19: ...mes reddish at low color temperatures and bluish at high color temperatures similar to the temperatures of a flame A gain preset value is set for each color temperature setting value Note The value sh...

Page 20: ...ions from being able to be displayed Saturation 50 to 50 Adjust the color saturation Note Using this function may prevent some color gradations from being able to be displayed The minimum value 50 cha...

Page 21: ...full screen without changing the aspect ratio Since aspect ratios are maintained blank horizontal or vertical borders may appear Dot by Dot Displays the image at the set resolution or size specified b...

Page 22: ...be extended to match the actual contrast ratio of the monitor Auto Automatically identifies the brightness range of the input signal and displays the image accordingly Full Extension of the signal out...

Page 23: ...hics board After setting adjust the Clock again if vertical bars appear Hor Position Ver Position The display position horizontal and vertical of the screen can be adjusted Note Since the number of pi...

Page 24: ...er saving mode images are not displayed on the screen Exiting power saving mode If the monitor receives input it automatically exits power saving mode and returns to the normal display mode Note At th...

Page 25: ...ting Range English Deutsch Fran ais Espa ol Italiano Svenska Japanese Simplified Chinese Traditional Chinese Attention The display language of the Administrator Settings menu cannot be changed Informa...

Page 26: ...Menu display 1 Touch to turn off the monitor 2 While touching the leftmost switch touch for more than 2 seconds to turn on the monitor The Administrator Settings menu appears 2 Setting 1 Select an ite...

Page 27: ...nizes the connector through which PC signals are input and displays images on the screen accordingly regardless of whether this function is set to On or Off just after the main power switch on the rea...

Page 28: ...he PC is connected to the DisplayPort connector Use a signal cable recommended by us for the connection Turn the monitor off and on 2 The message below appears This message appears when the signal is...

Page 29: ...crease decrease setting value and are displayed in gray Brightness adjustment menu via operation switch Brightness adjustment menu in color adjustment Brightness adjustment may not be possible when th...

Page 30: ...ry changing Input Color Format in the Setting menu see Input Color Format page 22 10 The image does not display on the entire screen Try changing Picture Expansion in the Setting menu see Picture Expa...

Page 31: ...the PC If the peripheral devices work correctly when they are directly connected to the PC contact your local EIZO representative Check whether the PC and OS are USB compliant For USB compliance of t...

Page 32: ...between screw holes 100 mm 100 mm VESA mount of the arm or stand external dimensions 122 mm x 122 mm or less Plate thickness 2 6 mm Strong enough to support weight of the monitor unit excluding the s...

Page 33: ...monitor Use the VESA mounting screws supplied with this product when attaching the arm or stand Attaching the original stand 1 Remove the fixing screws on the optional arm or optional stand and detach...

Page 34: ...r Detaching the cable holder 1 Slide the cable holder to the left and detach it from the stand Attaching the cable holder 1 Align the tabs of the cable holder with the attachment parts of the stand 2...

Page 35: ...B 1 Align the tabs of A with the attachment parts of the stand A 2 Slide A downward to secure the tabs to the attachment parts of the stand 3 Check the tabs of B four locations indicated by and the at...

Page 36: ...6 Chapter 6 Reference 5 Slide B downward and secure it to A Detaching the cable cover 1 Slide B upward and detach it from A 2 While holding down of A lightly slide A upward to detach it from the stand...

Page 37: ...1 To PC 2 To PC 3 To PC 4 DVI connector HDMI connector D Sub mini 15 pin connector DisplayPort connector Digital DisplayPort Signal cable PP200 supplied Note You can select the input signal to display...

Page 38: ...e used For USB compatibility of peripheral devices contact their manufacturers Even when the monitor is in power saving mode devices connected to the USB downstream port will still work Therefore powe...

Page 39: ...ps low Supply Current Downstream Max 900 mA per port Audio Audio Input Format DisplayPort 2ch linear PCM 32 kHz 44 1 kHz 48 kHz 88 2 kHz 96 kHz HDMI 2ch linear PCM 32 kHz 44 1 kHz 48 kHz Speakers 1 W...

Page 40: ...spect Ratio HDMI PC signal input Aspect Ratio HDMI video signal input Auto DVI D input Aspect Ratio D Sub input Aspect Ratio Input Color Format DisplayPort input Auto HDMI PC signal input RGB HDMI vid...

Page 41: ...ademarks of Microsoft Corporation in the United States and other countries Adobe is a registered trademark of Adobe Systems Incorporated in the United States and other countries Apple macOS Mac OS OS...

Page 42: ...ucts Thank you for making a responsible product choice that help drive progress towards a more sustainable future Criteria in TCO Certified have a life cycle perspective and balance environmental and...

Page 43: ...o radio communications However there is no guarantee that interference will not occur in a particular installation If this equipment does cause harmful interference to radio or television reception wh...

Page 44: ...tors b Any incompatibility of the Product due to possible technical innovations and or regulations c Any deterioration of the sensor d Any deterioration of display performance caused by the deteriorat...

Page 45: ...uire l impact sur l environnement Lorsque vous jetez ce produit veuillez contacter un distributeur ou une soci t affili e de votre pays Les adresses des distributeurs sont r pertori es sur le site Web...

Page 46: ...et N r du bortskaffer denne produkt skal du kontakte en distribut r eller et tilknyttet selskab i dit land Adresserne p kontaktpersonerne er angivet p EIZO s websted nedenfor www eizoglobal com Kierr...

Page 47: ...slat vou va ej krajiny aby sa zn ilo za a enie ivotn ho prostredia Ke sa chcete zbavi tohto v robku kontaktujte pros m distrib tora alebo pobo ku vo va ej krajine Zoznam kontaktn ch adries je uveden n...

Page 48: ...in evre kirlili inin azalt lmas konusundaki mevzuat na g re toplanmas ve yeniden de erlendirilmesi gerekmektedir r n ataca n z zaman l tfen lkenizdeki bir distrib t r veya ilgili kurulu la temasa ge i...

Page 49: ...Copyright 2016 2019 EIZO Corporation All rights reserved 03V25977D1 UM EV2456 4th Edition February 2019...

Reviews: