Eizo eClient 530L User Manual Download Page 29

English 


3. SETTING UP THE eClient 

29


4. 

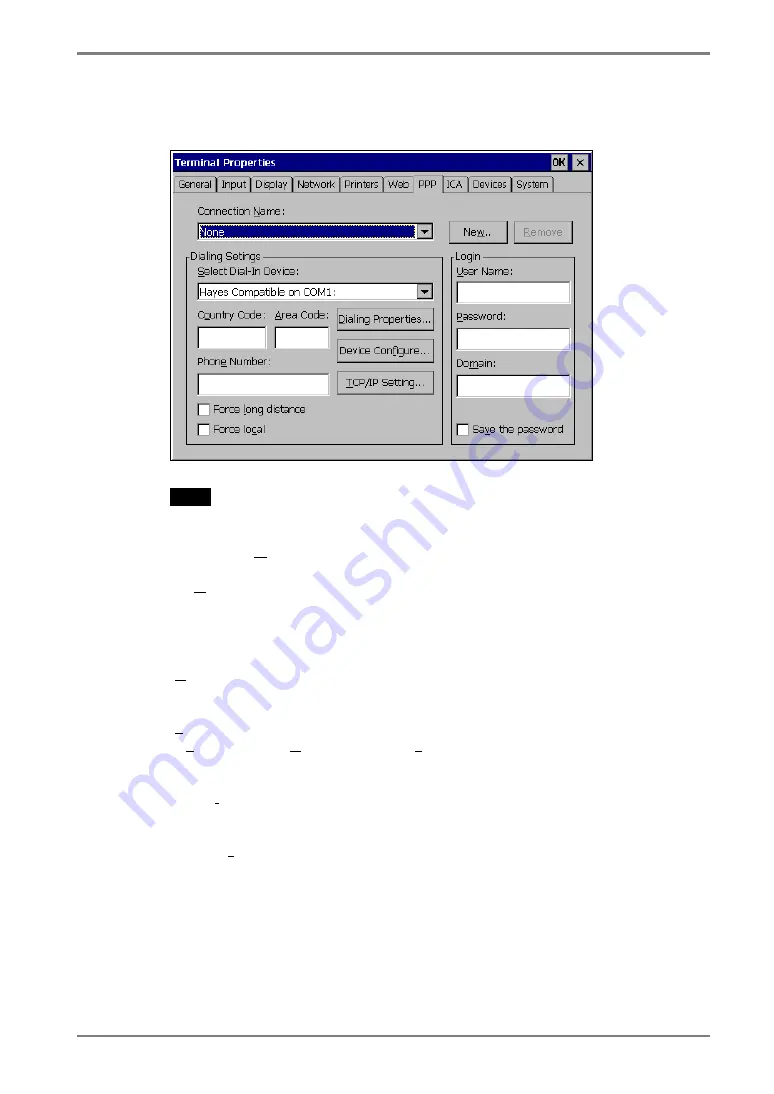
The dial-up setting window is displayed. 


NOTE 

• 

Enter your information in the pertinent fields. 

 
[Connection Name] ............Choose a connection name for a dial-up connection. 
([None] indicates no connection name chosen.) 
[New...]...............................Click the button to create a new dial-up connection 

name. 
“Create New Dial-Up Connection” dialog box is 
displayed. 
Enter the name and click [OK]. 

[Remove] ............................Delete the connection name displayed currently. 
 
[Dialing Settings] 
[Select Dial-In Device].........Choose a modem connecting device type. 
[Country Code:], [Area Code:], [Phone Number] 
 

...................................Enter a country code, an area code, and a phone 

number for the connection name. 

[Force long distance]...........Click here to use the country code, area code, and the 

phone number when connecting to the connection 
name. 

[Force local] ........................Click here to use only the phone number when 

connecting to the connection name.  (In case the area 
code of the connection name is different from the 
present area code.) 

Summary of Contents for eClient 530L

Page 1: ...r to the User s Manual Version List on next page This is the manual for the following software version Microsoft Windows CE 2 12 Rev 3 53 or later Microsoft Terminal Server Client Ver 5 60 or later IC...

Page 2: ...m ICA tab of Terminal Properties OS Microsoft Windows CE 2 12 Software Manual Terminal Server ICA Client Software C This Manual 2 12 Rev 3 53 or later Version 5 60 or later Version 6 30 Build1078 or l...

Page 3: ...any submitted material or information confidential unless prior arrangements are made pursuant to Eizo Nanao Corporation s receipt of said information Although every effort has been made to ensure th...

Page 4: ...ection 52 4 3 Editing a Connection 53 4 4 Setting an Autostart Connection 55 5 LOGON LOGOFF 56 5 1 Logon to a WTS 56 5 2 Logoff from the WTS 59 6 USING THE TERMINAL PROPERTIES 61 6 1 General Informati...

Page 5: ...TS or a web site and conveys input by a keyboard or a mouse to the WTS To operate the eClient please connect it to a WTS with Microsoft Window NT Terminal Server Edition or Windows 2000 Server Advance...

Page 6: ...ged Please make sure that all the listed items are in the package eClient 530L 531L 531LT GR Mouse Power Cord Screw M4 x 12 mm x 4 User s Manual Stickers of the Brightness Control Guide Stylus 531LT G...

Page 7: ...ols Connectors Front 1 2 1 Power Switch 2 Power Indicator Power Indicator Unit Green Operation Screen saver mode Yellow Power save mode NOTE When turning off on the unit leave the unit off for a few s...

Page 8: ...urity Lock 1 10 Holes for Mounting an Arm Stand 2 11 Stand 1 This allows for connection of a security cable This lock supports Kensington s MicroSaver security system For further information please co...

Page 9: ...ctions for the eClient s Operation 5 LOGON LOGOFF 5 1 Logon to a WTS p 56 5 2 Logoff from the WTS p 59 Directions for Changing Terminal Properties Settings 6 USING THE TERMINAL PROPERTIES 6 1 General...

Page 10: ...te surface may fall resulting in injury or equipment damage If the unit falls disconnect the power immediately and have the unit checked by a qualified service engineer before using it again Using a u...

Page 11: ...of connecting the WTS through LAN Connect the eClient to the network with an ethernet cable In case of a dial up or dial in connection 531L 531LT GR only Connect the eClient to a modem or a modem card...

Page 12: ...he enclosed power cord and connect to the standard power outlet of your country Be sure to remain within the rated voltage of the power cord Not doing so may cause in fire or electric shock The equipm...

Page 13: ...the first time 3 1 WBT Setup Wizard 1 Turn on the power switch The power indicator turns green NOTE When no picture is displayed or when the following message is shown on the screen please refer to 8...

Page 14: ...n Press the targets with a stylus or a fingertip to locate the center of the touch panel If you accidentally touched the screen in the wrong spot during calibration you will distort the touch panel ca...

Page 15: ...English 3 SETTING UP THE eClient 15 4 WBT Setup Wizard is displayed Click Next 5 End User License Agreement page is displayed Read the content and click Accept to continue...

Page 16: ...atic IP information Select this when not using DHCP service Enter the IP address of the eClient If DHCP service is not in operation following message appears Type a Terminal Name for connection to a W...

Page 17: ...THE eClient 17 7 IP address page is displayed IP Address Type the IP address of the unit Subnet Mask Type the subnet mask of the network Gateway Type IP address of the Gateway machine if necessary Cli...

Page 18: ...Enable DNS check box to activate this box Default Domain Name Type the default domain name Primary Server IP Type the DNS primary Server IP address Secondary Server IP Type the DNS secondary Server IP...

Page 19: ...536 colors 768 x 1024 256 colors 531L 531LT GR only 768 x1024 65 536 colors 531L 531LT GR only NOTE The orientation of 768 x 1024 is a portrait 768 x 1024 available for Citrix ICA When RDP is used 64...

Page 20: ...Server Advanced Server Datacenter Server is installed in a WTS A Local Printer mentioned here is a printer connected directly to the Parallel Connector of the unit Select Yes when using a local print...

Page 21: ...English 3 SETTING UP THE eClient 21 11 Printer port selection page is displayed Select a printer port The eClient supports LPT1 Click Next...

Page 22: ...nter User Defined Click the check box if your printer is not listed Click Next when finished Refer to step 13 if clicking User Defined Refer to step 14 if not clicking User Defined 13 Printer model an...

Page 23: ...E eClient 23 14 Printer name setting page is displayed Name the printer or use the indicated name Some programs do not support the Server and the printer name combinations of more than 31 characters C...

Page 24: ...nglish 24 3 SETTING UP THE eClient 15 Default printer setting page is displayed Select Yes to set this printer as the default printer Select No not to set this printer as the default printer Click Nex...

Page 25: ...ient 25 16 Another printer configuration page is displayed Select Yes to configure another printer Select No to finish printer settings Click Next when finished Refer to step 11 if selecting Yes Refer...

Page 26: ...ay Terminal Connection Manager on the screen The setting is not activated until the eClient is restarted This completes the eClient settings The Terminal Connection Manager dialog box will be displaye...

Page 27: ...ade for the Dial up connection To use a dial up connection requires an RAS server in operation Dial up Connection NOTE Another type of connection using a modem a dial in connection is available to con...

Page 28: ...28 3 SETTING UP THE eClient 2 Terminal Properties is displayed Click the Network tab 3 The network setting window is displayed Select Use PPP connection or another network adapter Click PPP tab when f...

Page 29: ...name and click OK Remove Delete the connection name displayed currently Dialing Settings Select Dial In Device Choose a modem connecting device type Country Code Area Code Phone Number Enter a country...

Page 30: ...sender s location Local Settings are The local area code is The local country code is Enter the area code and the country code of the sender s location Dial using Choose your using dial from Tone Pul...

Page 31: ...nsmission Stop Bits Set length of the Stop Bits Flow Control Set Flow Control Call Option tab Cancel the call if not connected within Click the box and set the intervals to the right box before cancel...

Page 32: ...igned IP address Click the box to use a server assigned IP address Specify an IP address Enter a provided IP address Use server assigned DNS or WINS server IP address Click the box to use a server ass...

Page 33: ...teway Click to use the default Gateway Click OK in the TCP IP Settings when finished Terminal Properties is displayed User s Name Password Domain Enter your information in the pertinent fields If you...

Page 34: ...ged in the Terminal Connection Manager 4 1 Adding a Connection Name These are settings for the Server connection Each protocol has different settings Please install the appropriate settings In use of...

Page 35: ...Use of RDP Protocol 1 Display Terminal Connection Manager Click the Configure tab and Add to set the connection information of the WTS 2 Protocol selection dialog box is displayed Select the Microsoft...

Page 36: ...e the Server from others Server Type the IP address or the name of the Server or WINS setting is necessary when the name is typed Low Speed Connection Click the check box when making a low speed conne...

Page 37: ...e of the WTS beforehand to enable an Automatic Logon to the WTS after connecting NOTE If an Automatic Logon is not needed click Next Click the check box of the Automatic Logon to enable the item Usern...

Page 38: ...ows desktop screen when you connect Application file name Select this to start an application when you connect Working directory Input the name of the application and the working directory if necessar...

Page 39: ...lick Finish to return to the Terminal Connection Manager dialog box The registered connection name is displayed in the Terminal Connection Manager dialog box This completes the setup of the eClient fo...

Page 40: ...40 4 ADDING CHANGING A CONNETION NAME In Use of the ICA protocol 1 Click the Configure tab Click Add 2 New Connection dialog box is displayed on the screen Select Citrix ICA Client ICA Click OK when f...

Page 41: ...Connection Type dialog box is displayed Network Connection Select for network connection Dial In Connection Select for dial in connection Click Next when finished Go to step 4 when selecting Network C...

Page 42: ...Name or IP address will be shown in the Address list Delete Delete the selected WTS from the Address list Default List Revert the state of the Address list to the saved one Address The added WTS IP ad...

Page 43: ...sh to refresh the list to the newest information 4 Select a WTS or a published application from the list NOTE Published applications are specific application set by a system administrator When connect...

Page 44: ...the eClient Phone Number Enter a country code an area code and a phone number for the connection Use Tone Dialing Click to use tone dialing Configure Click the button the detailed settings of the mode...

Page 45: ...anceling the connection in case of connection failure Wait for dial tone before dialing Click to dial after dial tone Wait for credit card tone Click to set the intervals before canceling the connecti...

Page 46: ...ctory of an application to operate NOTE Leave these fields blank and click Next to run a Windows desktop Command Line Type the application name and the path Working Directory Type the working director...

Page 47: ...the WTS beforehand to enable an Automatic logon to the WTS after connecting NOTE If an Automatic Logon is not needed click Next User Name Type the name to automatically connect the WTS Password Type t...

Page 48: ...DING CHANGING A CONNETION NAME 9 Colors selection page is displayed Set the colors of the WTS screen NOTE Thousands can be selected only when the color setting of the eClient is 65536 colors Click Nex...

Page 49: ...compression off to conserve processing power on the WTS SpeedScreen Select the speed at which the keyboard and mouse perform on the screen Select On when connecting to the WTS with a dial up connectio...

Page 50: ...e access to the WTS Proxy Click the drop down list box and select SOCKS from the list The Secure HTTPS setting is not available with eClient Address of SOCKS proxy to use Port Type the IP address of t...

Page 51: ...sh 4 ADDING CHANGING A CONNETION NAME 51 This completes the setup of the eClient for connection to a Server with the ICA protocol NOTE Please repeat the step 1 to 11 when you adding another connection...

Page 52: ...deletes an existing Connection Name 1 Display the Terminal Connection Manager dialog box 2 Click the Configure Tab 3 Select the Connection Name you want to delete 4 Click Delete 5 Confirm Connection D...

Page 53: ...g box 2 Click the Configure Tab 3 Select the connection you want to modify 4 Click Edit 5 Edit Connection dialog box or Edit Connection Details is displayed For RDP Connection Please see pages 35 to 3...

Page 54: ...ndows tab To set the colors of the WTS screen Options tab To set cancel the printer after connecting the WTS compression of data the speed at which the keyboard and mouse perform on the screen and enc...

Page 55: ...function is available for a LAN connection 1 Display the Terminal Connection Manager dialog box 2 Click the Configure tab 3 Select the desired Connection Name for Autostart Connection 4 Click Startup...

Page 56: ...LAN connection Go to step 3 Modem connection 531L 531LT GR only Dial Up connection to the RAS Server Click the active button of a small window on the right bottom of the screen A dial up connection i...

Page 57: ...me keys See page 55 on a default connection server setting 4 The eClient connects to the WTS and the Log On to Windows dialog box is displayed Type your User name and Password and click OK to log on t...

Page 58: ...t another Connection Name to log on to and click Connect Or double click the connection name 4 Log On to Windows dialog box is displayed after connecting to the WTS Type your User name and Password an...

Page 59: ...ndows 2000 Server Advanced Server Datacenter Server Select Shut Down and select Logoff of the Shut Down Windows dialog box 4 Click OK on the Logoff Window The session ends and automatically logs off f...

Page 60: ...dial up connection is running click the active button of the window on the right bottom of the screen Clicking the button Disconnects the dial up connection 531L 531LT GR only 2 Shut down the eClient...

Page 61: ...nal Connection Manager dialog box Press Ctrl Alt End to display the Terminal Connection Manager 6 1 General Information Reset to Default Click General tab to confirm general settings and to reset the...

Page 62: ...ctory default property settings check box 2 The System Settings Change dialog box is displayed Click Yes 3 Terminal Properties is displayed Click OK Terminal Setting Change dialog box is displayed Cli...

Page 63: ...n 530L 531L 531LT GR Keyboard Settings Keyboard Locale Selects a keyboard language NumLock Enable on Boot UP enables cancel NumLock function on start up Character Repeat Repeat delay Allows adjusting...

Page 64: ...ties to display the Mouse Properties Button Configuration Assigns the primary mouse button and the secondary mouse button Speed Adjusts the speed at which the pointer moves on your screen Acceleration...

Page 65: ...ck Properties to display the Touch panel Properties Mouse Right Click Emulation Enable right click emulation Holding stylus for a fixed period of time emulates mouse right button click Click the Enabl...

Page 66: ...h Panel calibration Five targets are displayed on the touch panel Press the targets with a stylus or a fingertip to locate the center of the touch panel If you accidentally touched the screen in the w...

Page 67: ...with a stylus or a fingertip Double click speed 1 Click Window s Start and select Settings Control Panel 2 Double click Mouse and adjust the speed at Double click speed Double click width and height...

Page 68: ...lick the Enable Screen Saver check box and set an idle period from 1 to 60 minutes before Screen Saver starts in minutes Once the Screen Saver starts the backlight is turned off Enable Power Save Inte...

Page 69: ...ases Click OK to close Terminal Properties and save the adjustments The Terminal Settings change dialog box will be displayed to restart the terminal and activate the adjustments when the Details Wait...

Page 70: ...To connect to the WTS with a LAN network set the following Obtain an IP address from a DHCP server This allows the user to receive IP information from a DHCP service automatically The DHCP service of...

Page 71: ...Advanced Network Allows setting for DNS WINS service A DNS WINS server is required for the setting Enable DNS Click the check box and type default domain name and IP address of the DNS server Enable...

Page 72: ...TERMINAL PROPERTIES NOTE The Terminal Settings Change dialog box will not be displayed when Terminal Name DHCP Options and Advanced Network are changed though the unit needs to be restarted to set th...

Page 73: ...rinters tab You can add delete and change the settings of the printer in this section NOTE The eClient supports a LPT1 port Use a RDP protocol to set the printer s adjustment If you are using the ICA...

Page 74: ...ect the manufacturer and model of your printer When your printer is not listed User Defined Click the check box Model Name Type the model and manufacturer of your printer Make this the default printer...

Page 75: ...is listed Manufactures Printers Select the manufacturer and model of your printer When your printer is not listed User Defined Click the check box Model Name Type the model and manufacturer of your p...

Page 76: ...ettings 531L 531LT GR only Click PPP tab to adjust the dial up settings of eClient The following details the installation of a dial up connection to a WTS or a Web Server To use a dial up connection r...

Page 77: ...d to change the settings when connecting to the Citrix Server with ICA protocol NOTE The ICA settings are effective only when the unit is connected to the WTS with ICA protocol Also the settings will...

Page 78: ...he eClient and the ones same as standard Windows hotkeys Please refer to the instruction manual of the Citrix MetaFrame for details NOTE No hotkeys are set in the eClient in the factory default Prefer...

Page 79: ...e Server Location tab for a WTS and published application browsing to work If the Firewall settings are changed at the eClient it is impossible to cancel the settings of a specific connection name To...

Page 80: ...soft Windows CE Version Revision Windows Terminal Server Client Window Terminal Server Client Revision Boot software Boot Software Version of the eClient Update See page 83 Hardware Serial Number Seri...

Page 81: ...l Properties General tab Reset the terminal to factory default settings Network tab Printers tab PPP tab ICA tab System tab Update Security PROCEDURE 1 Click the Security Enable box 2 Click Setting Pa...

Page 82: ...e Click the Security Enable check box on the System tab and remove the check mark Click OK on the Terminal Properties to save the settings and close the Terminal Properties Security becomes canceled A...

Page 83: ...the FTP Server If the WTS is connected with LAN close all the connections to the FTP Server Make a dial up connection if it is adopted to connect the WTS Software Updating is not available if a dial...

Page 84: ...FTP Server User Name Type the user name to connect the FTP Server Password Type the password for the user name to connect the FTP Server File Name Type the folder and copied file name located in the F...

Page 85: ...ection Please do not click the check box Keep the keyboard and the mouse connected Operate with the keyboard and the mouse if failed to update Click Save Settings to save settings Click Save Settings...

Page 86: ...dialog box is displayed confirm connection or network settings by following the message and click Retry If the setting still fails click Cancel to automatically restore the original software and rest...

Page 87: ...following settings from the defaults please change them before using the DHCP option function information not given by using the DHCP option Items Default Settings Locale Input Language English United...

Page 88: ...ate file and a registry file of the eClient User Name Type the user name to logon to the FTP Server Password Type the password for the user name Automatic Connection Enable unable an automatic connect...

Page 89: ...ionName Command argument to change connection information PropertiesExe TSConMan Fixed Command executable file to change connection information StartCmdLineArgs ConnectionName Command argument to conn...

Page 90: ...SetupWizardEnabled dword 0 Specifies whether starting up WBT Setup Wizard or not 0 not starting up 1 starting up HKEY_LOCAL_MACHINE SOFTWARE Microsoft WBT Clients Registration Web Connections Web1 Sta...

Page 91: ...er completing the above the eClient will automatically receive information such as an IP address from the DHCP Server every time the unit is turned on NOTE If the DHCP Option is used to setup the eCli...

Page 92: ...securely connected to the proper connector Check if the cable of the mouse is securely connected to the proper connector In use of a stylus or a finger as an input device No Mouse Connected caution do...

Page 93: ...he screen saver and avoid leaving the screen on all the time 5 The screen has defective pixels e g slightly light or dark This is due to the characteristics of the panel itself and not the failure 6 F...

Page 94: ...other strong solvents as these may cause damage to the cabinet or LCD panel Cabinet To remove stains wipe the cabinet with a soft lightly moistened cloth using a mild detergent Do not spray wax or cle...

Page 95: ...trackball cover Press the cover towards Open while pulling the other side of the cover 3 Remove the trackball 4 Wipe the trackball with a soft cloth with neutral detergent 5 Clean all the rollers get...

Page 96: ...n Microsoft Windows 2000 Server Advanced Server DataCenter Server Citrix MetaFrame 1 8 1 8 FR1 XP Mouse PS 2 2 button Mouse Power Supply 100 120 200 240 VAC 10 50 60 Hz 0 5 0 3 A Power Consumption Min...

Page 97: ...000 Server Advanced Server DataCenter Server Citrix MetaFrame 1 8 1 8 FR1 XP Mouse PS 2 2 button Mouse Power Supply 100 120 200 240 VAC 10 50 60 Hz 0 5 0 3 A Power Consumption Min 30 W Power saving mo...

Page 98: ...nal Server Microsoft Windows NT Server 4 0 Terminal Server Edition Microsoft Windows 2000 Server Advanced Server DataCenter Server Citrix MetaFrame 1 8 1 8 FR1 XP Mouse PS 2 2 button Mouse Power Suppl...

Page 99: ...English 10 SPECIFICATIONS 99 Dimensions mm inches 530L 531L 531LT GR...

Page 100: ...spacing on the arm mounting pad Use an arm stand that is able to support an object weighing 8 0 kg A GS approved arm stand Use an arm stand with sufficient stability mechanical firmness to support the...

Page 101: ...unit securely with the enclosed screws Not doing so may cause the unit to come unattached which may result in injury or equipment damage When the unit is dropped please ask your dealer for advice Do...

Page 102: ...ngs 27 Disconnect 60 DNS 18 Domain Name 18 E Editing a Connection 53 Encryption Level 49 F Firewall Settings 50 79 G General Information 61 Global ICA Client Settings 78 H Hotkeys 78 I ICA 34 40 ICA C...

Page 103: ...cify an IP Address 17 Specify Connection Type 41 SpeedScreen 49 Stylus 6 Subnet Mask 17 T TCO 6 Terminal Connection Manager 39 50 Terminal Name 16 70 Terminal Properties 30 61 Title for the ICA Connec...

Reviews: