background image

10

Chapter2AdjustingScreens

Windows XP

1.  Right-click the mouse anywhere on the desktop except for icons.
2.  From the displayed menu, click “Properties”.
3.  When the “Display Properties” dialog box is displayed, click the “Settings” tab and select desired resolution 

for “Screen resolution” under “Display”.

4.  Click the “OK” button to close the dialog box.

Mac OS X

1.  Select “System Preferences” from the Apple menu.
2.  When the “System Preferences” dialog box is displayed, click “Displays” for “Hardware”.
3.  On the displayed dialog box, select the “Display” tab and select desired resolution in the “Resolutions” field.
4.  Your selection will be reflected immediately. When you are satisfied with the selected resolution, close the 

window.

2-3.  Setting the Screen Position

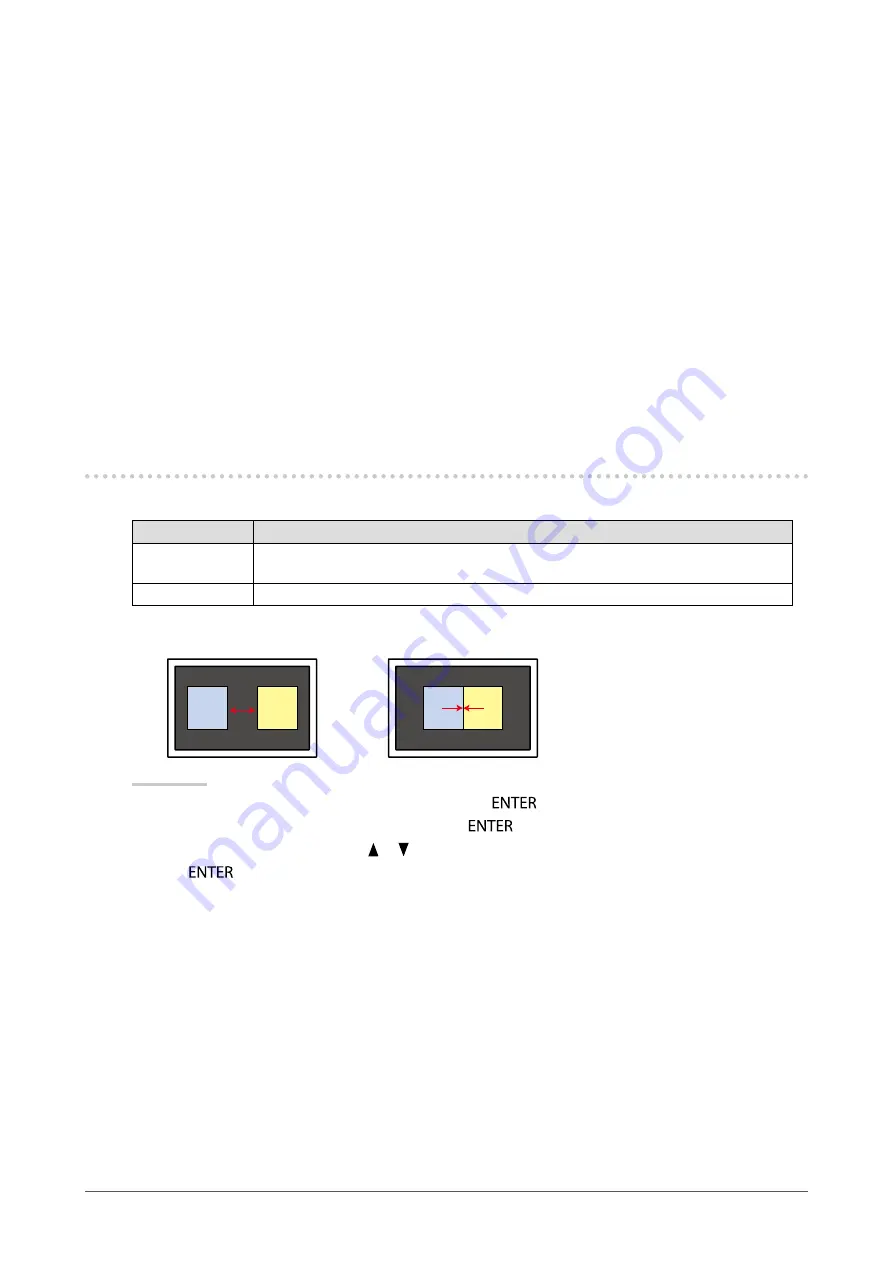
Set the display position of the images for the left and right screens.

Setting

Function

Separate

Theimagesoftheleftandrightscreensaredisplayedatthecenterofthesescreens
respectively.

Center

Theimagesoftheleftandrightscreensaredisplayedatthecenterofthemonitor.

Separate

Center

Procedure

1.  Choose “Screen” from the Adjustment menu, and press 

.

2.  Choose “Screen Position” from “Screen”, and press 

.

3.  Select “Separate” or “Center” with   or  .
4.  Press 

 to exit.

Summary of Contents for DURAVISION FDH3601

Page 1: ...carefully to familiarize yourself with safe and effective usage Please refer to the Setup Manual for basic information ranging from connection of the monitor to a PC to using the monitor The latest Us...

Page 2: ...by any means electronic mechanical or otherwise without the prior written permission of EIZO NANAO CORPORATION EIZO NANAO CORPORATION is under no obligation to hold any submitted material or informat...

Page 3: ...image may appear Use the screen saver or power save function to avoid displaying the same image for extended periods of time Periodic cleaning is recommended to keep the monitor looking new and to pro...

Page 4: ...ace Panel Clean the panel with a soft cloth such as cotton cloth or lens cleaning paper If necessary stubborn stains can be removed by moistening part of a cloth with water to enhance its cleaning pow...

Page 5: ...6 3 5 Enabling Disabling DC5V Output 16 3 6 Return To Default Setting 17 To reset the color adjustments 17 To reset all settings 17 Chapter 4 Power Saving Functions 18 4 1 Setting Power Save 18 4 2 Se...

Page 6: ...g off the AC adapter main power switch completely shuts off power supply to the monitor while the monitor is not used EcoView Sense function The sensor on the front side of the monitor detects the mov...

Page 7: ...Menu 1 Press The Adjustment menu appears Current mode Menu title Settings Menu Item 2 Adjusting Setting 1 Choose a menu to adjust set with and then press 2 Choose an item to adjust set with and then...

Page 8: ...ew Sense 4 3 Setting the power saving mode when a person leaves the monitor page 19 Power Indicator 4 2 Setting Power Indicator page 18 Menu Settings Language 3 2 Setting Language page 15 Menu Positio...

Page 9: ...3840 2160 with or and press 5 Select Finish with or 6 Press The Optional Settings menu is closed PC setting Windows 7 1 Right click the mouse anywhere on the desktop except for icons 2 From the displa...

Page 10: ...ialog box select the Display tab and select desired resolution in the Resolutions field 4 Your selection will be reflected immediately When you are satisfied with the selected resolution close the win...

Page 11: ...ts You can configure and save a separate set of color settings for each mode Attention The monitor will take about 30 minutes before its internal electric components stabilize Wait 30 minutes or more...

Page 12: ...contrast The luminance of the screen is adjusted by varying the video signal level Adjustable range 0 to 100 Procedure 1 Choose Color from the Adjustment menu and press 2 Choose Contrast from Color a...

Page 13: ...displayed in the preset color of the monitor Gain 100 for each RGB When gain is changed the color temperature is changed to User To adjust gamma Gamma can be adjusted The brightness of the monitor va...

Page 14: ...screen to monochrome To adjust gain The brightness of each color component red green and blue is called Gain You can change the hue of white by adjusting gain Adjustable range 0 to 100 Procedure 1 Cho...

Page 15: ...one mode to On 3 2 Setting Language This function allows you to select a language for the Adjustment menu and messages Selectable languages English German French Spanish Italian Swedish Japanese Simp...

Page 16: ...be locked Off Default setting None All buttons are enabled Menu button All All buttons excluding 5 Select Finish with or 6 Press The Optional Settings menu is closed 3 5 Enabling Disabling DC5V Output...

Page 17: ...the color adjustment value for the currently selected mode to the default settings Procedure 1 Choose Color from the Adjustment menu and press 2 Choose Color Reset from Color and press 3 Select Execu...

Page 18: ...er and press 3 Select Off High or Low with or Setting Function High Turns off the backlight The power saving effect is the greatest Low Turns down the backlight to the lowest setting The time until th...

Page 19: ...ting is displayed Procedure 1 Choose PowerManager from the Adjustment menu and press 2 Choose EcoView Sense from the PowerManager menu and press 3 Select any of Off Level 1 Level 2 Level 3 or Level 4...

Page 20: ...the mouse or keyboard Check whether the PC is turned on When the EcoView Sense sensor is set at a value from Level 1 to Level 4 the monitor may have shifted to the power saving mode Come near to the...

Page 21: ...se Brightness or Contrast in the Adjustment menu to adjust it The LCD monitor backlight has a limited life span When the screen becomes dark or begins to flicker contact your local dealer 2 Characters...

Page 22: ...the manual of the PC for details Reboot the PC If the peripheral devices work correctly when the PC and peripheral devices are connected directly please contact your local dealer Check whether the PC...

Page 23: ...stand do not use the screw holes for mounting the stand When using an arm or stand attach it to meet the following tilt angles of the monitor Up 45 down 45 Connect the cables after attaching an arm or...

Page 24: ...er attaching an arm or stand Do not move the removed stand up and down Doing so may result in injury or device damage The monitor AC adapter and wall mounting device are heavy Dropping them may result...

Page 25: ...connector Port 2 DisplayPort connector Port 2 DisplayPort connector Port 1 To switch among input signals The input signal combination changes each time is pressed Signal 1 DVI Signal 1 DVI Signal 1 D...

Page 26: ...lect Auto or Manual with or 4 Press to exit Note When Auto is selected for Input Selection the monitor s power saving function works only when all PCs are in the power saving mode To set input signal...

Page 27: ...Devices connected to the USB upstream port and USB downstream port work when the monitor is in power saving mode or when the power button of the monitor is Off Therefore power consumption of the monit...

Page 28: ...o from Tools and press The Signal Info appears Example Displaying monitor information This function displays the information about the monitor Procedure 1 Choose Tools from the Adjustment menu and pre...

Page 29: ...is connected or DC5V Output is set to Off AC adapter main power Off 0 W Input signal connector DVI D connector 2 DisplayPort connector 2 Standard V1 1a applicable to HDCP Digital Signal DVI Transmiss...

Page 30: ...2 Mbps full 1 5 Mbps low Supply current Downstream Max 500mA 1 port Main Default Settings EcoView Sense Off Power Save High Input Selection Auto Screen Position Center DC5V Output Off Resolution 4096...

Page 31: ...6 4 348 13 7 348 13 7 296 11 7 383 5 15 1 296 11 7 323 12 7 30 5 1 20 381 15 0 25 687 5 27 1 184 7 2 173 6 8 564 5 22 2 373 14 7 50 1 97 61 2 40 351 13 8 543 21 4 196 7 7 13 0 51 310 12 2 4 M6 SWIVEL...

Page 32: ...or displays the color by the light passing through the panel color filter Red green and blue are the three primary colors All the colors on the screen are displayed by combining these three colors The...

Page 33: ...Kelvin The screen becomes reddish at a low temperature and bluish at a high temperature like the flame temperature 5000 K Slightly reddish white 6500 K White referred to as daylight balanced color 93...

Page 34: ...emarks or trademarks of X Rite Incorporated TouchWare is a trademark of 3M Touch Systems Inc NextWindow is a registered trademark of NextWindow Ltd RealPlayer is a registered trademark of RealNetworks...

Page 35: ...cause harmful interference to radio communications However there is no guarantee that interference will not occur in a particular installation If this equipment does cause harmful interference to rad...

Page 36: ...olgen da die H he der Bildschirmmitte ber dem Boden zwischen 135 150 cm betr gt d Der Standfu mu die M glichkeit zur Neigung des Bildschirmger tes besitzen max vorw rts 5 min nach hinten 5 e Der Stand...

Page 37: ...e deterioration of expendable parts such as the LCD panel and or backlight etc e g changes in brightness changes in brightness uniformity changes in color changes in color uniformity defects in pixels...

Page 38: ...der Farbverteilung Pixeldefekte einschlie lich von durchgebrannten Pixeln usw e Produktdefekte die durch externe Ger te verursacht werden f Jeglicher Defekt eines Produkts dessen urspr ngliche Serienn...

Page 39: ...de l uniformit de la luminosit des modifi cations de couleur des changements de l uniformit des couleurs des d fectuosit s de pixels y compris des pixels br l s etc e Tout d faut du Produit caus par u...

Page 40: ...l color defectos de p xeles incluyendo p xeles muertos etc e Cualquier defecto del Producto causado por un equipo externo f Cualquier defecto del Producto en el que haya sido alterado o borrado el n m...

Page 41: ...ecc per esempio i cambiamenti di luminosit cambiamenti di uniformit della luminosit i cambiamenti di colore i cambiamenti di uniformit del colore i difetti dei pixel inclusi i pixel bruciati ecc e Qu...

Page 42: ...som orsakats av extern utrustning f Alla defekter hos Produkten p vilken det ursprungliga serienumret har ndrats eller avl gsnats g Alla produktfel som orsakas av v tska som l cker fr n batteriet h Al...

Page 43: ...43 Appendix EIZO NANAO CORPORATION EIZO EIZO EIZO EIZO 2 EIZO EIZO 7 EIZO EIZO EIZO LCD pixel pixel LCD EIZO EIZO EIZO EIZO EIZO EIZO...

Page 44: ...44 Appendix EIZO NANAO CORPORATION EIZO EIZO EIZO EIZO 2 EIZO EIZO 7 EIZO QC EIZO EIZO EIZO EIZO EIZO EIZO EIZO EIZO...

Page 45: ...45 Appendix EIZO NANAO EIZO EIZO EIZO EIZO 2 EIZO 7 EIZO EIZO EIZO a EIZO b c d LCD e f g h i LCD EIZO EIZO EIZO EIZO EIZO EIZO...

Page 46: ...46 Appendix China Measures for RoHS Compliance in ChinaRoHS Pb Hg Cd Cr VI PBB PBDE SJ T 11363 2006 SJ T 11363 2006...

Page 47: ...1st Edition October 2011 03V23674A1 U M FDH3601...

Reviews: