background image

Advanced Adjustments / Settings | 4

21

4.2.2 Signal

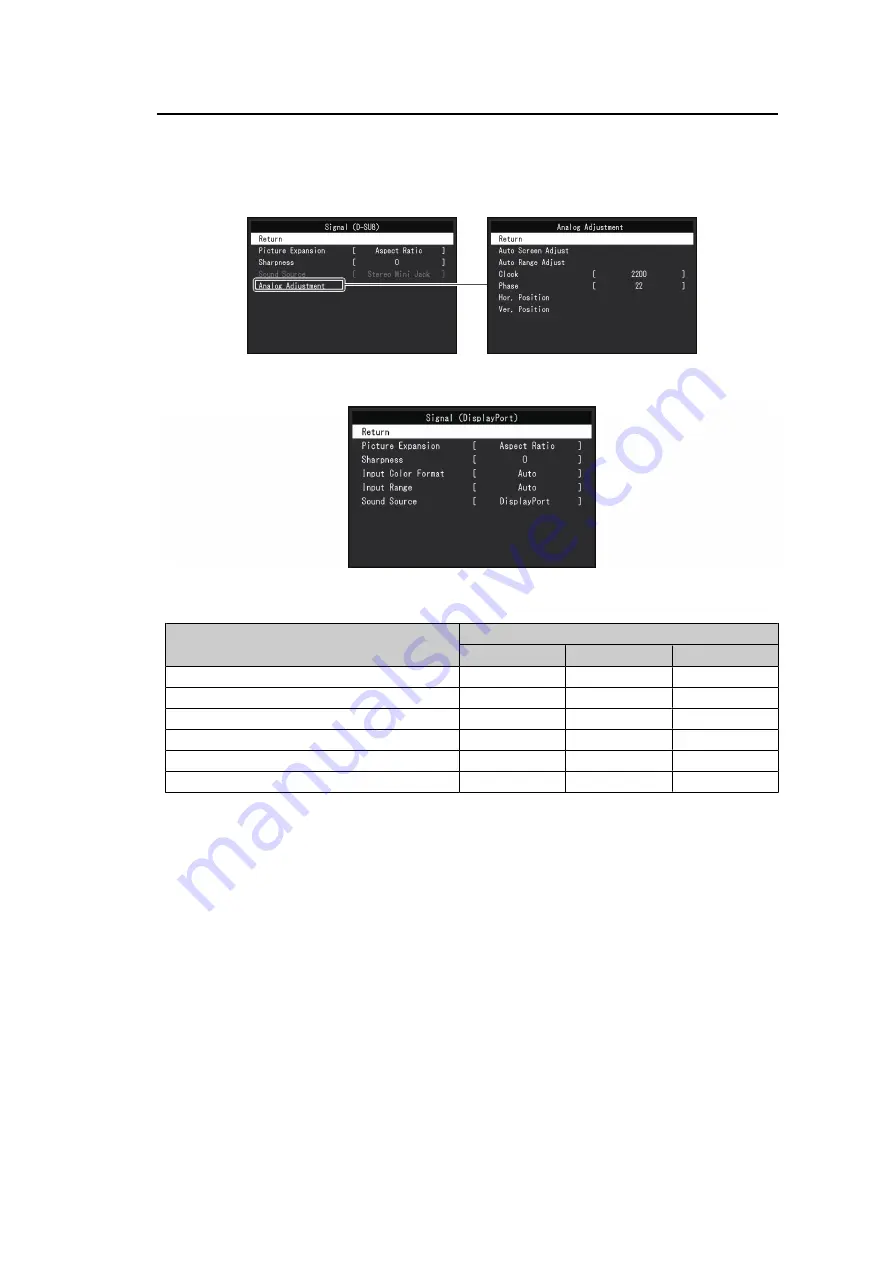
Set the details regarding input signal, such as the screen size and color format.

• D-Sub input

• HDMI/DisplayPort input

The functions that can be set differ depending on the input signal.

: Can be set, -: Cannot be set.

Function

Input Signal

DisplayPort

HDMI

D-SUB

Picture Expansion

Sharpness

Input Color Format

-

Input Range

-

Source

-

Analog Adjustment

-

-

Picture Expansion

Settings: "Auto

*1

" / "Full Screen" / "Aspect Ratio" / "Dot by Dot"

*1

Only enabled during HDMI input

The screen size of the monitor display can be changed.

• "Auto"

The monitor automatically changes the screen size according to the aspect ratio and
resolution information from the PC.

• "Full Screen"

Images are stretched to full screen. Since aspect ratios are not maintained, images may
be distorted in some cases.

• "Aspect Ratio"

Images are enlarged to full screen without changing the aspect ratio. Since aspect ratios
are maintained, blank horizontal or vertical borders may appear.

• "Dot by Dot"

Displays the image at the set resolution or size specified by the input signal.

Summary of Contents for DuraVision FDF2382WT-A

Page 1: ...ser s Manual and PRECAUTIONS separate volume carefully to familiarize yourself with safe and effective usage See the Setup Guide for monitor installation and connection For the latest product informat...

Page 2: ...ansmitted in any form or by any means electronic mechanical or otherwise without the prior written permission of EIZO Corporation EIZO Corporation is under no obligation to hold any submitted material...

Page 3: ...e screensaver or power save function to avoid displaying the same image for extended periods of time Depending on the image an afterimage may appear even if it was displayed for a short period of time...

Page 4: ...looking new and to prolong its operation lifetime The stains on the cabinet and LCD panel surface can be removed by using the provided cleaning cloth Attention Do not allow liquid to enter the cleara...

Page 5: ...Setting 11 2 1 Enabling Disabling the Touch Panel 11 2 2 Adjusting Touch Sensitivity 12 2 3 Switching Input Signals 12 2 4 Adjusting Brightness 13 2 5 Adjusting Volume 13 3 Touch Panel Settings 14 3...

Page 6: ...Installation Procedure 34 7 2 Connecting Multiple PCs 36 7 3 Using the USB Hub Function 37 7 4 Specifications 39 7 4 1 LCD Panel 39 7 4 2 Touch Panel 39 7 4 3 Video Signals 39 7 4 4 USB 39 7 4 5 Audi...

Page 7: ...touch Stand Mechanism The tilt angle can be adjusted steplessly You can smoothly change the screen position to make it easier to work in a way that suits how you are using the monitor such as for off...

Page 8: ...nals to be displayed 4 button 1 Selects items displayed in the Setting menu adjusts or sets the functions and displays the brightness adjustment screen 5 button 1 Selects items displayed in the Settin...

Page 9: ...f the angle 7 Tie band mounting hole Attach a tie band to prevent the HDMI cable from disconnecting 8 Stereo mini jack By connecting an external device using a stereo mini jack cable external audio ca...

Page 10: ...older Note The touch pen holder is included with the touch pen optional accessory Mount the touch pen holder in either of the holes to the left and right on the rear side of the monitor To mount the h...

Page 11: ...etting 2 11 2 Basic Adjustment Setting 2 1 Enabling Disabling the Touch Panel You can switch between enabling and disabling the touch panel You can use this when you want to temporarily disable the to...

Page 12: ...ase make sure to run TPOffset after setting up the monitor If the problem does not resolve after adjusting the touch sensitivity run TPOffset TPOffset can be downloaded from our web site www eizogloba...

Page 13: ...the screen can be adjusted to suit the installation environment or personal preference The screen brightness is adjusted by changing the brightness of the backlight light source from the LCD back pane...

Page 14: ...the User s Manual of the touch panel driver Note After completing the settings run the TPOffset software and adjust the sensitivity of the touch panel TPOffset can be downloaded from our web site www...

Page 15: ...tention If using the monitor in a multi monitor environment select the monitor to be used for correcting the touch position in the Display pull down menu and then click Calibrate 6 Touch the touch mar...

Page 16: ...system see Correcting the Touch Position 14 2 Click Hardware and Sound Pen and Touch The Pen and Touch screen appears Configure the touch panel operation settings in the Pen and Touch screen For more...

Page 17: ...u 1 Press The Setting menu appears 2 Select the menu to adjust set with then press The Sub menu appears 3 Select the menu to adjust set with then press The Adjustment Setting menu appears 4 Perform ad...

Page 18: ...ultiple monitors due to monitor specific characteristics Make fine color adjustments visually when matching colors across multiple monitors Follow the procedure below to adjust and match colors across...

Page 19: ...ature is normally used to express the hue of White and or Black with a numerical value The value is expressed in degrees K Kelvin The screen becomes reddish at low color temperatures and bluish at hig...

Page 20: ...yed Advanced Settings Saturation Settings 50 50 Adjusts the color saturation Note Using this function may prevent some color gradations from being able to be displayed The minimum value 50 changes the...

Page 21: ...Screen Aspect Ratio Dot by Dot 1 Only enabled during HDMI input The screen size of the monitor display can be changed Auto The monitor automatically changes the screen size according to the aspect ra...

Page 22: ...rt input Input Range Settings Auto Full Limited Depending on the video reproduction device there may be a restriction on black and white video signal levels output to the monitor This kind of signal i...

Page 23: ...ment function will operate correctly if an image is displayed in the entire displayable area of the screen It will not operate correctly in the following cases When an image is displayed in only part...

Page 24: ...re fixed so there is one correct display position for images Position adjustment is for adjusting an image to the correct position 4 2 3 Preferences The monitor s settings can be configured to suit th...

Page 25: ...in power saving mode Power Indicator Settings On Off The power indicator blue can be turned off in normal operation mode Monitor Reset Restores all settings to their default settings except for the fo...

Page 26: ...appears 3 Select an item to set with then press The Adjustment Setting menu appears 4 Set with then press The Administrator Settings menu appears 5 Select Apply then press The settings are applied an...

Page 27: ...n the monitor only enters the power saving mode when signals are not input from any PC Compatibility Mode Settings On Off If you want to avoid the following phenomena set this function to On The posit...

Page 28: ...r the PC is turned on Turn off the main power and then turn it on again The message No Signal appears on the screen Example The message shown above may appear as some PCs do not output the signal imme...

Page 29: ...same image for extended periods of time Depending on the image an afterimage may appear even if it was displayed for a short period of time To remove such a phenomenon change the image or keep the pow...

Page 30: ...see Analog Adjustment Hor Position Ver Position 24 If the graphics board s utility has a function to change the position of the image use that function to adjust the position Vertical lines appear on...

Page 31: ...USB cable Touching the touch panel too soon may cause incorrect cursor positioning or disable touch operation If this occurs turn the monitor off and then turn it on again Execute TPOffset to adjust...

Page 32: ...No audio output Check whether the volume is set to 0 Check the PC and audio playback software to see whether they are configured correctly When using DisplayPort input and HDMI input check the Sound...

Page 33: ...onnector Use a signal cable recommended by us for the connection Turn the monitor off and on Check the connection and condition of the USB peripheral devices connected to the monitor Turn off the main...

Page 34: ...e VESA standard Clearance between screw holes 100 mm x 100 mm Plate thickness 2 6 mm Strong enough to support weight of the monitor unit excluding the stand and attachments such as cables When using a...

Page 35: ...l vertically use the following procedure to remove the leg from underneath the monitor 1 Remove the leg cover 2 Remove the screws securing the unit and feet 3 Slide the feet toward the outer side of t...

Page 36: ...ort DisplayPort PP200 Included D Sub cable D Sub D Sub V55 MD C87 Sold separately Attention The touch panel only operates for a USB connected monitor Note You can select the input signal to display us...

Page 37: ...ions as a USB hub when connected to a USB compatible PC allowing the connection of peripheral USB devices 1 Connect the USB cable 2 If necessary connect a mouse keyboard or other device to the USB dow...

Page 38: ...e to this the power consumption of the monitor varies depending on the connected devices even in power saving mode When the main power switch of the monitor is off a device connected to the USB downst...

Page 39: ...upport will end when OS vendor support ends 7 4 3 Video Signals Input Terminals DisplayPort HDCP 1 3 compatible x 1 HDMI HDCP 1 4 compatible 1 x 1 D Sub 15 pin mini x 1 Digital Scanning Frequency H V...

Page 40: ...o USB upstream port is connected Administrator Settings Compatibility Mode is Off no external load is connected and the default settings are kept 7 4 7 Physical Specifications Dimensions W x H x D 556...

Page 41: ...0 x 480 59 940 720 x 480 60 000 720 x 576 50 000 800 x 600 56 250 800 x 600 60 317 800 x 600 72 188 800 x 600 75 000 1024 x 768 60 004 1024 x 768 70 069 1024 x 768 75 029 1280 x 720 50 000 1280 x 720...

Page 42: ...ries Microsoft and Windows are registered trademarks of Microsoft Corporation in the United States and other countries Adobe is a registered trademark of Adobe in the United States and other countries...

Page 43: ...03V60141A1 UM FDF2382WT A Copyright 2022 EIZO Corporation All rights reserved 1st Edition May 2022...

Reviews: