background image

24

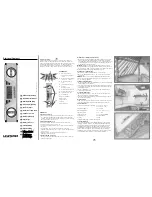
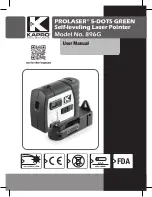
1. Opis urządzenia (Rys. 1)

1 Laser
2 Stopka- przyssawka
3 Podstawka do pracy na nierównych 

powierzchniach

4 Podstawka do niwelacji precyzyjnej
5 Okulary do pracy z laserem
6 Celownik laserowy

2. Wskazówki bezpieczeństwa

Uwaga!
Promieniowanie laserowe
Nie kierować wzroku na wiązkę  
lasera klasy 2!

Proszę podjąć środki bezpieczeństwa dla ochrony 
własnej i osób przebywających w otoczeniu.

Nie należy patrzeć bez ochrony wzroku w
kierunku wiązki lasera.

Nigdy nie patrzeć bezpośrednio w strumień
lasera.

Nie kierować wiązki lasera w żadnym razie na
powierzchnie odbijające światło, ludzi lub
zwierzęta. Również laser o niewielkiej mocy może
spowodować uszkodzenia oka.

Uwaga! W razie postępowania niezgodnego z
niniejszą instrukcją obsługi może dojść do
niebezpiecznego wystawienia na działanie
promieniowania laserowego.

Nigdy nie otwierać modułu lasera

Jeżeli niwelator nie jest używany przez dłuższy
czas, należy wyjąć stare baterie i je usunąć.

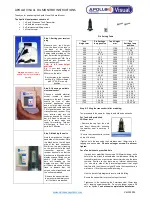
3. Użytkowanie (Rys 2a- 2d)

Ten niwelator 180° wytwarza wiązkę, którą można
obracać o 180°. Ma on wiele zastosowań;
począwszy od niewielkich prac, jak zawieszanie
obrazów bądź prace w kuchni. Niwelator można
trzymać w ręku, umieścić na podstawce do
precyzyjnej niwelacji lub przymocować do gładkich
powierzchni, tj. płytki za pomocą stopki- przyssawki
albo do chropowatych powierzchni, jak tynk albo

drewno za pomocą podstawki do powierzchni
chropowatych.

4. Dane techniczne

Dokładność 

±

0,6 mm/m  

Temperatura robocza 

-1 -40°C  

Klasa lasera 

2  

Długość fali lasera 

635 Nm  

Moc lasera 

5 m W  

Napięcie zasilania lasera 

2 x 1,5V (AAA)  

Napięcie zasilania stopki 

2 x 1,5 V (AA)  

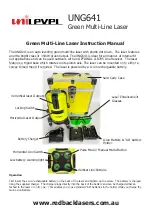
5. Uruchomienie jednostki lasera (rys.
3/ 4)

Włożyć baterie do pojemnika (rys 3/ 4)

Uwaga! Przed włożeniem baterii należy się
upewnić, że laser jest wyłączony!

Otworzyć przykrywkę pojemnika na baterie (1), jak
pokazano na rys. 4 i włożyć załączone w dostawie
baterie. Proszę pamiętać przy tym o właściwej
polarności baterii.

Proszę używać wyłącznie baterii alkaliczno-
manganowych. Przy wymianie baterii nie należy
używać baterii od różnych producentów. Proszę
pamiętać również o jednakowej pojemności baterii.

Opis urządzenia (Rys. 3) 

W celu włączenia lasera

proszę nacisnąć włącznik/ wyłącznik (2)
jednokrotnie.

Wyłączanie (Rys. 3) 

W celu wyłączenia lasera

proszę nacisnąć włącznik/ wyłącznik (2) dwukrotnie.

Użycie (Rys. 3)

Niwelator wytwarza jedną linię, którą można obracać
bezstopniowo w zakresie 180°. W tym celu proszę
przekręcić pokrętło do ustawiania kąta (3) w
kierunku przeciwnym do ruchu wskazówek zegara;
aż zostanie osiągnięty żądany kąt na skali (4).
Wiązkę lasera można zatrzymać pod kątem 0°, 

±

45°

±

90° ponieważ są to najczęściej wybierane kąty.

Dzięki magnetycznej płytce znajdującej się w
jednostce lasera można ją łatwo nałożyć na
wysklepioną płytkę metalową stopki- ssawki,
podstawki do powierzchni chropowatych lub do

PL

Achtung
Laserstrahlung
Nicht in den Strahl blicken!

Laserspezifikation nach
EN 60825-1: 1994+A1: 2002+A2: 2001
Laser Klasse 2                    JG9-635-5L

Ï

: 635 nm

P: 

 5 mW

Anleitung NLW 180 SPK1  08.09.2006  8:41 Uhr  Seite 24

Summary of Contents for 22.700.40

Page 1: ...ng lasernivelleertoestel Istruzioni per l uso Livella laser Betjeningsvejledning lasernivelleringsapparat Instrukcja obs ugi Niwelator laserowy Upute za uporabu uredjaja za lasersko niveliranje Uputst...

Page 2: ...sikkerhedsanvisningerne skal l ses inden maskinen tages i brug Alle anvisninger skal f lges Przed uruchomieniem nale y przeczyta instrukcj obs ugi i wskaz wki dotycz ce bezpiecze stwa oraz stosowa si...

Page 3: ...3 2a 1 2c 2b 2d Anleitung NLW 180 SPK1 08 09 2006 8 40 Uhr Seite 3...

Page 4: ...4 5 7 6 3 4 8 Anleitung NLW 180 SPK1 08 09 2006 8 40 Uhr Seite 4...

Page 5: ...5 9 10 Anleitung NLW 180 SPK1 08 09 2006 8 40 Uhr Seite 5...

Page 6: ...enl nge Laser 635 nm Leistung Laser 5 mW Stromversorgung Laser 2 x 1 5 V AAA Stromversorgung Saugfu 2 x 1 5 V AA 5 Inbetriebnahme Laser Einheit Bild 3 4 Batterien einsetzen und wechseln Bild 3 4 Achtu...

Page 7: ...r einen Permanent Magneten so dass die Basis auch auf magnetisierbare Oberfl chen befestigt werden kann Achtung Fassen Sie nicht an die R ckseite der Basis f r raue Oberfl chen wenn Sie die Bedien und...

Page 8: ...l ins Feuer oder ins Wasser Batterien sollen gesammelt recycelt oder umweltfreundlich entsorgt werden Sen den Sie verbrauchte Batterien an die iSC GmbH Eschenstra e 6 in D 94405 Landau Dort wird vom H...

Page 9: ...acy 0 6 mm m Operating temperature 1 40 C Laser class 2 Laser wave length 635 nm Laser output 5 mW Laser power supply 2 x 1 5 V AAA Suction foot power supply 2 x 1 5 V AA 5 Starting up the laser unit...

Page 10: ...zable surfaces Do not use the base on any other surfaces 8 Working with the precision level base Fig 9 10 Place the laser unit on the precision level base so that the two pins 1 engage in the guide gr...

Page 11: ...spare parts Model type of tool Article number of the tool ID number of the device Spare part number of the part to be replaced For our latest prices and information please go to www isc gmbh info GB i...

Page 12: ...construction secs 4 Caract ristiques techniques Pr cision 0 6 mm m Temp rature de service 1 40 C Classe de laser 2 Longueur d onde du laser 635 nm Puissance du laser 5 mW Alimentation en courant du la...

Page 13: ...mont e sur un tr pied pour appareil photo Vous trouverez ce propos un filet 1 4 4 au dos Au dos de la base pour surface rugueuse se trouve galement un l ment permanent ce qui permet de la fixer galem...

Page 14: ...oivent tre collect es recycl es ou limin es dans le respect de l environnement Envoyez vos piles us es l entreprise ISC GmbH Eschenstra e 6 D 94405 Landau Allemagne A cet endroit une limination selon...

Page 15: ...Laserklasse 2 Golflengte laser 635 nm Vermogen laser 5 mW Stroomtoevoer laser 2 x 1 5 V AAA Stroomtoevoer zuigvoet 2 x 1 5 V AA 5 Ingebruikneming van de lasereenheid fig 3 4 Batterijen installeren en...

Page 16: ...rden bevestigd Let op Pak niet de achterkant van de sokkel voor ruwe oppervlakken vast als u op de bedienings en veiligheidsknoppen drukt Lichamelijk gevaar Let op De sokkel voor ruwe oppervlakken is...

Page 17: ...tterijen naar ISC GmbH Eschenstra e 6 in D 94405 Landau Daar is door de fabrikant een behoorlijke verwijdering verzekerd 13 Bestellen van wisselstukken Gelieve bij het bestellen van wisselstukken de v...

Page 18: ...za d onda del laser 635 nm Potenza laser 5 mW Alimentazione corrente del laser 2 x 1 5 V AAA Alimentazione corrente base a ventosa 2 x 1 5 V AAA 5 Messa in esercizio dell unit laser Fig 3 4 Come inser...

Page 19: ...e premete i pulsanti di comando e di sicurezza Pericolo di lesioni Attenzione La base per superfici ruvide adatta solo per legno morbido per pareti prefabbricate a secco e superfici magnetizzabili Non...

Page 20: ...6 in D 94405 Landau Cos il costruttore ne garantisce uno smaltimento appropriato 13 Ordinazione dei pezzi di ricambio In caso di ordinazione di pezzi di ricambio necessario indicare quanto segue tipo...

Page 21: ...erklasse 2 B lgel ngde laser 635 nm Effekt laser 5 mW Str mforsyning laser 2 x 1 5 V AAA Str mforsyning sugefod 2 x 1 5 V AA 5 Ibrugtagning laserenhed fig 3 4 Is tning og udskiftning af batterier fig...

Page 22: ...s fig 9 10 S t laserenheden p pr cision nivelleringsbasen s ledes at de to tapper 1 g r i indgreb i laserenhedens f ringsnot Laserenheden kan nu drejes 360 omkring sin l ngdeakse Vinklen kan afl ses p...

Page 23: ...ing af reservedele Apparattype Apparatets varenummer Apparatets identnummer Nummeret p den nskede reservedel Aktuelle priser og vrig information findes p www isc gmbh info DK N iNTERNATiONALES SERViCE...

Page 24: ...ch 4 Dane techniczne Dok adno 0 6 mm m Temperatura robocza 1 40 C Klasa lasera 2 D ugo fali lasera 635 Nm Moc lasera 5 m W Napi cie zasilania lasera 2 x 1 5V AAA Napi cie zasilania stopki 2 x 1 5 V AA...

Page 25: ...y u zintegrowany magnes dzi ki czemu mo na j przytwierdza do magnesowalnych powierzchni Uwaga Prosz nie dotyka tylnej strony podstawki do chropowatych powierzchni w czasie naciskania przycisk w u ytko...

Page 26: ...lub wody Baterie nale y oddawa do punkt w zbiorczych poddawa recyclingowi b d likwidowa w spos b bezpieczny dla rodowiska naturalnego Zu yte baterie prosz przes a na podany adres iSC GmbH Eschenstra e...

Page 27: ...2 x 1 5 V AAA Naponsko napajanje vakuumskog podno ja 2 x 1 5 V AA 5 Pu tanje laserske jedinice u pogon slika 3 4 Umetanje i zamjena baterije slika 3 4 Pa nja Prije umetanja baterije uvijek provjerite...

Page 28: ...tizirati Ne koristite bazu za druge povr ine 8 Rad s bazom za precizno niveliranje slika 9 10 Lasersku jedinicu stavite na bazu za precizno niveliranje tako da oba klina 1 dosjednu u utore za vodjenje...

Page 29: ...esti sljede e podatke Tip uredjaja Broj artikla uredjaja Identifikacijski broj uredjaja Broj potrebnog rezervnog dijela Aktualne cijene i informacije prona i ete na web stranici www isc gmbh info HR i...

Page 30: ...0 2 635 5 2 1 5 2 1 5 5 3 4 3 4 1 4 3 2 3 2 RUS Achtung Laserstrahlung Nicht in den Strahl blicken Laserspezifikation nach EN 60825 1 1994 A1 2002 A2 2001 Laser Klasse 2 JG9 635 5L 635 nm P 5 mW Anlei...

Page 31: ...31 3 180 3 4 0 45 90 5 6 5 6 1 4 5 4 2 2 3 7 7 8 1 2 3 1 4 4 8 9 10 1 360 2 3 RUS Anleitung NLW 180 SPK1 08 09 2006 8 41 Uhr Seite 31...

Page 32: ...32 1 4 4 5 5 8 6 9 1 5 5 5 10 1 6 11 12 ISC GmhH Eschenstra e 6 D 94405 Landau 13 www isc gmbh info RUS iNTERNATiONALES SERViCE CENTER GmbH Anleitung NLW 180 SPK1 08 09 2006 8 41 Uhr Seite 32...

Page 33: ...vanje lasera strujom 2 x 1 5 V AAA Snabdevanje vakuumskog podno ja strujom 2 x 1 5 V AA 5 Pu tanje laserske jedinice u pogon slika 3 4 Umetanje i zamena baterije slika 3 4 Pa nja Pre umetanja baterije...

Page 34: ...Baza za hrapavu povr inu podesna je samo za meko drvo zidane zidove i povr ine koje se mogu namagnetisati Ne koristite bazu za druge povr ine 8 Rad sa bazom za precizno nivelisanje slika 9 10 Lasersk...

Page 35: ...ja zbrinuti na stru an na in 13 Porud bina rezervnih delova Prilikom porud bine rezervnih delova treba da se navedu slede i podaci Tip uredjaja Broj artikla uredjaja Identifikacioni broj uredjaja Broj...

Page 36: ...en mukaista yhdenmukaisuutta tuotteelle erkl rer herved f lgende samsvar med EU direktiv og standarder for artikkel EC izjavljuje sljede u uskladjenost s odredbama i normama EU za artikl declar urm to...

Page 37: ...en Hauptvertriebspartners als Er g nzung der lokal g ltigen gesetzlichen Vorschriften Bitte be achten Sie Ihren Ansprechpartner des regional zust ndigen Kun dendienstes oder die unten aufgef hrte Serv...

Page 38: ...and hvor den regionale hovedforhandler har sit s de Vi henviser endvidere til din kontaktperson hos den regionalt ansvarlige kundeservice eller til nedenst ende serviceadresse CERTYFIKAT GWARANCJI Na...

Page 39: ...s As an alternative to returning the electrical device the owner is obliged to cooperate in ensuring that the device is properly recycled if ownership is relinquished This can also be done by handing...

Page 40: ...o interessati gli accessori e i mezzi ausiliari senza elementi elettrici forniti insieme ai vecchi apparecchi G lder kun EU lande Smid ikke el v rkt j ud som almindeligt husholdningsaffald I henhold t...

Page 41: ...i pribora ugradjeni u stare uredjaje i pomo ni materijali bez elektri nih elemenata 2002 96 EG Samo za zemlje EU Ne bacajte elektro alate u ku no sme e Shodno evropskoj smernici 2002 96 EG o starim el...

Page 42: ...pa o l ulteriore riproduzione anche parziale della documentazione o dei documenti d accompagnamento dei prodotti consentita solo con l esplicita autorizzazione da parte della ISC GmbH Eftertryk eller...

Reviews: