


-69-
Electrical Adjustment
10.
Gamma shipment adjustment
Software
PROJECTOR SERVICE TOOL v4.20
Use the software to obtain the proper gray scale. See the
further information of the software instruction manual.
13.
Wind Sensor calibration
1. Enter the service mode.
2. Select group no. “
170
” and item no. “
4
”. Confirm the
Data value is “
1
”.
0: Wind sensor function Disable
1: Wind sensor function Enable
3. Select group no. “
170
” and item no. “
0
”.
4. To start the adjustment, change data value from “
0
”
to “
1
”. After the auto-calibration completed, "OK" will
appear on the screen.
IMPORTANT
Before taking this adjustment, you need to replace the air
filter with new one or scroll up the filter sheet and make
sure the cabinet top, filter cover and filter cartridge are
securely installed.
11. Color Shading Correction adjustment
Software
PROJECTOR SERVICE TOOL v4.20
Use the software to correct the color shading of the
screen. See the further information of the software in-
struction manual.
The color shading correction adjustment for this model
should be performed with the whole-gray patterns speci-
fied as below.
8-input patterns:
5% gray, 10% gray, 15% gray, 20% gray,
30% gray, 50% gray, 60% gray, 80% gray
9. Common center adjustment
Input mode Computer mode
Input signal 50% (R,G,B) pattern signal
1. Enter the service mode.
2. Project only one color component to the screen.
Select Group "
900
", No. "
1
" and then change data val-
ue from "
2
" to "
0
".
3. Change data value to obtain
the minimum flicker
for
each color on screen.
Group No. Screen
280 - 9
only green color picture
280 - 10
only blue color picture
280 - 11
only red color picture
4. Select Group "
900
", No. "
1
" and then change data
value from "
0
" to "
2
".
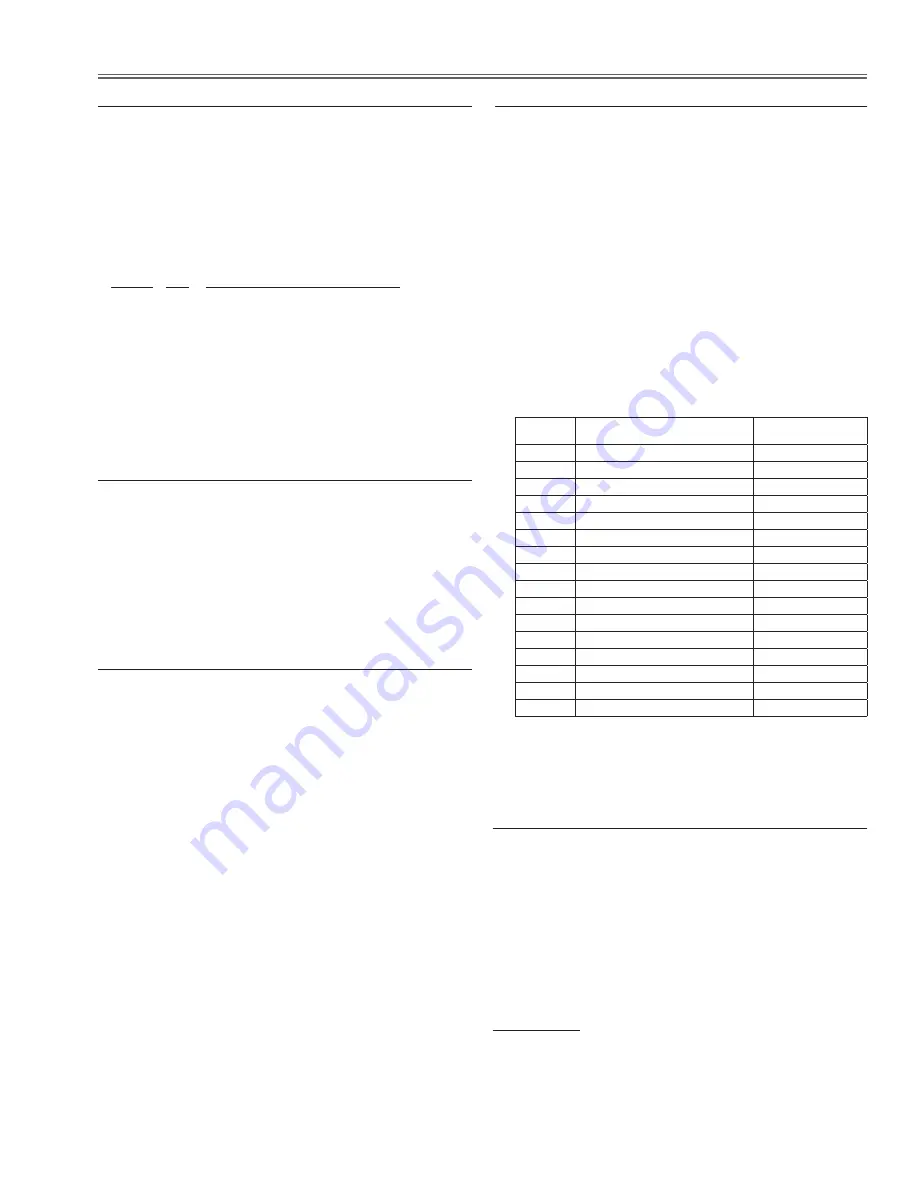
12. White balance adjustment
1. Enter the service mode. (Input signal is not required.)
2. Select Group and No. of white balance adjustment
items referring to the table below. For example, when
adjusting the white balance in the Standard PC mode
with Advanced color : Auto, select Group - No. "982
- 1 (X value)" or "982 - 2 (Y value)".
3. Change the Data value.
4. Select Group "
982
", No. "
64
". When the data value
is changed "
0
" to "
10
", the adjustment is performed
automatically. The displayed adjustment Group -No.
changes to "930 - 0" and it takes for 2-3 minutes to
complete the adjustment.
5. Check proper white balance and gray scale are ob-
tained in the selected input mode.
i
This white balance adjustment can be done in each
lamp mode of "2 lamps", "Lamp 1" and "Lamp 2".
group-No. advanced color mode:
input adjustment Mode (X, Y)
data (initial value)
982 - 1 Advanced color-Auto: PC Standard -X
310
982 - 2 Advanced color-Auto: PC Standard -Y
330
982 - 9 Advanced color-Auto: PC Real -X
315
982 - 10 Advanced color-Auto: PC Real -Y
340
982 - 17 Advanced color-Auto: AV Standard -X
310
982 - 18 Advanced color-Auto: AV Standard -Y
330
982 - 25 Advanced color-Auto: AV Cinema -X
315
982 - 26 Advanced color-Auto: AV Cinema -Y
328
982 - 33 Advanced color-Off: PC Standard -X
287
982 - 34 Advanced color-Off: PC Standard -Y
317
982 - 41 Advanced color-Off: PC Real -X
292
982 - 42 Advanced color-Off: PC Real -Y
323
982 - 49 Advanced color-Off: AV Standard -X
287
982 - 50 Advanced color-Off: AV Standard -Y
317
982 - 57 Advanced color-Off: AV Cinema -X
313
982 - 58 Advanced color-Off: AV Cinema -Y
329


