background image

12

Installation

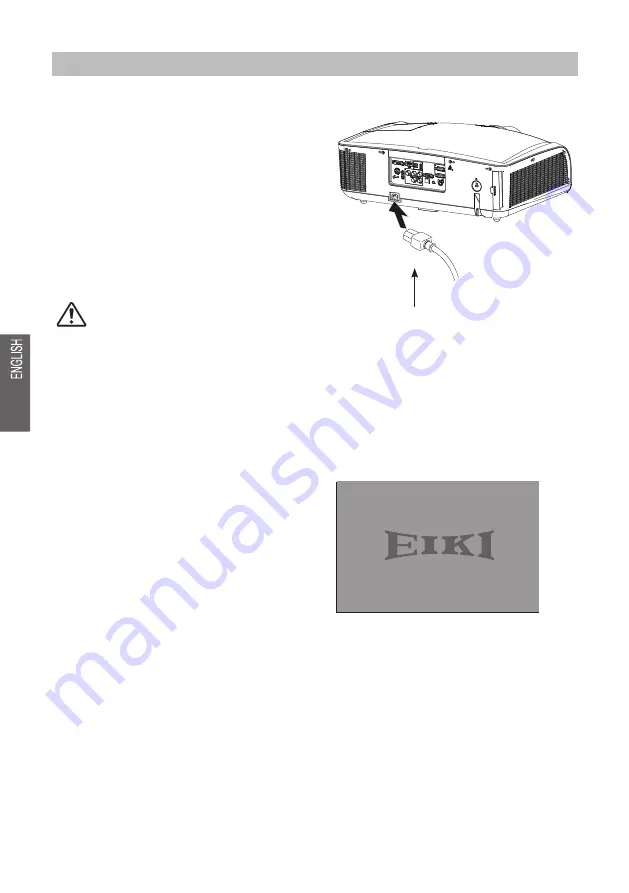
Connecting the AC power cord

This projector uses nominal input voltages of 

100-240V AC and it automatically applies to 

different input voltages. It is designed to work 

with a single-phase power system having a 

grounded neutral conductor. 

To reduce the risk of electrical shock, do not 

plug into any other type of power system. If 

you are not sure of the type of power being 

supplied, consult your authorized dealer or  

service station. Connect the projector with all 

peripheral equipment before turning it on.

The AC outlet should be near this equipment 

and must be easily accessible.

Note:

Note: 

   For safety, unplug the AC power cord when the projector is not in use. When the projector is 

  connected to an outlet with AC power cord, it is in stand-by mode and consumes a little electric 

  power.

Connect the AC power cord 

(supplied) to the projector.

Turn on the projector

1.Complete peripheral connections (with a 

   computer, DVD, Blu-ray, etc.) before turning 

   on the projector.

2. Connect the projector’s AC power cord into 

    AC outlet. The POWER indicator turns red. 

3. Press the POWER button on side control or  

    on the remote control. The POWER indicator 

    becomes green and the cooling fans start to 

    work. The preparation display appears on 

    the screen and the countdown starts.

4. If the projector is locked with a PIN code, a 

    PIN code input dialog box appears. Enter 

    the PIN code as instructed below.

Note:

● When the logo select is set to be "Off" the

   logo will not be displayed on the screen.

● When the Display function is set to be "Off" , 

   the logo and countdown will not be displayed 

   on the screen.

● During the countdown period, all operations 


are invalid except shutdown.

16

Start-up display

Summary of Contents for LC-WXN200

Page 1: ...e projector For detailed information about installation setup and operation of projector refer to the owner s manual on the CD ROM Read the safety instructions in the Owner s Manual before using proje...

Page 2: ......

Page 3: ......

Page 4: ...e projector For detailed information about installation setup and operation of projector refer to the owner s manual on the CD ROM Read the safety instructions in the Owner s Manual before using proje...

Page 5: ...listed below are in the box If something is missing please contact your dealer Owner s Manual CD AC Power cord Remote control with batteries AA or LR6 VGA cable Quick start guide Rubber Cap WiFi Dong...

Page 6: ...ssing any button The maximum operating range for the remote control is about 5 meters and 60 degrees Use two 2 AA or LR6 type batteries Always replace batteries in sets Do not use a new battery with a...

Page 7: ...0 aspect ratio 40 100 150 200 300 861x538 2154x1346 3231x2019 4308x2692 6462x4039 Maximum 1 30m 3 40m 5 10m 6 70m 10 10m Minimum 2 20m 5 70m 8 50m 11 40m 17 20m 300 200 150 100 40 300 6 91m 7 60m 3 45...

Page 8: ...be shifted to the left up to 10 width of the display The display position can be shifted to the right up to 10 width of the display When the lens is shifted to top When the lens is shifted to leftmost...

Page 9: ...d with the projector Connecting the cables first then plug the power cords of both the projector and external equipment from the AC outlet VGA input output VGA output input RS232 output VGA output DVI...

Page 10: ...able Cables not supplied with the projector Connecting the cables first then plug the power cords of both the projector and external equipment from the AC outlet Component video output Component video...

Page 11: ...B A port Cables used for connection USB A cable USB B cable Cables not supplied with the projector Connecting the cables first then plug the power cords of both the projector and external equipment fr...

Page 12: ...cord it is in stand by mode and consumes a little electric power Connect the AC power cord supplied to the projector Turn on the projector 1 Complete peripheral connections with a computer DVD Blu ra...

Page 13: ...fans is changed according to the temperature inside the projector Do not put the projector in a case before it is cooled enough If the WARNING TEMP indicator flashes see Warning Temp While the POWER...

Page 14: ...LC XN200 LC WXN200 LC XN200L LC WXN200L Das Projektionsobjektiv ist optional...

Page 15: ...en Artikel darin befinden Wenden Sie sich bitte an unseren Kundendienst wenn etwas fehlen sollte Lieferumfang Zubeh r Bedienungsanweisung CD AC Netzkabel Fernbedienung mit Batterien AA oder LR6 VGA Ka...

Page 16: ...imale Arbeitsbereich der Fernbedienung ist ungef hr 5 Meter und 60 Grad Benutzen Sie zwei 2 AA oder LR6 Typ Alkali Batterien oder mit Zink Magnesium Ersetzen Sie die Batterien immer als Set Benutzen S...

Page 17: ...Bildschirmgr e LxH mm 16 10 Bildseitenverh ltnis 40SDSq 100SDSq 150SDSq 200SDSq 300SDSq 861x538 2154x1346 3231x2019 4308x2692 6462x4039 Maximum 1 30m 3 40m 5 10m 6 70m 10 10m Minimum 2 20m 5 70m 8 50m...

Page 18: ...t werden Die Position des Bildschirms kann nach links um 10 bewegt werden Die Position des Bildschirms kann nach rechts um 10 bewegt werden Wenn das Objektiv nach oben bewegt wird Wenn das Objektiv ma...

Page 19: ...g des Projektors enthalten Trennen Sie die Netzkabel des Projektors und der externen Ger te von den Steckdosen bevor Sie die Kabel anschlie en Monitor Eingang Serieller Ausgang Computer Ausgang Digita...

Page 20: ...el BNC Kabel die Kabel sind nicht im Lieferumfang des Projektors enthalten Trennen Sie die Netzkabel des Projektors und der externen Ger te von den Steckdosen bevor Sie die Kabel anschlie en Component...

Page 21: ...die f r den Anschluss benutzt werden USB A Kabel USB B Kabel die Kabel sind nicht im Lieferumfang des Projektors enthalten Trennen Sie die Netzkabel des Projektors und der externen Ger te von den Ste...

Page 22: ...st befindet er sich im Standby Modus und braucht ein wenig Strom auf Schlie en Sie das AC Netzkabel im Lieferumfang an das Projektorgeh use an Einschalten des Projektors 1 Beenden Sie alle Anschl sse...

Page 23: ...komplett abgek hlt ist Falls die WARNUNG TEMP Anzeige blinkt lesen Sie Warnung Temp W hrend die POWER Anzeige blinkt wird die Lame heruntergek hlt und der Projektor kann nicht eingeschaltet werden Wa...

Page 24: ...LC XN200 LC WXN200 LC XN200L LC WXN200L Lentille de projection en option...

Page 25: ...i quelque chose manque merci de contacter notre service Client Accessoires Manuel d utilisateur CD Cordon d alimentation AC T l commande avec piles AA ou LR6 C ble VGA Guide de d marrage rapide Capuch...

Page 26: ...sur n importe quel bouton La distance maximale de fonctionnement de la t l commande est d environ 5 m tres et 60 Utiliser deux 2 piles de type AA ou LR6 alcaline dioxyde de zinc et mangan se Remplace...

Page 27: ...40SDSq 100SDSq 150SDSq 200SDSq 300SDSq 861x538 2154x1346 3231x2019 4308x2692 6462x4039 Maximum 1 30m 3 40m 5 10m 6 70m 10 10m Minimum 2 20m 5 70m 8 50m 11 40m 17 20m 300 200 150 100 40 300 6 91m 7 60m...

Page 28: ...a position de l affichage peut tre d cal e vers la gauche jusqu 10 de la largeur de l cran La position de l affichage peut tre d cal e vers la droite jusqu 10 de la largeur de l cran Quand la lentille...

Page 29: ...rojecteur D branchez de la prise murale les cordons d alimentation du projecteur et de l quipe ment externe avant de connecter les c bles Entr e moniteur Sortie en s rie Sortie ordinateur Entr e num r...

Page 30: ...e BNC Les c bles ne sont pas fournis avec le projecteur D branchez de la prise murale les cordons d alimentation du projecteur et de l quipement externe avant de connecter les c bles Sortie d un compo...

Page 31: ...bles utilis s pour la connexion C ble USB A C ble USB B Les c bles ne sont pas fournis avec le projecteur D branchez de la prise murale les cordons d alimentation du projecteur et de l quipement exte...

Page 32: ...somme un peu de courant lectrique Connectez le cordon d ali mentation AC fourni au projecteur Allumer le projecteur 1 Effectuez les connexions p riph riques avec un ordinateur un DVD un Blu ray etc av...

Page 33: ...e voyant WARNING TEMP clignote voir la section Attention Temp Quand le voyant POWER clignote la lampe refroi dit et le projecteur ne peut pas tre rallum At tendre jusqu ce que le voyant POWER devienne...

Page 34: ...LC XN200 LC WXN200 LC XN200L LC WXN200L La lente de proyecci n es opcional...

Page 35: ...n dentro Si faltase algo p ngase en contacto con nuestro servicio de atenci n al cliente Accesorios Manual del Propietario CD Cord n de alimentaci n de CA Control remoto con bater as AA o LR6 Cable VG...

Page 36: ...trasero al pulsar cualquier bot n El alcance m ximo de funcionamiento del control remoto es alrededor de 5 metros y 60 grados Use dos 2 bater as AA o LR6 tipo alcalinas o de di xido de zinc magnesio S...

Page 37: ...pantalla Ancho x alto mm Relaci n de aspecto 16 10 40SDSq 100SDSq 150SDSq 200SDSq 300SDSq 861x538 2154x1346 3231x2019 4308x2692 6462x4039 M ximo 1 30m 3 40m 5 10m 6 70m 10 10m M nimo 2 20m 5 70m 8 50...

Page 38: ...er desplazada hacia la izquierda hasta el 10 del ancho de la pantalla La posici n de la pantalla puede ser desplazada hacia la derecha hasta el 10 del ancho de la pantalla Cuando la lente se desplaza...

Page 39: ...Desenchufe los cordones de alimentaci n del proyector y de los equipos externos del tomacorriente de CA antes de conectar los cables Entrada al monitor Salida serie Salida de computadora Entrada digit...

Page 40: ...BNC cables no suministrados con el proyector Desenchufe los cordones de alimentaci n del proyector y de los equipos externos del tomacorriente de CA antes de conectar los cables Salida de video del co...

Page 41: ...USB A Cables usados para la conexi n Cable USB A Cable USB B cables no suministrados con el proyector Desenchufe los cordones de alimentaci n del proyector y de los equipos externos del tomacorriente...

Page 42: ...e CA est en modo de espera y consume poca energ a el ctrica Conecte el cord n de alimentaci n de CA suministrado al proyector Encendido del proyector 1 Complete las conexiones perif ricas con una comp...

Page 43: ...caja antes de que se enfr e suficientemente Si destella el indicador WARNING TEMP vea Advertencia de temperatura Mientras el indicador POWER est destellando la l mpara se est enfriando y el proyector...

Page 44: ...LC XN200 LC WXN200 LC XN200L LC WXN200L L obiettivo di proiezione opzionale...

Page 45: ...i seguito Se manca qualcosa contattare la nostra assistenza clienti Accessori Manuale di istruzioni CD Cavo di alimentazione CA Telecomando con batterie AA o LR6 Cavo VGA Guida rapida Cappuccio in gom...

Page 46: ...sante La massima gamma effettiva del telecomando di circa 5 metri e 60 gradi Utilizzare due 2 batterie alcaline AA o LR6 che utilizzano una combinazione tra biossido di zinco e biossido di manganese S...

Page 47: ...o LxH mm Formato dello schermo 16 10 40SDSq 100SDSq 150SDSq 200SDSq 300SDSq 861x538 2154x1346 3231x2019 4308x2692 6462x4039 Massimo 1 30m 3 40m 5 10m 6 70m 10 10m Minimo 2 20m 5 70m 8 50m 11 40m 17 20...

Page 48: ...el display verso sinistra fino al 10 della larghezza del display possibile spostare la posizione del display verso destra fino al 10 della larghezza del display Quando l obiettivo viene spostato verso...

Page 49: ...oiettore Scollegare i cavi di alimentazione sia dal proiettore che all apparecchiatura esterna dalla presa CA prima di collegare i cavi Ingresso monitor Uscita di serie Uscita computer Ingresso digita...

Page 50: ...deo Cavo RCA Cavo BNC cavi non in dotazione con il proiettore Scollegare i cavi di alimentazione sia dal proiettore che all apparecchiatura esterna dalla presa CA prima di collegare i cavi Uscita vide...

Page 51: ...orta USB A Cavi utilizzati per la connessione Cavo USB A Cavo USB B cavi non in dotazione con il proiettore Scollegare i cavi di alimentazione sia dal proiettore che all apparecchiatura esterna dalla...

Page 52: ...di stand by e consuma energia ridotta Collegare il cavo di alimentazione CA in dotazione al proiettore Accendere il proiettore Nota Quando la selezione del logo impostata su Off il logo non viene visu...

Page 53: ...cientemente raffreddato Se l indicatore WARNING TEMP lampeggia consultare Warning Temp Mentre l indicatore POWER sta lampeggiando la lampada si sta raffreddando e il proiettore non pu essere acceso At...

Page 54: ...Fax 420 241 409 435 E Mail info eiki cz China EIKI Shanghai Co Ltd LAKESIDE OASIS MIDDLE RING BUSINESS CENTRE Block 1 Room 606 1628 Jin Sha Jiang Road Shanghai 200333 CHINA Tel 86 21 3251 3993 Servic...

Reviews: