background image

29

COMPUTER INPUT

PICTURE SCREEN ADJUSTMENT

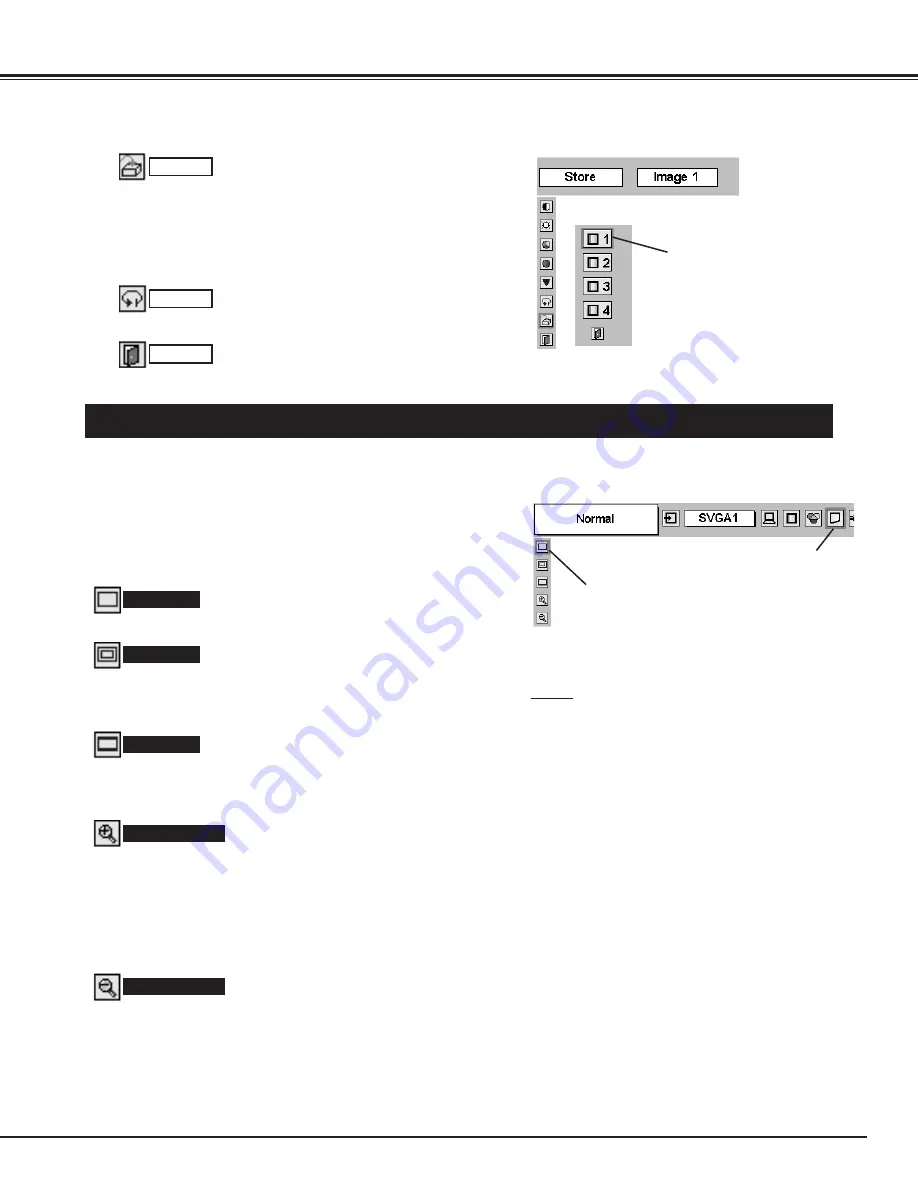
This projector has a picture screen resize function, which enables you to display the desirable image size.

Press MENU button and ON-SCREEN MENU will appear.  Press
POINT LEFT/RIGHT button(s) to move a red frame pointer to
SCREEN Menu icon.

When Digital zoom + is selected, ON-SCREEN MENU disappears
and the message “D. Zoom +” is displayed.  Press SELECT button to
expand image size.  And press POINT UP/DOWN/LEFT/RIGHT
button(s) to pan the image.  Panning function can work only when
the image is larger than screen size.
A projected image can be also expanded by pressing D.ZOOM 

button on Remote Control Unit.  

1

To cancel Digital Zoom +/– mode, press any button except D.ZOOM

/

, SELECT, and POINT buttons.

Move the red frame to the function and
press SELECT button.

Press POINT DOWN button and move a red frame pointer to the
function that you want to select and then press SELECT button.

2

Wide

Digital zoom +

NOTE

This SCREEN Menu cannot be operated when
“1035i (HDTV)” or “1080i (HDTV)” is selected on
PC SYSTEM Menu  (P22).

Wide cannot be selected when “720p (HDTV)” is
selected on PC SYSTEM Menu  (P22).

True and Digital zoom +/– cannot be selected
when  “RGB” is selected on PC SYSTEM Menu
(P22).

This projector cannot display any resolution higher
than 1280 X 1024.  If your computer’s screen
resolution is higher than 1280 X 1024, reset the
resolution to the lower before connecting projector.

Digital zoom – cannot be fully operated when the
image resolution is higher than SVGA (800 x 600).

The image data in other than SVGA (800 x 600) is
modified to fit the screen size in initial mode.

Panning function may not operate properly if the
computer system prepared on PC ADJUST Menu
is used.

Provides image to fit screen size.

Normal

True

SCREEN MENU

SCREEN Menu icon

When Digital zoom – is selected, ON-SCREEN MENU disappears
and the message “D. Zoom –” is displayed.  Press SELECT button to
compress image size. 
A projected image can be also compressed by pressing D.ZOOM 

button on Remote Control Unit.  

Digital zoom –

Provides image in its original size.  When the original image size is
larger than screen size (800 x 600), this projector enters “Digital
zoom +” mode automatically. 

Provides image to fit wide video aspect ratio (16 : 9) by expanding
image width uniformly.  This function can be used for providing a
squeezed video signal at 16 : 9.

Image Level Menu
Move a red frame pointer to any
of Image 1 to 4 where you want
to set  and then press SELECT
button.

Reset all adjustment to previous figure.

Reset

Store

Closes IMAGE MENU.

Quit

Other icons operate as follows.

3

To store manually preset image, move a red frame pointer to
Store icon and press SELECT button.  Image Level Menu will
appear.  Move a red frame pointer to the Image 1 to 4 where you
want to set and then press SELECT button.

Summary of Contents for LC-SM4

Page 1: ...MULTIMEDIA PROJECTOR OWNER S MANUAL MODEL LC SM4...

Page 2: ...et If the problem still persists contact the sales dealer where you purchased the projector or the service center TO THE OWNER SAFETY PRECAUTIONS WARNING TO REDUCE THE RISK OF FIRE OR ELECTRIC SHOCK D...

Page 3: ...abinet slots as they may touch dangerous voltage points or short out parts that could result in a fire or electric shock Never spill liquid of any kind on the projector This projector should be operat...

Page 4: ...frequency energy and if not installed and used in accordance with the instructions may cause harmful interference to radio communications However there is no guarantee that interference will not occur...

Page 5: ...ADJUSTMENT 29 SELECTING INPUT SOURCE 30 SELECTING VIDEO SYSTEM 31 PICTURE IMAGE ADJUSTMENT 32 IMAGE LEVEL SELECT 32 IMAGE LEVEL ADJUSTMENT 33 PICTURE SCREEN ADJUSTMENT 34 SETTING MENU 35 LAMP REPLACEM...

Page 6: ...puter output signals quickly There is no need for troublesome manual adjustment of frequency and other settings Keystone Correction Positioning height of a projector may result in distorted image bein...

Page 7: ...ects internal temperature and automatically controls operating power of Cooling Fans FRONT This projector is equipped with Cooling Fans for protection from overheating Pay attention to the following t...

Page 8: ...fety unplug AC Power Cord when an appliance is not used When this projector is connected to the outlet with AC Power Cord an appliance is in Stand by Mode and consumes a little electric power CONNECTI...

Page 9: ...Menu Operation Refer to P20 and 35 3 CAUTION Avoid positioning a projector with the angle of more than 20 degrees Projection Lamp may malfunction This projector is designed to project on a flat projec...

Page 10: ...JECTOR CAUTION Carrying Bag supplied is intended for protection from dust and scratches on the surface of a cabinet and it is not designed to protect an appliance from external forces Do not transport...

Page 11: ...VIDEO Y jack or connect the component video outputs to VIDEO Y Pb Cb and Pr Cr jacks Refer to P13 Connect the computer output to this jack Refer to P12 COMPUTER INPUT TERMINAL ANALOG This projector ha...

Page 12: ...puter only when controlling the computer with the optional Wireless Remote Control Unit ADB port Cables used for connection Cable or adapter is not supplied with this projector Control Cable for PS 2...

Page 13: ...en both Y Pb Cb Pr Cr jacks and S VIDEO jack are connected Y Pb Cb Pr Cr jacks has priority over S VIDEO jack S VIDEO Output Audio Input Cables used for connection Cable is not supplied with this proj...

Page 14: ...AUTO PC ADJ BUTTON Use to operate Auto PC Adjustment function P24 VOLUME BUTTONS Used to adjust volume P21 D ZOOM BUTTONS Used to select DIGITAL ZOOM mode and resize the image P29 KEYSTONE BUTTONS Use...

Page 15: ...te Control Unit or improper battery s installation may cause explosion Be sure to install battery with correct polarity Do not expose a battery to moisture or heat Do not charge a battery If a battery...

Page 16: ...ode P36 Becomes dim when the projector is turned on And it is bright when the projector is in stand by mode Turns yellow when the life of the projection lamp draws to an end P37 Flashes red when inter...

Page 17: ...e each adjustment on ON SCREEN MENU 2 MOVING POINTER 3 SELECT ITEM Move the pointer see below or adjust the value of item by pressing POINT button s on Top Control or on Remote Control Unit Select the...

Page 18: ...GE ADJUST MENU Used to adjust picture image Contrast Brightness Color Tint White balance R G B Sharpness Gamma Auto grayscale Auto fleshtone Refer to P33 34 FOR VIDEO SOURCE Press MENU BUTTON while co...

Page 19: ...flashes red projector is automatically turned off Wait at least 5 minutes before turning on projector again When WARNING TEMP Indicator continues to flash follow procedures below 1 Press POWER ON OFF...

Page 20: ...image and press KEYSTONE button or POINT DOWN button to reduce the lower part Reduce the upper width with KEY STONE button or POINT UP button Reduce the lower width with KEY STONE button or POINT DOWN...

Page 21: ...he screen for a few seconds VOLUME or POINT RIGHT button to increase volume and VOLUME or POINT LEFT button for decreasing Mute Press MUTE button on Remote Control Unit to cut off sound To restore sou...

Page 22: ...nually Note Projector may display one of the following messages When projector cannot recognize connected signal as PC system provided in this projector Auto PC Adjustment function operates to adjust...

Page 23: ...38 00 60 51 SVGA 9 800 x 600 38 60 60 31 SVGA 11 800 x 600 38 00 60 51 ON SCREEN DISPLAY RESOLUTION H Freq kHz V Freq Hz XGA 10 1024 x 768 XGA 11 1024 x 768 XGA 12 1024 x 768 XGA 13 1024 x 768 62 04...

Page 24: ...mote Control Unit Move a red frame pointer to AUTO PC Adj icon and press SELECT button PC ADJUST MENU Auto PC Adj PC ADJUST Menu icon Store adjustment parameters Adjustment parameters from Auto PC Adj...

Page 25: ...on 1 2 Press POINT DOWN button to move a red frame pointer to the item that you want to adjust and then press SELECT button Adjustment dialog box will appear Press POINT LEFT RIGHT button to adjust va...

Page 26: ...note This function does not work when adjusting Horizontal or Vertical manually Full screen Reset Store Closes PC ADJUST MENU Quit Other icons operates as follows 3 To store adjustment parameters move...

Page 27: ...nt improved in reproduction of halftones This adjustment is suitable for providing better image in brighter place Real User preset picture adjustment in IMAGE ADJUST Menu P28 29 IMAGE 1 4 IMAGE SELECT...

Page 28: ...to 63 Contrast Brightness Press either POINT LEFT button or POINT RIGHT button to obtain better balance of contrast From 0 to 15 Gamma Press POINT LEFT button to lighten color and POINT RIGHT button t...

Page 29: ...s screen resolution is higher than 1280 X 1024 reset the resolution to the lower before connecting projector Digital zoom cannot be fully operated when the image resolution is higher than SVGA 800 x...

Page 30: ...IDEO Move a pointer to the source and press SELECT button Source Select Menu VIDEO INPUT MENU INPUT button Video Computer Move a pointer to the source that you want to select and then press SELECT but...

Page 31: ...ess SELECT button PAL SECAM NTSC NTSC4 43 PAL M PAL N Projector automatically detects incoming Video signal and adjusts itself to optimize its performance If projector cannot reproduce proper video im...

Page 32: ...l picture adjustment preset on this projector Standard Picture level adjusted for the picture with fine tone Cinema User preset picture adjustment in IMAGE ADJUST Menu P33 34 IMAGE 1 4 IMAGE SELECT Me...

Page 33: ...items IMAGE ADJUST Menu icon Press POINT LEFT RIGHT buttons to adjust value Press POINT LEFT button to lighten color and POINT RIGHT button to deeper color From 0 to 63 Press POINT LEFT button or POI...

Page 34: ...1080i is selected on AV SYSTEM Menu P31 Move the red frame to the function and press SELECT button SCREEN MENU SCREEN Menu icon Provides image at a wide screen ratio of 16 9 Wide Provides image at a n...

Page 35: ...NU is selectable from among English German French Italian Spanish Portuguese Dutch Swedish Chinese Korean and Japanese Display This function decides whether to display On Screen Displays On shows all...

Page 36: ...Control Unit again Power management This function is used to reset Lamp Replace Counter When replacing Projection Lamp reset Lamp Replace Counter by using this function Refer to page 38 for operation...

Page 37: ...rojector can become very hot WARNING TEMP LAMP REPLACE TOP CONTROL CAUTION Turn off the projector and disconnect AC plug Allow the projector to cool at least for 45 minutes Remove 2 screws with a scre...

Page 38: ...r similar lamps If the projector indicates that the lamp should be replaced i e if the LAMP REPLACE INDICATOR lights up replace the lamp with a new one IMMEDIATELY after the projector has cooled down...

Page 39: ...on 3 AIR FILTER Large Turn off the projector and disconnect AC power cord from the AC outlet Turn the projector upside down and remove two Air Filters Large and Small by pulling the latches upward 1 2...

Page 40: ...hts green again and a projector may be turned on by pressing Power ON OFF button Check WARNING TEMP indicator If the indicator flashes red the projector cannot be turned on See TURNING ON OFF PROJECTO...

Page 41: ...rating instructions contact the sales dealer where you purchased the projector or the service center Give the model number and explain the difficulty We will advise you how to obtain service Remote Co...

Page 42: ...focus 5 3 26 6 1 6 m 8 1 m 150 W RCA Type x 3 Video Y Pb Cb Pr Cr and Mini DIN 4 pin x 1 S Video Projection Lens Throw Distance Projection Lamp Video Input Jacks Mini Jack stereo x 1 Audio Input Jacks...

Page 43: ...2 3 4 5 8 7 6 Pin Configuration CONTROL PORT CONNECTOR CLK DATA GND GND R X D GND RTS CTS T X D GND GND ADB GND GND PS 2 Serial ADB 1 2 3 4 5 6 7 8 Vcc Data Data Ground 1 2 3 4 USB CONNECTOR Series B...

Page 44: ...06126 9371 0 Fax 06126 9371 14 E Mail info eiki de Eastern Europe EIKI CZECH spol s r o Umeleck 15 170 00 Praha 7 Czech Republic Tel 42 02 20570024 42 02 20571413 Fax 42 02 20571411 E Mail easterneur...

Reviews: