background image

73

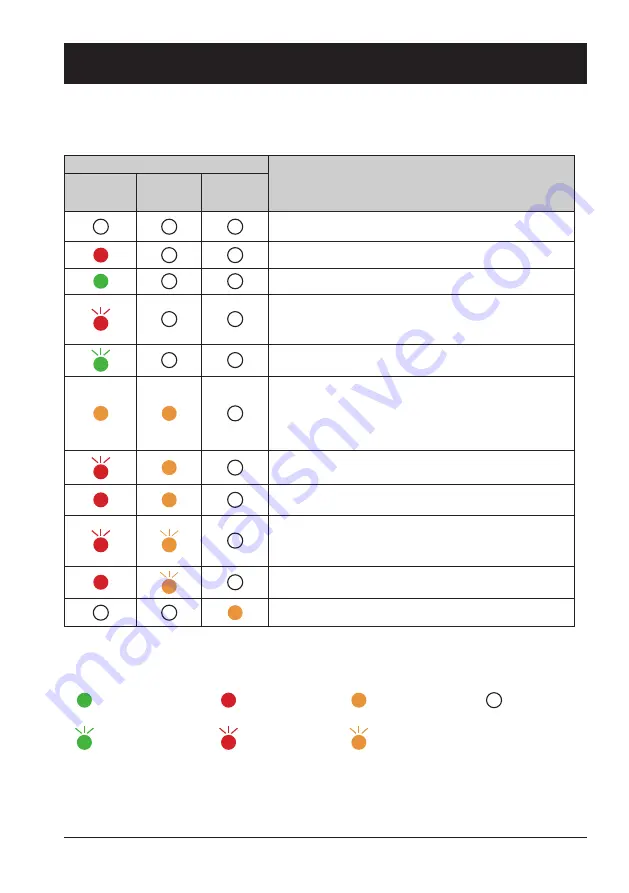
Light indicator

Status of the projector

POWER

Green /Red /

Orange

STATUS

FILTER

The projector is in Off status (without AC power supply). 

The projector is in standby status. Press Standby button to turn it 

on. 
The projector is in normal status. 

It is ready for standby or the LED light source is cooling.  You 

may power on the projector only after the LED light source is 

fully cooled and the POWER light indicator stops flashing.

The projector is in Ready mode.

The projector detects abnormal situation and cannot power 

on. Unplug the AC power cord and connect it again before 

powering on the projector.  If it powers off again, please un-

plug the cord and call the dealer or service center for mainte-

nance or inspection.  Do not let it continue operating as this 

may lead to electric shock or fire. 

The projector detects LED light source abnormality and cools 

down. 
The projector detects LED light source abnormality and 

switches into standby mode.
The projector cannot power on, as its internal temperature is 

too high.  You may power it on after it is fully cooled, tempera-

ture backs to normal, and the POWER light indicator turns 

red.
You may power is fully cooled with temperature backs to 

normal.

The filter requires cleaning 

Appendix 

Light indicator status

Check light indicator to learn status of the projector. 

...

Green 

...

Red

...

Yellow

...

Turns off

...

Flashing green

...

Flashing red

...

Flashing yellow

Summary of Contents for EK-351WST

Page 1: ...Owner s manual Multimedia Projector EK 351WST EK 352UST ...

Page 2: ... screen menu of the projector is available in 26 languages English German French Italian Spanish Polish Swedish Dutch Portuguese Japanese Simplified Chinese Traditional Chinese Korean Russian Arabic Turkish Finnish Norwegian Danish Indone sian Hungarian Czech Kazakh Vietnamese Thai and Farsi Helpful Maintenance Functions Filter maintenance functions provide for better and proper maintenance of the...

Page 3: ...er operation 30 Input select 31 How to use the OSD 33 Menu operation 33 Menu item overview 34 Display Auto PC Adjusting 35 Manual computer adjustment 36 Color Adjust Color Adjust Computer signals 39 Color Adjust Video signals 40 Setting Setting 41 Expand Language 43 Auto Setup 43 Keystone 44 Curved correction 45 Logo 46 Security 47 Power Management 48 Filter counter 48 Test pattern 49 Network 49 F...

Page 4: ...anual to check the operation and connections and try solutions given in the Troubleshooting section at end of this manual If the problem persists call the dealer or our service center The projector s LED light source is a consumable and will get dimmer after long term use It s normal for an older LED light source to be dimmer than a newer one Please power on and off the projector by strictly follo...

Page 5: ...ies without recommendation by the manufacturer as it may result in potential risks Caution Precautions on air outlet Keep adequate clearance around the projector for its ventilation and cooling See figure be low for the least clearance requirements The least clearance is a MUST when the projector is placed within a cabinet or other closed environment 0 7 20cm 3 1m 3 1m 1 5 50cm Sides and bottom Re...

Page 6: ...e wall and ceiling mount racks for installation Use installation components approved by the manufacturer Be careful when moving the projector with cart Abrupt stops pushing too hard and rugged surfaces may topple the projector and the cart together FOR EU USERS The symbol mark and recycling systems described below apply to EU countries and do not apply to countries in other areas of the world The ...

Page 7: ...s expected by following operation instructions adjust it ac cording to given instructions Other invalid operations may damage the projector which requires the technician to spend more time before returning it back to normal e The projector falls off to ground or its casing is damaged f In case of any abnormal change in the projector during its use then maintenance services would be required In cas...

Page 8: ...le materials or sprayers near the projector Keep the air outlet one meter away from other objects DO NOT touch the area close to the air outlet especially the metal components e g screws This area and parts will get very hot once the projector starts oper ating DO NOT place any object atop the pro jector They may not only be damaged but also lead to fire after being over heated Cooling fans are de...

Page 9: ...360 projection vertically and horizontally Note Precautions on moving or shipping the projector DO NOT drop or impact the projector as it may get damaged or failed in operation Please employ proper container for movement Prohibit express or other shipping service provider personnel from shipping the projector with improper boxes The projector may become damaged Please consult the dealers for shipp...

Page 10: ...le on the pin face of the plug i e red or orange Fuse covers are available from the Parts Department indicated in the User Instructions If the plug supplied is not suitable for the socket outlet it should be cut off and destroyed The end of the flexible cord should be suitably prepared and the correct plug fitted WARNING A PLUG WITH BARED FLEXIBLE CORD IS HAZARDOUS IF ENGAGED IN A LIVE SOCKET OUTL...

Page 11: ... batteries AAA or LR3 VGA VIDEO HDMI MENU INPUT FREEZE MUTE BLANK LAMP PATTERN KEYSTONE TIMER INFO SCREEN IMAGE AUTO D ZOOM VOLUME VGA VIDEO HDMI MENU INPUT FREEZE MUTE BLANK LAMP PATTERN KEYSTONE TIMER INFO SCREEN IMAGE AUTO D ZOOM VOLUME Safety Information VGA Cable ...

Page 12: ...This chapter presents names and functions of individual component Overview ...

Page 13: ...jection lens Control panel Speaker Exhaust vent Rear Bottom Note Air exhaust emits hot air DO NOT place heat sensitive objects near it Anti thief bar Input Output terminal Remote controller receiver rear Kensington Security Slot Kensington is a registered trademark of ACCO Brands Corporation Intake vent AC power cord connector Exhaust vent Adjustable foot ...

Page 14: ...PERATURE 注意高温 PRECAUCION CALIENTE APPARECCHIO CALDO ATTENTION CHAUD WARNUNG HEISS 고온주의 157 161 0 OK Enter the OSD menu or select options in a menu CAUTION HIGH TEMPERATURE 注意高温 PRECAUCION CALIENTE APPARECCHIO CALDO ATTENTION CHAUD WARNUNG HEISS 고온주의 138 157 6 161 0 Input Select source of input CAUTION HIGH TEMPERATURE 注意高温 PRECAUCION CALIENTE APPARECCHIO CALDO ATTENTION CHAUD WARNUNG HEISS 고온주의 13...

Page 15: ...o use the USB display function when connected the projector to computer with USB cable USB A When using the Memory Viewer function insert the USB Flash Drive to this terminal directly RS232C Connect serial cable to this terminal when using RS232 device to control or operate the projector AUDIO IN Connect audio signals AUDIO OUT Output audio signals to amplifier or other audio equipment Remote Cont...

Page 16: ...value in screen menu Select the image display area in digital zoom mode OK Enter the menu or select an item in the menu KEYSTONE Correct the keystone distortion IMAGE Select the image mode FREEZE Freeze the projected image PATTERN Set the internal test image SCREEN Select the screen size LAMP Select the lamp mode MUTE Turn off the volume INFO Display the projector information D ZOOM Digital zoom i...

Page 17: ...ays replace batteries in sets Do not use a new battery with a used battery Avoid contact with water or liquid matter Do not expose the remote control to moisture or heat Do not drop the remote control If the battery has leaked in the remote control carefully wipe the case clean and install new batteries Risk of explosion if two batteries are replaced by an incorrect type Dispose of used batteries ...

Page 18: ...This chapter introduces the information of install Installation ...

Page 19: ...9 1750 2800 A Maximum 410 468 585 643 759 Minimum 432 493 615 676 799 B Maximum 80 138 255 313 429 Minimum 101 163 285 346 469 C Maximum 128 155 208 235 288 Minimum 184 219 289 324 393 D Maximum 276 303 357 383 437 Minimum 333 368 437 472 542 EK 351WST EK 352UST 16 9 Unit mm Screen size 70 80 100 110 130 Height Width Height Width Height Width Height Width Height Width 872 1550 996 1771 1245 2214 1...

Page 20: ...up to 2 of the width of the image Move lens to leftmost position The projection location of the image may be moved rightward a distance up to 2 of the width of the image Move lens to rightmost position Scope of lens shift adjustment Center of the lens Lens shift range When the setting of LENS SHIFT as the maximum position the corner of projection image might be darker Installation Lens shift adjus...

Page 21: ...m Cables used for connection VGA cable USB cable HDMI cable USB device Serial cable Cables are not supplied with the projector HDMI output HDMI cable USB device HDMI input RS232 input RS232 output Serial cable VGA input VGA output USB A output VGA output VGA cable VGA cable USB cable VGA cable VGA output VGA input USB B input USB A input VGA input ...

Page 22: ...ords of the projector and all external equipment before connecting any cable to them S video input S video output Video output Video input Component output Component input S video con version cable Com ponent con version cable Video cable HDMI cable HDMI output HDMI input ...

Page 23: ... external equipment before connecting any cable to them R L R L Audio cable Audio cable stereo Audio cable stereo Note The left and right channels are combined when there is only the L mono is inserted External audio equipment Audio input Audio input Audio input Audio output Audio output Audio output ...

Page 24: ... cable Do not use any other type of power cords or you may face the risks of electric shock In case you have any doubt on type of power cord you are using please call authorized dealer or service center for help Before powering on the projector get all external equipment connected in advance Keep the AC power socket close to the pro jector for easy plugging and unplugging Note Note Use of invalid ...

Page 25: ...This chapter introduces you to basic operation of the projector Operation ...

Page 26: ... PIN code the cursor would move to the Set selection Press the EN TER button and now you are ready to use the projector Or press button select Cancel to give up the setting If the password is invalid the password dis played as will be in red Please try again with a valid one Note In case the Logo Select option is set to OFF then no welcome image will display in screen You can do nothing but poweri...

Page 27: ... without stop As it may hurt the life cycle of the LED light source Power off the pro jector at least once every 24 hours and have it idle for an hour Power off Power off message disappears in 4 seconds Note If the On Start function is set to On the projector will power on once it is connected to an AC power socket Refer to page 43 Speed of the cooling fan varies with internal temperature of the p...

Page 28: ...us of the image Lens shift function Perform the lens shift adjustment with H V knob manually Use a screwdriver to rotate the V knob the screen may deviate up and down from the central axis of lens shift 3 elevation of the display Use a screwdriver to rotate the H screw the screen may deviate left and right from the central axis of lens shift 2 width of the display FOCUS ZOOM Len shift H Len shift ...

Page 29: ...n existence The arrow mark indicating the adjustment direction turns red The arrow mark disappears when the maximum adjustment limit reaches The keystone adjustment will be canceled if you press the keystone adjustment button when it is displaying The adjustable range is subject to source of signal input Basic operation H V Keystone Corner correction Curved correction Reset value H V Keystone Adju...

Page 30: ...unction Mute the sound MUTE Press MUTE button on the remote control to turn off the volume Press MUTE button again or VOL button to cancel mute function Blank BLANK Press the BLANK button on remote controller a blank screen displays to replace existing image Press the BLANK button or any other button to restore the image Press the BLANK to toggle switch the screen as shown below BLANK Normal BLANK...

Page 31: ...o Memory Viewer Network or USB Display then press the OK button Input select menu Remote control When input source is from equip ment connected to HDMI 1 terminal with HDMI cable please select HDMI 1 When input source is from comput er connected to VGA IN 2 YPbPr S VIDEO terminal with VGA cable please select VGA 2 When input source is from equip ment connected to HDMI 2 MHL terminal with HDMI cabl...

Page 32: ...n USB Display Memory Viewer and Network FREEZE ASPECT IMAGE AUTO SETUP TEST PATTERN and SCREEN function cannot work Select it when the video input signal is connected to VGA IN 2 YPbPr S VIDEO terminal via S Video to VGA adaptor cable S video When input source is from device connected to USB A terminal please select Memory Viewer Memory Viewer VGA VIDEO HDMI MENU INPUT FREEZE MUTE BLANK LAMP PATTE...

Page 33: ...3 Press button to select required sub menu then press OK button or button to set up or enter an option 4 Press button to select settings or navigate options then press OK button to act on the item and exit 5 Press button to return to mainmenu Press the MENU button on remote control ler or control panel to exit the OSD OK Menu Menu OK Basic operation Main menu Sub menu Display Auto PC adj Fine sync...

Page 34: ...lock Contrast optimization Remote control Sound and HDMI setup For video input the setting options are On start Standby mode High land Light source mode Cooling fast Closed caption Key lock Contrast optimization and Sound For HDMI input the setting options are On start Standby mode High land Light source mode Cooling fast Key lock Contrast optimization Sound and HDMI setup Expend Setting the Langu...

Page 35: ...ton to confirm the choice Note The projector executes the Auto PC adjustment automatically when the computer signals input the projector for the first time Auto PC adjustment may not work depending on the model of the computer and the input signal The Auto PC adjustment cannot be operated when 480i 576i 480p 576p 720p 1080i or 1080p is selected in the Display menu System or when the signal is comi...

Page 36: ...o minimize the amount of interference From 15 to 15 Note H Size must be set before adjust Fine sync Aspect Press button to select the item to set the screen size to fit the image while maintaining the aspect ratio of the input signal Normal Projects the image at the maximum size while maintaining the aspect ratio of the input signal Wide Projects the image at 16 9 aspect ratio Full To provide an i...

Page 37: ... of the screen Center Menu locates at the center of the screen Lower left Menu locates on lower left of the screen Lower right Menu locates on lower right of the screen Background display Press button to select the screen background of the projector when there is no signal detected Black Select black background Blue Select blue background Project way menu Display Auto PC adj Fine sync H Position V...

Page 38: ...manual adjustment is required There is no signal input from computer Check the connection between the computer and projector When input source as VIDEO or S Video Auto The projector may auto detect the input video system and adjust to the optimum status For PAL M or PAL N video system select the sys tem manually PAL SECAM NTSC NTSC4 43 PAL M PAL N If image cannot be displayed correctly you may nee...

Page 39: ...ntrast Press button to decrease contrast press button to increase contrast Brightness Press button to decrease brightness press button to increase brightness Color Temp Press button to select required color temperature High Blueish image color Mid Natural image color Low Reddish image color Red Press button to lighten red tint and button to darken it Green Press button to lighten green tint and bu...

Page 40: ...h excellent detail and clarity for medi cal training presentations and conferences Colorboard Image mode suitable for image projecting on surface of wall in red blue yellow or green User Image Default image mode set by users in the Image Adjust menu Contrast Press button to decrease contrast press button to increase contrast Brightness Press button to decrease brightness press button to increase b...

Page 41: ...ltitude Note Please change the setting as ON while operating the projector at an altitude around 1400 2700m Light source control Change the brightness of the projection Normal Normal brightness Eco Lower brightness reducing power consumption and extending the life time of the light source Cooling fast provides the following options in the cooling fans operation after turning off the projector Norm...

Page 42: ...up menu if the image is not projected properly Image 64 940 For the video device 0 1023 For the computer device Note The optimal setting varies depending on the out put setting of the connected external device Refer to the operation instruction of the external device regarding the output of the external device Sound HDMI The image and audio are transmitted while input signal from video device Comp...

Page 43: ...anese Simplified Chinese Traditional Chinese Korean Russian Arabic Turkish Finnish Norwegian Danish Indonesian Hungarian Czech Kazakh Vietnamese Thai and Farsi Auto setup Auto setup Press AUTO button on the remote control to execute Input search Auto PC adj and Auto keystone functions Input search Allows you to automatically detect input signals It stops when a signal is found Press button to sele...

Page 44: ...ed image is distorted Store The keystone correction will be kept when plug out the power cord or turn off the projector Reset When Standby mode is set to Eco plug out the power cord or turn off the projector the keystone correction will be canceled When Standby mode is set to Normal plug out the power cord the keystone correction will be canceled turn off the projector the keystone correction will...

Page 45: ...or adjustments with Keystone However the image quality will degrade and it will get harder to focus with more correction Install the projector so that the correction will be as small as possible Screen size will also change when H V Keystone is used to perform various adjustments Aspect ratio of the image size may shift depending on the correction Curved correction EK 351WST only Adjust when the l...

Page 46: ...ber and then press the OK button to enter this number the cursor automatically move to next box If you fixed an incorrect number press MENU button to reset it again Repeat this step to complete entering a three digit number After entering the three digit number the cursor automatically move to Set and press the OK button then you can start to operate the projector If you entered an incorrect PIN c...

Page 47: ... second Enter the correct PIN code all over again PIN code change The PIN code can be changed to three digit number Press button to select PIN code change Pin code dialog box appears Press button to enter the correct code The New PIN code input dialog box appears Set a new PIN code CAUTION WHEN YOU HAVE CHANGED THE PIN CODE WRITE DOWN THE NEW PIN CODE IN COLUMN OF THE PIN CODE NO MEMO ON PAGE 87 A...

Page 48: ... be turned on if the input signal is reconnected or any button on the remote control or control panel is pressed Shut down When the LED light source has been fully cooled down the power will be turned off Off Disable the Power management function Timer If the input signal is interrupted and no button is pressed for more than 30 seconds the timer display with No signal appears It starts the countdo...

Page 49: ...network address DHCP set is displayed as On and obtain network address automatically If familiar with network you can set DHCP as Off and obtain network address manually 3 Enter network settings menu 1 Press MENU button on the remote control to display screen menu Press button to select Expand and then press the OK button 2 Press button to select Network and then press the OK button to enter the n...

Page 50: ...of Network This function returns all setting values except for the PIN code lock Logo PIN code lock Light source counter and Filter counter to the factory default settings Note The captured user logo image is deleted when factory default is executed Factory default ENTER 192 168 1 100 Move Next Back MENU ENTER Network setting DHCP Off IP address Subnet Gateway DNS LAN Set Cancel 255 255 255 0 192 ...

Page 51: ...OK button Set the sort order of the slide show Extend Order Sort files or folders in extended order Size Order Sort files or folders in amount of data order Time Order Sort files or folders in stored time order Sort Order Set the rotate direction of image No Rotate Rotate is disabled 270 Degrees Rotate 270 degrees in anti clockwise direction 180 Degrees Rotate 180 degrees 90 Degrees Rotate 90 degr...

Page 52: ...Computer 1 1024 x 768 60Hz 48 24 kHz 60 06 Hz 2 H Ready 5 Min Standard EK 351WST Input The selected input source is displayed H sync freq The horizontal frequency of the input signal is displayed in KHz or KHz when no signal is detected V sync freq The vertical frequency of the input signal is displayed in Hz or Hz when no signal is detected Light source status The setting status of Light source m...

Page 53: ...Description on using useful function ...

Page 54: ...Obtain network address DHCP set is displayed as on and obtain network address automatically If familiar with network you can set DHCP as close and obtain network address manually Expend Network Network setting Network information MAC address IP address 7C 6F F8 4E 48 A8 192 168 1 100 Network setting DHCP On Set Cancel IP address Subnet Gateway DNS Move Next Back LAN MENU ENTER 3 Enter network sett...

Page 55: ...trol is not displayed consult the network administrator 7 Items in Network Display System page including System Status General Setup Picture Setup Image Setup and Network Setup System Status The System Status page is displayed by clicking this item General Setup The General Setup page is displayed by clicking this item Picture Setup The Picture Setup page is displayed by clicking this item Image S...

Page 56: ...Versions Displays the version of the firmware of the projector Enter Old password Enters the configured password Enter New password Enters the new password Confirm New password Enters the wanted new password again for confirmation Apply Updates the settings Power Switches on off the power of the projector Source Select Switches the input source of the projector LAN Status Displays the connection s...

Page 57: ... the projected image Fine sync Adjusts the fine sync of the projected image H Position Adjusts the horizontal position of the projected image V Position Adjusts the vertical position of the projected image H Size Adjusts the total number of dots of the projected Freeze Switches the freeze function between on and off Auto PC adj Executes the Auto PC adj function V Keystone Corrects the keystone in ...

Page 58: ...lly if you want to enable the DHCP client IP Address Enter the IP address when not using a DHCP server Subnet Enter the subnet mask when not using a DHCP server Gateway Enter the default gateway address when not using a DHCP server DNS Enter the DNS server when not using a DHCP server Apply Updates the settings ...

Page 59: ...Download to download the PwPresenter software according to the operation system 2 Launch the pwPresenter software Search for projector display Click to enter Search select the projector and connect it Please setting the same IP address of the projector in pwPresenter software such as 192 168 1 100 Both the initial name and passwords are admin Note Before use PwPresenter software to search you need...

Page 60: ...work port etc Parameters Setting Basic Setting Setting language region of capture image etc Global Setting Setting remote control capture by audio or screen etc Choose capture mode Choose a capture mode from Full Screen Fixed Size or Alterable Play Pause Play or pause the selected image ...

Page 61: ...1 Description on network display operation Multicast Setting Setting Sound volume Bandwidth and Capture rate etc Network Display Management Setting device and password management Disconnect the projector ...

Page 62: ...B memory into the USB A terminal of the projector directly the standby screen of please press RC ENTER appears when the USB memory icon is displayed on the screen 3 Press the OK button on the remote control the root directory of the USB memory will appear in thumbnail on the screen It will display a picture when play the picture manually every time 1 Press to select a file on the thumbnail screen ...

Page 63: ... levels of magnification Press on the remote control to move the display screen up and down Remove the display screen up down left and right by button on the remote control Exit the PDF file and return to the thumbnail screen 5 5 5 5 GO 1 GO 1 1 6 5 5 5 5 GO 1 GO 1 1 6 5 5 5 5 GO 1 GO 1 1 6 5 5 GO 1 GO 1 1 6 5 5 GO 1 GO 1 1 6 5 5 GO 1 GO 1 1 6 GO 1 GO 1 1 6 1 6 5 5 5 5 GO 1 GO 1 1 6 5 5 5 5 GO 1 G...

Page 64: ...it USB Display 3 Click the driver icon in the task bar of computer and select one item in Pop up menu Projecting the USB Display 1 Connect the Micro USB terminal of the projector to a computer with a USB converting cable 2 Press the Input button on the remote controller or control panel to switch the input source as USB Display The startup screen will be displayed automatically due to the driver w...

Page 65: ...l of the projector to a computer with a USB converting cable 2 Press the INPUT button on the remote control or Control panel to switch the input source to USB Display The image on the computer screen is projected Pop up menu is only displayed in English The item which is displayed in gray is unavailable OS Mac OS X 10 5 10 6 10 7 or newer version CPU Power PC G4 1GHz or faster Amount of memory 512...

Page 66: ...This chapter describes the regular maintenance procedure of the projector to ensure its optimal operation status for long Maintenance ...

Page 67: ... following Is adequate clearance provided for the projector s ventilation Check the installation status and any air outlet block Is the projector installed at location close to outlet of air conditioning equipment Keep the pro jector away from air outlet of air conditioning equipment Is the filter in clean condition Please clean the filter regularly The STATUS indicator turns red and the projector...

Page 68: ...tor and shorten its life cycle Clean the filter immediately whenever the Filter Warning icon displays Please follow these steps to clean the filter 1 Power off the projector and unplug from AC power source 2 Remove the filter from the filter cover 3 Gently clean it with a brush 4 Insert the filter Make sure it has been fully inserted Clean casing of the projector Wipe the casing surface with clean...

Page 69: ...t place of dust and smoke That may affects image quality Using the projector in place of dust and smoke may lead to piling dusts on lens LCD panel and lens components within it In case like this call the dealer or service center for correct cleaning Note Reset the filter counter after its cleaning or replacement Reset the filter counter Expend Filter counter Filter counter Timer Filter counter res...

Page 70: ...Appendix ...

Page 71: ...n distance The projection lens requires cleaning Moving the projector from a colder environment to a hotter one may result in condensing on the lens If this is the case wait until the condensing water evaporated before powering on the projector Image mirror reflected Image turns upside down Check the Ceiling and Rear settings Check the Ceiling settings Image looks dim Check for contrast and bright...

Page 72: ...ojector and the remote controller Make sure the remote controller is not too far away from the projector The maximum operation range is 5m Make sure the remote controller and the projector are paired with the same remote control codes Disable the key lock on remote controller function in the Safety option of the Setting menu Indicator turns on or flashes Check status of the projector according to ...

Page 73: ... projector If it powers off again please un plug the cord and call the dealer or service center for mainte nance or inspection Do not let it continue operating as this may lead to electric shock or fire The projector detects LED light source abnormality and cools down The projector detects LED light source abnormality and switches into standby mode The projector cannot power on as its internal tem...

Page 74: ...0 19 640x480 75Hz 37 500 75 000 31 500 20 640x480 85Hz 43 269 85 008 36 000 21 800x600 56Hz 35 156 56 250 36 000 22 800x600 60Hz 37 879 60 317 40 000 23 800x600 72Hz 48 077 72 188 50 000 24 800x600 75Hz 46 875 75 000 49 500 25 800x600 85Hz 53 674 85 061 56 250 26 832x624 75Hz 49 725 74 550 57 283 27 1024x768 60Hz 48 363 60 004 65 000 28 1024x768 70Hz 56 476 70 069 75 000 29 1024x768 75Hz 60 023 75...

Page 75: ...g field synchronizing 3 Blue Input output 11 Grounding 4 12 DDC data 5 Grounding line synchronizing 13 Horizontal synchronizing compound sync input output 6 Grounding red 14 Vertical synchronizing input output 7 Grounding green 15 DDC Clock 8 Grounding blue SERIAL Terminal D SUB 9 1 6 2 RXD 7 3 TXD 8 4 9 5 GND LAN Terminal 8765432 1 1 TX 5 2 TX 6 RX 3 RX 7 4 8 HDMI Terminal HDMI Type A 19 1 2 4 6 ...

Page 76: ...o ceiling Front Auto ceiling Rear Front Menu position Upper Left Upper Righ Center Lower Left Lower Right Upper Left Background display Black Blue Blue System Auto PAL SECAM NTSC NTSC4 43 PAL M PAL N PAL 60 verify by input source S Video Input Video Input Color adjust Image mode Standard Dynamic Bright User Image Cinema Blackboard Green DICOM Colorboard Standard Contrast 0 63 32 PC Input Brightnes...

Page 77: ...caption Off CC1 CC2 CC3 CC4 Off Key lock Off Projector Remote controller Off Contrast optimization On Off Off Sound Volume 0 25 12 Mute On Off Off HDMI Setup Image 64 940 0 1023 0 1023 Sound HDMI HDMI Computer HDMI EQ setup 0 5 Expand Language Projector provides multiple language support English Auto Setup Input Search On Off On Auto PC Adj On Off On Auto Keystone Off Off AUTO Manual Keystone Keys...

Page 78: ...lor bar Red Green Blue Cross hatch White Black Raster gray Off Network Network setting LAN DHCP On Off Off IP address Subnet 255 255 255 0 Gateway 192 168 1 1 DNS 192 168 1 1 Network status MAC address IP address 192 168 1 100 Factory default Memory Viewer Set slide Slide transition effect Slide down Slide right Slide right Sort order Extend name order Size order Time order Name order Name order R...

Page 79: ...nu Setting Remarks Info Input H sync Freq V sync Freq Light source status Light source counter Power management Image mode Projector name Input VGA 1 VGA 2 HDMI1 HDMI 2 MHL Component Video S video Memory Viewer Network USB display ...

Page 80: ... pin x1 HDMI HDMI A type 19 pin x2 one is compatible with MHL LAN RJ45 x1 100 Base TX 100Mbps 10 Base T 10Mbps USB connector USB A x1 USB B x1 AUDIO 3 5mm Mini Type Stereo x2 RCA L R x2 VIDEO RCA x1 RS232 terminal D sub 9 pin x1 Power Voltage and power consumption AC 100 240 V Max 5 5A 50 60 Hz Fuse 10A 250V Internal speaker 10W RMS 8ohm 2 Operating Environment Operating temperature 0 C 40 C Stora...

Page 81: ...control Annex Chemical Substances table This table is made according to SJ T 11364 specifications The contents of toxic and hazardous substances in all homogeneous materials of this part is below the limit requirement in GB T 26572 The contents of toxic and hazardous substances in at least one of the homogeneous materials of this part is above the limit requirement in GB T 26572 ...

Page 82: ...82 Dimensions Unit mm Screw Holes for Ceiling Mount Screw M4 Depth 10 0 Appendix ...

Page 83: ...ot or lost the number and unable to operate the projector contact the service center PIN code lock Logo PIN code Lock No Factory default PIN code 111 Factory default PIN code 111 If this 3 digit number is changed the factory default number will be ineffective PIN code memorandum ...

Page 84: ...o eiki de Eastern Europe EIKI CZECH SPOL s r o Nad Cementárnou 1163 4a Praha 4 Podolí 147 00 Czech Republic Tel 420 241 410 928 420 241 403 095 Fax 420 241 409 435 E Mail info eiki cz South East Asia EIKI Industrial M Sdn Bhd No 11 Nouvelle Industrial Park Lorong Teknologi B Taman Sains Selangor 1 Kota Damansara PJU5 47810 Petaling Jaya Selangor Darul Ehsan Malaysia Tel 60 3 6157 9330 Fax 60 3 615...

Reviews: