background image

18

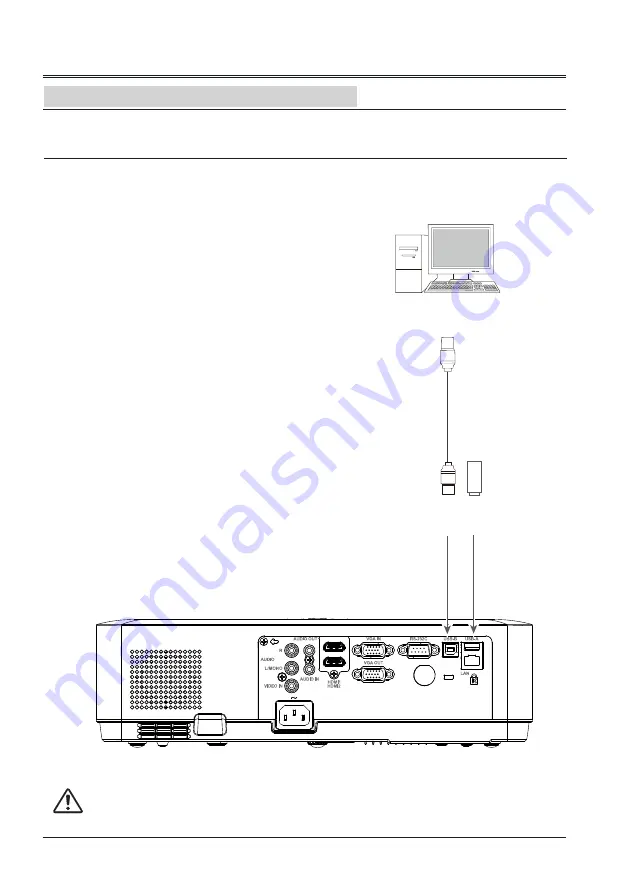
USB-B 
cable

USB-A 

output

USB-B 

input

USB-A 

input

      USB-A device

Installation

Connecting to USB device (USB-A, USB-B)

Cables used for connection:

● USB-B cable*                                                   

(*=Cables are not supplied with the projector)

Unplug the power cords of both the projector and external equipment from the AC outlet 

before connecting the cables.

Summary of Contents for EK-120 Series

Page 1: ...OWNER S MANUAL EK 120UK EK 122X ...

Page 2: ...itional Chinese Korean Russian Arabic Turkey Finland Norway Denmark Indonesia Hungary Czech Republic Kazakhstan Vietnamese Thai Farsi Helpful Maintenance Functions Filter maintenance functions provide for better and proper maintenance of the projector Security Function The Security function helps you to ensure security of the projector With the Key lock function you can lock the operation on the t...

Page 3: ...ect 31 Project Way 31 Menu Position 32 Background Display 32 System 33 Color adjust 34 Image Mode 34 Color adjust Computer 35 Color adjust Video 36 Setting 37 On start 37 Standby mode 37 High land 38 Lamp control 38 Cooling fast 38 Closed Caption 39 Key lock 39 Iris 40 Sound 40 HDMI setup 41 Expand 42 Language 42 Auto setup 42 Keystone 43 Logo 45 Security 46 Power management 47 Filter counter 47 T...

Page 4: ...it may result in fire hazard Leave an appropriate space from the top sides and back of the shell in order to ventilate and cool down the projector The figures below indicate the minimum distance to be left It must be satisfied if the projector is placed in sealed environment like a cabinet 0 7 20cm 1 5 50cm 3 1m 3 1m Do not cover the vent of the projector Poor radiation may shorten the service lif...

Page 5: ...y kind on the projector Do not install the projector near the ventilation duct of air conditioning equipment This projector should be operated only from the type of power source indicated on the marking label If you are not sure of the type of power supplied consult your authorized dealer or local power company Do not overload wall outlets and extension cords as this can result in fire or electric...

Page 6: ...ll the projector over 10o from side to side Do not point the projector up to project an image Do not point the projector down to project an image Do not put the projector on either side to project an image Only qualified personal is authorized for ceiling installation We are not responsible for the hurt and damage caused by ceiling bracket that purchased from unauthorized dealer even in warranty p...

Page 7: ...he plug which is marked by the letter E or by the safety earth symbol or coloured green or green and yellow The wire which is coloured blue must be connected to the terminal which is marked with the letter N or coloured black The wire which is coloured brown must be connected to the terminal which is marked with the letter L or coloured red WARNING THIS APPARATUS MUST BE EARTHED THE SOCKET OUTLET ...

Page 8: ...ANK LAMP PATTERN KEYSTONE TIMER INFO SCREEN IMAGE AUTO D ZOOM VOLUME FREEZE MUTE BLANK LAMP PATTERN KEYSTONE TIMER INFO SCREEN IMAGE D ZOOM VOLUME VGA VIDEO HDMI MENU INPUT FREEZE MUTE BLANK LAMP PATTERN KEYSTONE TIMER INFO SCREEN IMAGE AUTO D ZOOM VOLUME FREEZE MUTE BLANK LAMP PATTERN KEYSTONE TIMER INFO SCREEN IMAGE D ZOOM VOLUME Accessories ...

Page 9: ... thief bar AC cord connector Remote control receiver rear Kensington Security Slot Adjustable foot Exhaust vent Caution Caution Hot air is exhausted from the exhaust vent Do not put heat sensitive objects near this side Kensington Security Slot is for a Kensington lock used to deter theft of the projector Kensington is a registered trademark of ACCO Brands Corporation ...

Page 10: ...Display function Refer to Page 62 63 USB A When using the Memory Viewer function insert the USB memory directly to this terminal Refer to Page 60 61 VIDEO IN This is the terminal to input video signals AUDIO IN This is the terminal to input computer audio signals VGA OUT Output the analog signal form to other monitor Remote Control receiver BACK Operation the projector by remote control Kensington...

Page 11: ...e It lights green during normal operations It flashes green during the Power management mode It flashes red during fans cooling It turns steady green yellow while the power is abnormal UP DOWN VOL VOL Select an item or adjust the value in the screen menu Select the image display area in D zoom mode Increase or decrease volume MENU Open or close the screen menu POWER Turn on off the projector OK En...

Page 12: ...n screen menu Select the image display area in digital zoom mode OK Enter the menu or select an item in the menu KEYSTONE Correct the keystone distortion IMAGE Select the image mode FREEZE Freeze the projected image PATTERN Set the internal test image SCREEN Select the screen size LAMP Select the lamp mode MUTE Turn off the volume INFO Display the projector information D ZOOM Digital zoom in zoom ...

Page 13: ...ith a used battery Avoid contact with water or liquid matter Do not expose the remote control to moisture or heat Do not drop the remote control If the battery has leaked in the remote control carefully wipe the case clean and install new batteries Risk of explosion if two batteries are replaced by an incorrect type Dispose of used batteries according to the instructions on the battery or local re...

Page 14: ...58m 5 95m 6 11m 8 93m 9 18m 10 74m 11 04m A B 8 71 1 30 Diagonal Inch Max Min Center 0 89m 0 97m 3 02m 3 29m 4 54m 4 95m 6 06m 6 60m 9 10m 9 92m 10 94m 11 92m A B 6 00 1 Note The data in is the project distance for 16 9 aspect ratio Note The data in is the project distance for 16 9 aspect ratio XGA model 16 9 4 3 Screen size WxH mm 16 9 aspect ratio 30 100 150 200 300 664x374 2214x1245 3321x1868 4...

Page 15: ...ossover type HDMI cable Cables are not supplied with the projector Unplug the power cords of both the projector and external equipment from the AC outlet before connecting the cables HDMI output HDMI cable HDMI input RS232 input RS232 output Serial cable VGA output VGA input VGA cable VGA cable VGA input VGA output ...

Page 16: ...or connection Video cable HDMI cable Cables are not supplied with the projector Video output Video input Video cable Unplug the power cords of both the projector and external equipment from the AC outlet before connecting the cables HDMI output HDMI cable HDMI input ...

Page 17: ...rted External audio equipment Unplug the power cords of both the projector and external equipment from the AC outlet before connecting the cables Installation Connecting to audio equipment Cables used for connection Audio cable Cables are not supplied with the projector Audio output Audio input Audio input Audio input Audio output Audio output ...

Page 18: ... A device Installation Connecting to USB device USB A USB B Cables used for connection USB B cable Cables are not supplied with the projector Unplug the power cords of both the projector and external equipment from the AC outlet before connecting the cables ...

Page 19: ...the projector is connected to an outlet with AC power cord it is in stand by mode and consumes a little electric power Note Using incorrect power cord may influence the product performance or even cause hazards like an electric shock or fire To ensure the product performance and security please apply the cable of the same model with the original one Note on the power cord AC power cord must meet t...

Page 20: ... then number changes to automatically move the cursor to next box If you fixed an incorrect number press MENU button to reset it again Repeat the steps to complete entering a three digit number After entering the three digit number automatically move the cursor to Set press the OK button then you can start to operate the projector If you entered an incorrect PIN code the number turn red PIN code w...

Page 21: ...ccording to the temperature inside the projector Do not put the projector in a case before it is cooled enough If the POWER indicator flashes or emits a red light see page 76 While the POWER indicator is flashing the lamp is being cooled down and the projector cannot be turned on Wait until the POWER indicator turns red to turn on the projector again The fan rotation will terminate directly if the...

Page 22: ...omatically below settings Page 42 Auto PC adj ON Auto keystone Manual Rotate the ZOOM ring to zoom in or zoom out the image Rotate the FOCUS ring to adjust the focus of the image Basic operation VGA VIDEO HDMI MENU INPUT FREEZE MUTE BLANK LAMP PATTERN KEYSTONE TIMER INFO SCREEN IMAGE AUTO D ZOOM VOLUME FOCUS ring Front ZOOM ring Back Remote control AUTO button ...

Page 23: ...rows turn red and can be adjusted quickly The arrows disappear at the maximum correction If you press the KEYSTONE button on the remote control once again while the keystone dialog box is being displayed the keystone adjustment is canceled The adjustable range can be limited depending on the input signal H V Keystone H V Keystone Adjusts when the horizontal or vertical trapezoid of the projected i...

Page 24: ...button to enter the submenu entry 2 Press button to select Sound and then press the OK button 3 Press button to select Volume or Mute to adjust Basic operation Direct operation Volume Press the VOLUME buttons on the remote control or top control to adjust the volume Mute Press the MUTE button on the remote control and select On to turn off the audio temporarily To restore the audio to its previous...

Page 25: ...ress MUTE button again or VOLUME button to cancel mute function VGA VIDEO HDMI MENU INPUT FREEZE MUTE BLANK LAMP PATTERN KEYSTONE TIMER INFO SCREEN IMAGE AUTO D ZOOM VOLUME IMAGE button Press IMAGE button on the remote control to select the image mode you want Dynamic Standard Cinema Blackboard Green Colorboard User Image VOLUME button Press VOLUME button on the remote control to increase or decre...

Page 26: ... SCREEN button on the remote control to select the screen size you want Normal Wide Full Full is not available for EK 120UK Blank disappears after 2 seconds if there is no other button operation SCREEN TIMER Blank Image Blank 02 02 D ZOOM Basic operation TIMER button Press TIMER button The timer display 00 00 appears on the screen and the timer starts to count time 00 00 59 59 To stop the Timer pr...

Page 27: ...ewer or USB Display then press the OK button Input select menu Remote control VGA VIDEO HDMI MENU INPUT FREEZE MUTE BLANK LAMP PATTERN KEYSTONE TIMER INFO SCREEN IMAGE AUTO D ZOOM VOLUME VIDEO HDMI VGA INPUT When input source is from equipment connected to HDMI terminal with HDMI cable please select HDMI When input source is from equipment connected to HDMI 2 terminal with HDMI cable please select...

Page 28: ...ms Press the OK button for corresponding operation 5 Press button on the remote control or top control to go back to the previous menu Press MENU button again to exit the screen menu Display Auto PC adj Fine sync H Position V Position H Size Aspect Project way Menu position Background display System 17 0 0 0 Normal Front Center Blue 1024 x 768 60Hz Basic operation How to operate the screen menu Th...

Page 29: ...e R G B and Sharpness If video equipment is selected as a signal source the following image adjusting options are available Contrast Brightness Color Tint White balance R G B and Sharpness Setting Configure basic operation settings of the projector On start Standby mode High land Lamp control Cooling fast Closed caption Key lock Iris Sound and HDMI setup Expand Configure expand operation settings ...

Page 30: ...to select Auto PC adj then press the OK button Please wait will be displayed on the screen the Auto PC adj function will be executed Fine sync H Position V Position H Size Note The adjustment of Fine sync H Position V Position and H Size is only for computer signal input You can cut off flicker from the image displayed by pressing to adjust the value from 0 to 31 Press to adjust the horizontal ima...

Page 31: ... rear screen and modify as front standing or ceiling automatically Project Way Display Aspect You can set a screen size to fit the image while maintaining the aspect ratio of the input signal 1 Press to select Aspect and then press the OK button 2 Press button to select the item then press the OK button Normal Projects the image at the maximum size while maintaining the aspect ratio of the input s...

Page 32: ...ss the OK button 2 Press button to select Menu position press the OK button 3 Press button to select the item you want to set press the OK button Upper left Menu locates on upper left of the screen Upper right Menu locates on upper right of the screen Center Menu locates at the center of the screen Lower left Menu locates on lower left of the screen Lower right Menu locates on lower right of the s...

Page 33: ...CAM NTSC NTSC 4 43 PAL M PAL N and PAL60 Display System AUTO PAL SECAM NTSC NTSC4 43 PAL M PAL N PAL60 System for Video or S video signal Display Auto PC adj Fine sync H Position V Position H Size Aspect Project way Menu position Background display System 17 0 0 0 Normal Front Center Blue 1024 x 768 60Hz System System menu System Computer system select The projector automatically tunes to various ...

Page 34: ...utton to select the item you want to set press the OK button Cinema For watching movies with multiple gray scale levels Blackboard Green For viewing the image projected on a blackboard green by enhancing the image quality This is mainly effective on a green colored board instead of a black colored board Colorboard For images projected onto a red blue yellow or green wallpaper User Image Image qual...

Page 35: ... Low Mid and High Red White balance Press to lighten the red tone and to deepen it Green White balance Press to lighten the green tone and to deepen it Blue White balance Press to lighten the blue tone and to deepen it Sharpness Press to decrease the sharpness of the image and to increase it 1 Press MENU button on the remote control or top control to display screen menu Press button to select Colo...

Page 36: ... green tone and to deepen it Blue White balance Press to lighten the blue tone and to deepen it Sharpness Press to decrease the sharpness of an image and to increase it 1 Press MENU button on the remote control or top control to display screen menu Press button to select Color adjust then press the OK button 2 Press button to select the item you want to set press the OK button 3 Press button to ad...

Page 37: ...ojection immediately enter countdown display Off Start up in the standby mode This function is available when operating the projector via network Press button to select the item below ECO Choose Eco to save power consumption Normal Choose Normal to return to normal standby Network Choose Network as network standby mode 1 Press MENU button on the remote control or top control to display screen menu...

Page 38: ...l 90 sec Normal cooling speed 60 sec Faster and lounder than Normal cooling time is shorter 0 sec Enable you directly unplug the AC power cord after turning off the projector no need waiting for cooling Note When it is set to 0 sec you cannot restart the projector immediately after the power off The lamp remains high temperature and needs to be cooled so it takes longer time than usual for the lam...

Page 39: ...to be displayed for the audio contents or other information If the input source contains closed caption you can enable this function and change the channel Press to select Off CC1 CC2 CC3 or CC4 Note The icon of Closed Caption is displayed in grey when it is disable Closed caption is disable when screen menu or Timer displayed on screen If the top control accidentally becomes locked and you do not...

Page 40: ...s used to adjust the volume Sound Press button to increase the volume press button to decrease the volume 0 25 Mute Press button to switch mute function On Off Sound Iris Setting On start Standby mode High land Lamp control Cooling fast Closed caption Key lock Iris Sound HDMI Setup Off Eco Off Normal Off On Setting Iris Sound Setting Sound Volume Mute 12 Off ...

Page 41: ...to HDMI terminal if the image is not projected properly please switch the settings of Image or Sound in HDMI setup menu Setting On start Standby mode High land Lamp control Cooling fast Closed caption Key lock Iris Sound HDMI Setup Off Eco Off Normal Off On Note The optimal setting varies depending on the output setting of the connected external device Refer to the operation instruction of the ext...

Page 42: ...uto setup Keystone Logo Security Power management Filter counter Test pattern Network Factory default Lamp counter Press AUTO button on the remote control to execute Auto PC adj and Auto keystone functions Input search Allows you to automatically detect input signals when the signal is available Press button to select an option below On Enabled This function is used to detect input signals automat...

Page 43: ...torted Store The keystone correction will be kept when plug out the power cord or turn off the projector Reset When Standby mode is set to Eco plug out the power cord or turn off the projector the keystone correction will be canceled When Standby mode is set to Normal plug out the power cord the keystone correction will be canceled turn off the projector the keystone correction will be kept Keysto...

Page 44: ...age quality will degrade and it will get harder to focus with more correction Install the projector so that the correction will be as small as possible Screen size will also change when H V Keystone is used to perform various adjustments Aspect ratio of the image size may shift depending on the correction Reset value Return the corrected values to the factory default values Press to select Reset v...

Page 45: ...r automatically move to next box If you fixed an incorrect number press MENU button to reset it again Repeat this step to complete entering a three digit number After entering the three digit number the cursor automatically move to Set and press the OK button then you can start to operate the projector If you entered an incorrect PIN code the number turn red it will be reset automatically within o...

Page 46: ...tomatically move to next box If you fixed an incorrect number press MENU button to reset it again Repeat this step to complete entering a three digit number After entering the three digit number the cursor automatically move to Set and press the OK button then you can change the PIN code lock setting If you entered an incorrect PIN code the number turn red it will be reset automatically within one...

Page 47: ...ollowing options Ready When the lamp has been fully cooled down the POWER indicator changes to green blinking In this condition the projection lamp will be turned on if the input signal is reconnected or any button on the remote control or top control is pressed Power off When the lamp has been fully cooled down the power will be turned off Off Power management function is off Timer If the input s...

Page 48: ... and obtain network address automatically If familiar with network you can set DHCP as Off and obtain network address manually 3 Enter network settings menu Expend Language Auto setup Keystone Logo Security Power management Filter counter Test pattern Network Factory default Lamp counter Filter check Check the temperature iside the projector and make reactions On enable the filter check function w...

Page 49: ...fault settings This function resets the counter of Lamp usage hours Please be sure to reset the lamp counter after replacing the lamp WARNING indicator turns Off and the lamp replacement icon disap pears after reset the lamp counter Press MENU button on the remote con troller or on the top control panel to display the OSD menu Press button to select the Expand menu then press OK or button 1 Press ...

Page 50: ...ory Viewer then press the OK button 3 Press button to select the item you want to set press the OK button 4 Press button to adjust the item then press the OK button Set the sort order of the slide show Extend Order Sort files or folders in extended order Size Order Sort files or folders in amount of data order Time Order Sort files or folders in stored time order Name Order Sort files or folders i...

Page 51: ...Power management Image mode Computer 1 1024 x 768 60Hz 48 24 kHz 60 06 Hz 2 H Ready 5 Min Standard Input The selected input source is displayed H sync freq The horizontal frequency of the input signal is displayed in KHz or KHz when no signal is detected V sync freq The vertical frequency of the input signal is displayed in Hz or Hz when no signal is detected Lamp status The setting status of Lamp...

Page 52: ...displayed as on and obtain network address automatically If familiar with network you can set DHCP as close and obtain network address manually 3 Enter network settings menu 1 Press MENU button on top control or remote control to display screen menu Press button to select Expand icon then press the OK button 2 Press button to select Network setting and press the OK button enter the network setting...

Page 53: ...l is not displayed consult your network administrator 7 Items in Network Display System page including System Status General Setup Picture Setup Image Setup and Network Setup System Status The System Status page is displayed by clicking this item General Setup The General Setup page is displayed by clicking this item Picture Setup The Picture Setup page is displayed by clicking this item Image Set...

Page 54: ...or Versions Displays the version of the firmware of the projector Enter Old password Enters the configured password Enter New password Enters the new password Confirm New password Enters the wanted new password again for confirmation Apply Updates the settings Power Switches on off the power of the projector Source Select Switches the input source of the projector LAN Status Displays the connectio...

Page 55: ...the contrast of the projected image Sharpness Adjusts the sharpness of the projected image Color Adjusts the color saturation of the projected image Tint Adjusts the skin tone of the projected image Color Temperature Adjusts the color temperature of the projected image Network Control Instructions ...

Page 56: ...d image H Size Adjusts the total number of dots of the projected Freeze Switches the freeze function between on and off Auto PC adj Executes the Auto PC adj function V Keystone Corrects the keystone in vertical direction H Keystone Corrects the keystone in horizontal direction Curved Correction Corrects the pincushion or barrel of the projected image Corner correction Corrects the four corners of ...

Page 57: ...ware according to your operation system LAN Setup Select Obtain an IP address automatically if you want to enable the DHCP client IP Address Enter the IP address when not using a DHCP server Subnet Enter the subnet mask when not using a DHCP server Gateway Enter the default gateway address when not using a DHCP server DNS Enter the DNS server when not using a DHCP server Apply Updates the settings...

Page 58: ... name and passwords are admin Note Before use pwPresenter software to search you need change Source Select to Network Play Pause Play or pause the selected image Choose capture mode Choose a capture mode from FullScreen FixedSize or Alterable Network Control Instructions Advanced Setting setting image quality network port etc Parameters Setting Basic Setting setting language region of capture imag...

Page 59: ...ound volume Bandwidth and Capture rate etc Global Setting setting remote control capture by audio or screen etc Network Display Management Setting device and password management Disconnect the projector Network Control Instructions ...

Page 60: ...irectly the standby screen as Please Press OK appears when the USB memory icon is displayed on the screen 3 Press the OK button on the remote controler the root directory of the USB memory will appear in thumbnail on the screen It will display a picture when play the picture manually every time 1 Press to select a file 2 Press the OK button the picture will display on the full screen 3 Press to sw...

Page 61: ... short circuit or fire Do not put foreign matter or metal items in the USB port Static electricity may cause data loss or data damage When USB memory is reading Do not remove USB memory from the projector otherwise it may result in data loss or corruption of data Please do not put the USB memory in high temperature damp or dusty place or next to magnetic materials Play the PDF Playing the PDF file...

Page 62: ...the task bar of computer and select one item in Pop up menu Projecting the USB Display 1 Connect the USB B terminal of the projector to a computer with a USB converting cable 2 Press the USB DISPLAY button on the remote control or switch the input source to USB Display Press the INPUT button on the top control and select the input source in the Input menu The startup screen will be displayed autom...

Page 63: ...B converting cable 2 Press the USB DISPLAY button on the remote control or switch the input source to USB Display Press the INPUT button on the top control and select the input source in the Input menu The image on the computer screen is projected Pop up menu is only displayed in English The item which is displayed in gray is unavailable OS Mac OS X 10 5 10 6 10 7 CPU Power PC G4 1GHz or faster Am...

Page 64: ...eck the items below Did you provide appropriate space for the projector to be ventilated Check the installing condition to see if ventilation slots are not blocked Has the projector been installed near the duct or vent of an airconditioning Move the installation of the projector away from the duct or vent Are the air filters clean Clean the air filters periodically The projector is shut down and t...

Page 65: ...r dialog box pops up select Yes to reset the filter counter 1 Turn off the projector and unplug the AC power cord from the AC outlet 2 Remove the air filter 3 Gently clean the filter with a brush 4 Reinstall the filter into the projector properly Caution Do not operate the projector with the air filter removed Dust may accumulate on the optical elements degrading picture quality Do not put any sma...

Page 66: ... Abrasive cleaners solvents or other harsh chemicals might scratch the surface of lens Unplug the AC power cord before cleaning Gently wipe the projector surface with a soft dry cleaning cloth When the cabinet is heavily soiled use a small amount of mild detergent and finish with a soft dry cleaning cloth Avoid using an excessive amount of cleaner Abrasive cleaners solvents or other harsh chemical...

Page 67: ... enough Check whether the contrast or brightness is adjusted correctly Page 35 36 Check whether the Image mode is properly selected Page 34 Check the function of lamp brightness adjusting Page 35 36 No image Check the connection between Computer or video equipment and the projector Check whether the signal from Computer is correct If connected to certain laptops the settings of their video adapter...

Page 68: ...the Auto setup menu is set to Off Make sure On is not chosen in the Ceiling function The image is distorted or disappears Check and adjust Screen menu PIN code dialog box appears at start up PIN code lock is being set The remote control does not work Check the batteries Make sure no obstruction is between the projector and the remote control Make sure you are not too far from the projector when us...

Page 69: ...Normal Wide Full Advanced Full and Advanced are only for EK 122X Project way Front Rear Ceiling Front Ceiling Rear Auto ceiling Front Auto ceiling Rear Menu positon Upper left Upper right Center Lower left Lower right Background display Black Blue System Auto PAL SECAM NTSC NTSC4 43 PAL M PAL N PAL60 Video Input Color adjust Image mode Dynamic Standard Cinema Blackboard Green Colorboard User Image...

Page 70: ...rmal Eco High land On Off Lamp control Normal Eco Cooling fast Normal 60 sec 0 sec Closed caption Off CC1 CC2 CC3 CC4 Key lock Off Projector Remote control Iris On Off Sound Sound 0 25 Mute On Off HDMI setup Image 64 940 0 1023 Sound HDMI Computer HDMI EQ setup 1 4 Expand Language English German French Italian Spanish Polish Swedish Dutch Portugese Japanese Simplified Chinese Traditional Chinese K...

Page 71: ...2X Capture LogoPINcodelock On Off Logo PIN code change Security PIN code lock On Off PIN code change Power management Ready Shut down Off Timer Ready countdown Filter counter Filter counter Timer Filter counter reset Filter check On Off Test Pattern Off Gray scale1 1 4 Colorbar Red Green Blue Cross hatch White Black Raster gray Network Network setting DHCP IP address Subnet Gateway DNS Network inf...

Page 72: ...ht Sort Order Extend order Size order Timer order Name order Rotate No Rotate 270 Degrees 180 Degrees 90 Degrees Best Fit On Off Repeat On Off Apply Info Input H sync freq V sync freq Lamp status Lamp counter Power management Image mode Projector name Input VGA Network Memory Viewer USB Display HDMI 2 HDMI Video ...

Page 73: ...ully cooled and the POWER light indicator stops flashing Your projector is in Ready mode Your projector detects the temperature abnormality and switches into cooling mode Your projector detects the temperature abnormality and switches into standby mode Your projector detects power abnormality Your projector detects fan abnormality Your projector detects lamp abnormality and switches into cooling m...

Page 74: ...69 85 008 36 000 21 800x600 56Hz 35 156 56 250 36 000 22 800x600 60Hz 37 879 60 317 40 000 23 800x600 72Hz 48 077 72 188 50 000 24 800x600 75Hz 46 875 75 000 49 500 25 800x600 85Hz 53 674 85 061 56 250 26 832x624 75Hz 49 725 74 550 57 283 27 1024x768 60Hz 48 363 60 004 65 000 28 1024x768 70Hz 56 476 70 069 75 000 29 1024x768 75Hz 60 023 75 029 78 750 30 1024x768 85Hz 68 678 84 997 94 500 31 1152x8...

Page 75: ...ing Zoom Ratio 1 2x optics Lamp Consumption W 225W Terminal VGA IN Mini D sub 15 pin x1 VGA OUT Mini D sub 15 pin x1 HDMI HDMI x 2 LAN 100 Base TX 100Mbps 10 Base T 10Mbps RJ45 USB B x1 display Firmware upgrade USB A x1 memory viewer RS 232 D sub 9 pin x1 AUDIO OUT 3 5mm Mini Type Stereo x1 AUDIO IN 3 5mm Mini Type Stereo x1 Composit Video RCA x1 MONO R L 2RCA L R x1 Power Voltage and power consum...

Page 76: ...en 15 DDC clock 8 GND Blue 1 T M D S data2 11 T M D S clock shield 2 T M D S data2 shield 12 T M D S clock 3 T M D S data2 13 CEC 4 T M D S data1 14 Reserved N C on device 5 T M D S data1 shield 15 SCL 6 T M D S data1 16 SDA 7 T M D S data0 17 DDC CEC GND 8 T M D S data0 shield 18 5V 9 T M D S data0 19 Hot plug detec 10 T M D S clock 1 2 RXD 3 TXD 4 5 GND 6 7 8 9 1 TX 5 2 TX 6 RX 3 RX 7 4 8 RS232 ...

Page 77: ...bstances in all homogeneous materials in this part don t exceed Required Limitations specified in GB T26572 It means that contents of hazardous substances in at least one homogeneous material in this part exceed Required Limitations specified in GB T26572 Note Optical parts includes optical lens monitor reflection lens ect Electric parts includes PCB internal wires fans power supply sensors etc Ap...

Page 78: ...ot or lost the number and unable to operate the projector contact the service center PIN code lock Logo PIN code Lock No Factory default PIN code 111 Factory default PIN code 111 If this 3 digit number is changed the factory default number will be ineffective PIN code memorandum ...

Page 79: ...1 409 435 E Mail info eiki cz China EIKI Shanghai Co Ltd LAKESIDE OASIS MIDDLE RING BUSINESS CENTRE Block 1 Room 606 1628 Jin Sha Jiang Road Shanghai 200333 CHINA China Tel 86 21 3251 3993 Service Hot line 86 21 3251 3995 Fax 86 21 3251 3997 E mail info eiki china com South East Asia EIKI Industrial M Sdn Bhd No 11 Nouvelle Industrial Park Lorong Teknologi B Taman Sains Selangor 1 Kota Damansara P...

Reviews: