background image

Mechanical Operation and Maintenance Manual for ER20-1100 Industrial Robot

42

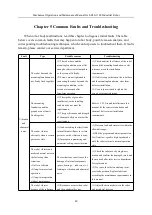
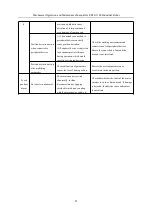
operating conditions:
(1) unmatched
parameters;
(2) improper program
commands;
(3) Overload.

abnormal state, increase of the
average current value, and then
overheating.

manual. Control the load within the
allowable range.

Other faults that may
cause the motor
overheating.

(1) Abnormality in the joints
cause overload and overheating of
the motor.
(2) motor failure

(1) Check the joints of the robot whose
motor is overheated, including external
interference and damage of internal
components. If abnormality is detected,
contact our after-sales service department
for repair and replacement;
(2) Change the motor, if overheating is
eliminated, it means that the motor is in
failure.

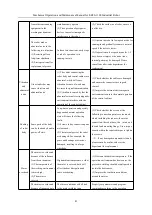
Joints

cannot

be

locked

The robot joints fail to
be locked, so the robot
arms cannot stay at the
designated position, and
will be dropped by the
influence of gravity.

(1) Wear or circuit faults will
both cause invalid brake of the
motor.
(2) The sealing fails and the
lubricant is leaked into the motor
brake, leading to the brake failure.

(1) If only the motor fails, replace it;
(2) If the lubricant is leaked into the motor
which causes the brake failure, the cause of
sealing failure needs to be found and solved
before the replacement of the motor.

Oil

leakage

Oil leakage of robot
joints.

(1) Collision or long-term
overload cause the abnormality of
the joint components, such as
casting damage, worn O-ring, oil
seal damage, etc;
(2) If the robot has been
disassembled and reassembled,
the O-ring assembly may be
abnormal;
(3) If the joints operate in harsh
environment without proper
protection, the dust would enter in
and damage the oil seal;
(4) It also would cause oil leakage
that the oil port plug screw is
loosened.

(1) Check whether the relevant parts are
normal. If not, replace them in time.
(2) Check for ensuring that the O-ring is
properly assembled;
(3) In case of harsh working environment,
take necessary preventive measures to
protect the robot body;
(4) Check the plug screws at the oil port
and make sure that it is tightened.

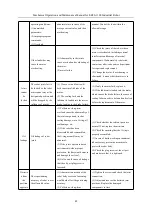
Deviatio

n from

the

position

appointe

The repositioning
accuracy of robot is over
the allowable value.

(1) Abnormal connection of the
robot body or screws loosening
would both affect the positioning
accuracy;
(2) Collision or long-term

(1) Tighten the screws and check the joint
connection;
(2) Adjust and recover the deviated joint
positions. Replace the damaged
components in time.

Summary of Contents for ER20-1100

Page 1: ...ER20 1100 Mechanical Operation and Maintenance Manual for Industrial Robot EFORT Intelligent Equipment Co Ltd Service Hotline Tel 86 400 0528877 ...

Page 2: ......

Page 3: ... surrounding properties This statement and manual are the latest version until this batch of products leave the factory Please visit the official website www efort com cn to obtain up to date information in the future This manual is only used as a normal operation guide EFORT company will not be liable for personal injury and property loss caused by other reasons except product defects Therefore E...

Page 4: ......

Page 5: ...1 COMPOSITION OF ROBOT 13 2 2 PACKAGE CHECK 13 2 3 NAMEPLATE ON ROBOT BODY 14 2 4 BODY COMPOSITION AND DIRECTION IDENTIFICATION OF EACH AXIS 15 2 5 RANGE LIMIT AND HOME POSITION OF EACH AXIS 15 2 6 ROBOT PERFORMANCE PARAMETERS 16 2 7 MAXIMUM WRIST PAYLOAD 17 2 7 1 Maximum carrying weight 18 2 7 2 Maximum static payload torque 18 2 7 3 Maximum moment of inertia 18 2 7 4 Allowable payload curve diag...

Page 6: ...c interface and signal interface 28 CHAPTER 4 REPAIR AND MAINTENANCE 30 4 1 PREVENTIVE MAINTENANCE 30 4 1 1 Routine Check 30 4 1 2 Quarterly check 30 4 1 3 Annual check 31 4 1 4 Every three year check 31 4 2 REPAIR AND MAINTENANCE FOR MAIN BOLTS 31 4 3 CHANGE LUBRICANT 32 4 3 1 Demand capacity of lubricant 32 4 3 2 Azimuth of axis when lubricant to be replaced 32 4 3 3 Process for replacing lubric...

Page 7: ...tenance personnel and precautions 36 4 6 CALIBRATION OF HOME POSITION 37 4 6 1 Calibrating method of home position 37 4 6 2 Mechanical calibration of axis home position 38 4 7 BATTERY REPLACEMENT 39 CHAPTER 5 COMMON FAULTS AND TROUBLESHOOTING 40 APPENDICES 44 A TORQUE TABLE OF TIGHTENING SCREW 44 B LIST OF SPARE PARTS 44 ...

Page 8: ......

Page 9: ...the operator or property damage 1 1 1 Safety precautions during adjustment operation maintenance and other Work 1 Operators must wear uniforms helmets safety shoes and other protective wear 2 Please be sure operators are not within the motion range of the robot when switching on power 3 Operation within the motion range of the robot must not be allowed until the power is cut off 4 Overhaul repair ...

Page 10: ... actions such as temporary ignorance failure to comply with the prescribed steps Operators have little time to perform emergency stops evacuate or other actions to avoid serious accidents in emergency situations as shown below 1 Low speed movement suddenly changes to high speed movement 2 Other operators performed the operation 3 Abnormality and program errors caused by peripheral equipment start ...

Page 11: ...tective structures against faults that are not prone to damage or accidents during movements should be used Additionally safe operation should be ensured by installing misoperation detection stop and emergency stop functions and interlocking function to avoid dangers when peripheral equipment acts abnormally The body is a multi joint mechanical arm structure and the angle of each joint constantly ...

Page 12: ...ll not occur The corners or protruding parts should be treated to prevent damage to humans or objects It is forbidden to supply unspecified power compressed air and welding cooling water which could affect the mobility and cause abnormal movements malfunctions or damage and other dangerous situations Electromagnetic interference which is related to its type or intensity cannot be handled with curr...

Page 13: ... and wave to the left Operators must always keep awareness of evacuation at any time during operation Immediate evacuation must be ensured in an emergency Always keep attentive to robot s movement Do not turn your back to the robot during operation Slow reaction to the robot can cause accidents too Immediately press the emergency stop button in case of abnormality which must be thoroughly implemen...

Page 14: ...ntamination in the work area and forgetting tools may cause accidents such as falls Ensuring safety start with tiding up 1 2 Instructions of Labels on Robot Body Safety labels are affixed on specific parts of the robot to warn users of safety precautions in operating and maintaining it Label Name Description Attached part Be careful not to clamp hands The movable parts of the robot may clamp your ...

Page 15: ...ocal laws and regulations Wrong or unsafe operation due to insufficient understanding of the manuals can lead to accidents When the robot is transferred or sold to a foreign country safety relevant terms in initial contract which does not include specific provisions shall not be borne by the new recipient The original user and the new recipient must sign a new contract 1 4 Abandonment of Robot The...

Page 16: ...Mechanical Operation and Maintenance Manual for ER20 1100 Industrial Robot 12 Attention should be paid to clamp or injuries when performing abandoning work Waste products should be discarded safely ...

Page 17: ...e opening it 2 Check whether each part or component is complete and consistent with the order Please contact the supplier in time for any missing or wrong part Table 2 1 robot packing list Name Configuration type Quality Unit Remark Robot body ER20 1100 1 PC Robot control cabinet EC S6 1 PC Connecting cable from robot body to electric control cabinet Power cable 1 PC Standard length 8m Optional le...

Page 18: ...ached adapter for 25PIN Standard 1 PC In the accessory case of control cabinet Direct attached adapter for 50PIN Standard 1 PC In the accessory case of control cabinet Operation manual Mechanical operation and maintenance manual 1 PC QR code Electrical operation and maintenance manual 1 PC Programming manual 1 PC Product certification Manufacturer s standard 1 PC Others Note The above list is for ...

Page 19: ...ure 2 3 Mechanical composition of ER20 1100 body 2 5 Range limit and home position of each axis Each axis of the body sets a home position and range limit When the system is in normal operation each axis is controlled to move within the allowable range To further ensure safety some axes are equipped with mechanical end stops shown as follows to prevent malfunction of the control device and operati...

Page 20: ...0 sec axis J2 轴 255 sec axis J3 轴 210 sec axis J4 轴 450 sec axis J5 轴 450 sec axis J6 轴 600 sec Maximum motion range axis J1 轴 170 axis J2 轴 160 83 axis J3 轴 85 175 axis J4 轴 190 axis J5 轴 130 axis J6 轴 360 Maximum motion radius of robot arm 1143mm Maximum payload of robot wrist 20 kg Installation conditions Ground upside down wall hanging Protection class IP65 others IP67 wrist Repeatability 0 05...

Page 21: ... the front of the wrist is affected by the maximum carrying weight of the wrist the maximum payload torque value and the maximum moment of inertia The maximum payload torque changes depending on the actual moment of inertia The wrist payload should be strictly controlled within the maximum value range Otherwise normal operation cannot be guaranteed Point P Trajectory of point P ...

Page 22: ...tatic payload torque Robot model Maximum static payload torque Axis J4 rotation Axis J5 rotation Axis J6 rotation ER20 1100 42 N m 42 N m 20N m 2 7 3 Maximum moment of inertia Robot model Maximum moment of inertia Axis J4 rotation Axis J5 rotation Axis J6 rotation ER20 1100 2 kg m2 2 kg m2 0 7 kg m2 2 7 4 Allowable payload curve diagram Figure 2 6 Axis torque curve of wrist ...

Page 23: ...dents such as tipping or falling may occur Attention should be paid to avoiding the damage of wiring in transporting and installation Additionally protective measures such as cover the protective shield should be taken after the installation to avoid the damage of wiring by operators and forklifts 3 1 2 Auxiliary handling tooling Before handling the robot the robot needs to fix the body part of wr...

Page 24: ...n install 3 M12 separate ring screws on the main frame and lift it with four flexible lifting belts It is suggested that the length of the flexible lifting belts should not be less than 2m and rubber hose should be put on the contact part between the lifting belts and the main body of the robot for protection In Figure 3 3 3 4 other devices are not installed on the end effector or robot arm Extra ...

Page 25: ...dling please be sure to install and use the fixed fixture When using other handling methods instead of crane and forklift please note that the arm and motor of the robot cannot be affected by external force After unpacking be sure to remove the handling fixture and rubber pad Due to the need of robot handling in the future please keep the fixture properly Figure 3 3 Schematic of lifting and handli...

Page 26: ...le s Republic of China GB11291 2 2013 Robot and Robot Equipment and Safety Requirements for Industrial Robots Part 2 Robot system and Integration should be observed Section 5 4 the robot movement restriction stipulates that the design and integration of robot equipment shall reduce the situation that personnel may be exposed to danger Section 5 4 2 the provisions for establishing safety protection...

Page 27: ...rface are shown in Figure 3 5 as follows Figure 3 5 Dimensions of ER20 1100 robot base 3 2 3 Ground installation The ground installation requires that the concrete foundation is firm The strength grade and bearing capacity meet the relevant quality specifications The concrete thickness shall not be less than the landfill depth of chemical bolts and the effective range shall completely cover the fi...

Page 28: ... the nominal diameter of the thread In order to prevent the hexagon socket cap screws from loosening during the operation of the equipment please fully fix and prevent loosening according to the method of robot installation example in Figure 3 6 below Figure 3 6 Example of robot installation Too long or too short screw for fixing robot base will cause bad fixing accident The connection strength of...

Page 29: ...pth of chemical bolt group can be increased appropriately Improve the strength of concrete foundation The strength of concrete foundation is higher than that of corresponding chemical bolt 3 2 5 Upside down installation When Upside down installation the fixed bottom plate for the robot base refer to table 3 1 that included in the specifications for ground installation In order to ensure safety the...

Page 30: ...0 5G 4 9m s Other noncorrosive gas note Note For robots to be used if there is strong vibration in the use environment there is a lot of dust cutting oil splashing or other objects please contact the after sales service department of the company to protect the robot parts by using robot sleeve or other means 3 4 Integrated application installation interface Table 3 3 Table of robot external interf...

Page 31: ...Mechanical Operation and Maintenance Manual for ER20 1100 Industrial Robot 27 3 4 2 Interface of peripheral installation Figure 3 9 Peripheral installation dimension diagram ...

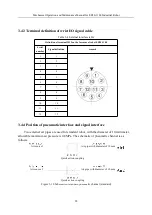
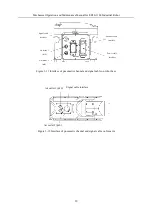
Page 32: ...3 3 4 4 5 5 6 6 7 7 8 8 9 9 10 10 11 11 12 12 3 4 4 Position of pneumatic interface and signal interface Two external air pipes are used for standard robot with the diameter of 10 millimeter allowable maximum air pressure is 0 8MPa The schematic of pneumatic channel is as follows Figure 3 10 Schematic of standard pneumatic channel standard Air source 1 Air source 2 Air pipe with diameter of 10 mm ...

Page 33: ...Interface of pneumatic channel and signal cable on robot base Figure 3 12 Interface of pneumatic channel and signal cable on forearm Signal cable interface Air intake 1 ϕ10 Air intake 2 ϕ10 Encoder cable interface Power cable interface Air outlet 1 ϕ10 Air outlet 2 ϕ10 Signal cable interface ...

Page 34: ... Check whether the transmission mechanism makes abnormal noise 2 interference Check whether the transmission mechanism runs smoothly without abnormal vibration 3 air cooling Check if the fan behind the control cabinet is ventilated 4 pipeline accessories Check whether it is complete worn or rusty 5 peripheral electrical accessories Check the peripheral wiring and whether the buttons work 6 leak Ch...

Page 35: ...ves oil seal of the mechanical wrists chips and splashes 2 The screws on the end executor and robot body for installation need to be tightened Screws removed for repair and maintenance and all the external screws exposed also need to be tightened Please refer to the screw tightening torque table in the appendix for installation torque and paint corresponding glue or sealant 4 2 Repair and maintena...

Page 36: ...d Position Capacity Lubricant name Remark Reducer of J1 axis 600cc MOLYWHITERE No 00 Rapid injection will cause pressure rising in the lubricant tank and then the lubricant will leak due to cracking of sealing ring Therefore injection speed should be controlled lower than 40cc 10 seconds Reducer of J2 axis 525cc Reducer of J3 axis 370cc Cavity of J4 axis 55cc Reducer of J5 axis 57cc LD super No 09...

Page 37: ... Otherwise the weight of lubricant before and after the injection should be measured to confirm the injected capacity 3 Hoses on the injection side are first filled with grease Be attention that not to mix air in grease 4 If the required capacity is not reached a precision regulator for air supply can be used to squeeze the air in the cavity before injection The air pressure should be controlled l...

Page 38: ...hould be kept on low speed motion for more than 20 minutes with the respective axis azimuth is 30 5 5 30 30 If the residue pressure releasing motion can not be performed due to surrounding situations the robot should be operated equivalently For example half the axis azimuth and twice the motion time When the motion was completed seal the lubricant outlet with combination washer or with binding se...

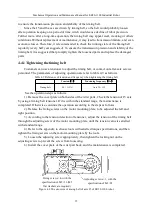
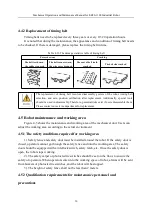
Page 39: ...n tightening the timing belt Tension N Tensioning frequency Hz Timing belt 80 1 3 Axis J5 115 See the operation steps as follows 1 Remove the cover plate on both sides of the wrist parts Check the tension of J5 axis by using a timing belt tensioner If it is within the standard range the maintenance is completed Otherwise continue the operation according to the steps as follows 2 Release the fixing...

Page 40: ...xist if users disassemble them Please contact our service department for replacement 4 5 Robot maintenance and working area Figure 4 3 shows the maintenance and working area of the mechanical unit Users can adjust the working area according to the actual environment 4 5 1 The safety conditions required for working area 1 Safety fence and safety door must be installed around the robot If the safety...

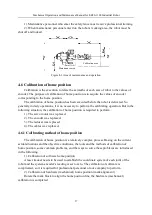
Page 41: ...n of home position is required to perform 1 The servo motor was replaced 2 The encoder was replaced 3 The reducer was replaced 4 The cables was replaced 4 6 1 Calibrating method of home position The calibration of home position is a relatively complex process Basing on the current actual situations and the objective conditions the tools and the methods of calibration of home position some common p...

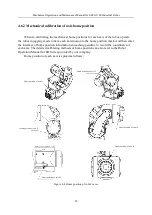
Page 42: ...k And then enter the interface of home position information in teaching pendant to record the coordinates of each axis The detailed calibrating methods of home position can also refer to the Robot Operation Manual for ER Series provided by our company Home position of each axis is spread as follows Figure 4 4 Home position of robot s axes Home position of axis J1 Home position of axis J2 Home posi...

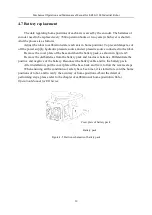
Page 43: ...ate of the base and then the battery pack as shown in figure 4 5 Remove the old batteries from the battery pack and load new batteries Differentiate the positive and negative of the battery Reconnect the battery cable and fix the battery pack After installation put the cover plate of the base back and fix it follow the reverse steps When ensuring all the conditions of safety have been met it is st...

Page 44: ...ficient so the installing conditions do not meet the requirements 2 The specifications and strength of chemical bolts do not meet the requirements Refer to 3 2 3 Ground installation in this manual let the concrete foundation and chemical bolt set meet installation requirements The robot vibrates obviously when a certain gesture or state 1 load exceeding the limit leads to insufficient stiffness in...

Page 45: ...e external electromagnetic environment to ensure the normal operation of the control cabinet Shaking of robot body Some parts of the body can be shaken by hand in power off state Long time operation and possibly happened abnormal operation state will cause the following faults 1 Screws in key connection parts are loosened 2 The internal parts of the robot are damaged For example the gears and bear...

Page 46: ...f the lubricant is leaked into the motor which causes the brake failure the cause of sealing failure needs to be found and solved before the replacement of the motor Oil leakage Oil leakage of robot joints 1 Collision or long term overload cause the abnormality of the joint components such as casting damage worn O ring oil seal damage etc 2 If the robot has been disassembled and reassembled the O ...

Page 47: ... Check the working environment and connections of the peripheral devices Ensure the connection is firm and the motion is not interfered Position deviation occurs after modifying parameters The modification of parameters causes the loss of home position Restore the previous parameters or re calibrate the home position Teach pendant alarm Encoder is in abnormal The motor encoder is wired abnormally ...

Page 48: ...cations Unit per robot Applied position O ring rubber seal 103x3 55 2 O ring rubber seal AS568 263 1 Hexagon socket cap plug screw M10x1 10 Whole Composite sealing washer 10 10 Whole Table3 Sealant and Others Name Specifications Unit per robot Applied position Grease MOLYWHITE RENO 00 2 5kg Flat sealant THREEBOND 1110F 1 Thread locker THREEBOND 1374 1 Detergent THREEBOND 6602T 2 Thread sealant LOC...

Page 49: ...this product are subject to change without prior notice The technical data and illustrations are for reference only and we reserve the right to change them EFORT INTELLIGENT EQUIPMENT CO LTD No 96 Wanchun Road Jiujiang Economic Development Zone Wuhu Anhui China website http www efort com cn ...

Reviews: