


5. Inserting the Eyepiece
2 eyepieces: 26mm and 9.7mm come with your telescope. With the
eyepieces, you can control the magnifi cation of your telescope. Before
installing the eyepieces and the focuser, take the lens cap out of the
eyepiece holder.
NOTE: Make sure the focuser is closest to the object which you are trying
to view. If the focuser is not closest to the object the telescope is facing
backwards and the view will not of the ground and dark or black.
6. Aligning the Red Dot Finder scope
Your telescope is designed for terrestrial and astronomical observations.
Please keep in mind that heat turbulences in the air are also magnifi ed.
In warm conditions, it can be useful to limit observations to medium
magnifi cations. First, remove the dust cover from the objective lens.
Please make sure to remove plastic insulator from battery (picture
below). Insert the 26mm Eyepiece into the diagonal; you may now
adjust the focus with the draw tube’s wheel. The Red Dot Finder scope is
activated by sliding the switch on its right side; there are two intensities
available. Before the fi rst observation, the Red Dot Finder scope has
to be aligned to the telescope. For this, point at a striking target (e.g.
telephone pole) with the telescope’s eyepiece. Now, without moving the
telescope, switch on the Red Dot Finder scope and adjust the red dot
with the 2 adjustment screws (left and right - up and down) until it fi ts to
the eyepiece’s view. Now the Red Dot Finder scope is aligned and ready
to point for the telescope.
Never use a telescope to look at the sun! Looking at or near the sun
will cause instant and irreversible damage to your eye. Eye damage is
often painless, so there is no warning to the observer that damage has
occurred until it is too late. Do not point the telescope or its viewfi nder at
or near the sun. Do not look through the telescope or its viewfi nder as it is
moving. Children should always have adult supervision while observing.
7. Flexible shafts
In order to facilitate the exact fi ne adjustment of the declination and right
ascension shafts, the fl exible shafts have been placed on the holders
of both these shafts, in the places designed for that purpose. The long
fl exible shaft is mounted parallel to the telescope tube. It is secured with
a clamp screw on the designat-ed indentation on the shaft. The short
fl exible shaft is mounted sideways. It is secured with a clamp screw on
the designated indentation on the shaft. Your telescope is now ready for
use.
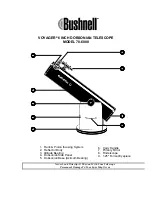
Parts listing
Your telescope has the following parts:
1 Telescope tube
2 Red Dot Finder
3 Adjusting screws for fi nder
4 Dew Shield
5 Focuser
6 Diagonal
7 Flexible Shaft (Azimuth Left and Right)
8 Flexible Shaft (Altitude Up and Down)
9 Mount head
10 26mm and 9.7mm Plossl Eyepieces
11 Locking clips (on tripod)
12 Tripod and Accessory Tray
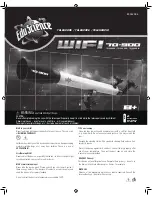
13 Wi-Fi Eyepiece
Set-up
1. General Information regarding Assembly, Positioning Before beginning
with the assembly, choose a suitable position for your telescope. It will
help if you assemble this apparatus at a spot from where you have a
clear view of the sky, a sturdy surface beneath you, and enough space.
Important: Tighten screws only as much as you can by hand - do not
“over-tighten” the screws.
2. Tripod
Take the three-legged tripod and set it vertically on the fl oor with the feet
pointing downwards. Now take two of the tripod legs and pull these legs
carefully out away from each other, until they have reached their fully
opened position. During this time, the entire weight of the tripod rests on
one leg. Finally, set the tripod down on all legs, so that it stands straight.
Loosen the three locking clips (11) on the tripod legs, pull each individual
tripod leg out until it has reached the desired length close up the locking
clips (11) and set the tripod down on a sturdy, even surface.
TIP:
A small water level on the accessory tray can help you position your
tripod horizontally.
3. Mounting the tray:
The accessory tray must be positioned with its fl at side down in the
middle of the tripod leg brace, and then must be mounted by turning it
60° in a clockwise direction. The three projections on the tray plate must
match up to the mounting brackets on the division bars (and must snap
into place. If necessary, you may push the tripod leg brace downwards
a little.
4. Connecting the tube
Now set the tube (and holder) onto the mount with the objective opening
in the direction marked (N-marking on the tripod head, north point and
telescope fi gure on the mount). Then fasten the tube holder with the
clamping screw of the dovetail adapter on the mount head.
Need Help? Toll Free 855-863-4426
Warning:
Never use a telescope to look at the sun! Looking
at or near the sun will cause instant and
irreversible damage to your eye. Eye damage is
often painless, so there is no warning to the
observer that damage has occurred until it is too
late. Do not point the telescope or its viewfi nder at
or near the sun. Do not look through the telescope
or its viewfi nder as it is moving. Children should
always have adult supervision while observing.
11
12
Summary of Contents for WIFI 70-900
Page 2: ...Need Help Toll Free 855 863 4426 13 10 1 4 9 8 5 7 2 3 6...
Page 8: ...1 4 9 8 5 7 2 3 6 Vous avez besoin d aide Composez sans frais le 855 863 4426 13 10...
Page 14: ...1 4 9 8 5 7 2 3 6 Necesita ayuda Llame al n mero gratuito 855 863 4426 13 10...
Page 19: ...MISE EN GARDE Ne pas regarder directement le soleil...