Edimax PT-31E User Manual Download Page 39

38 

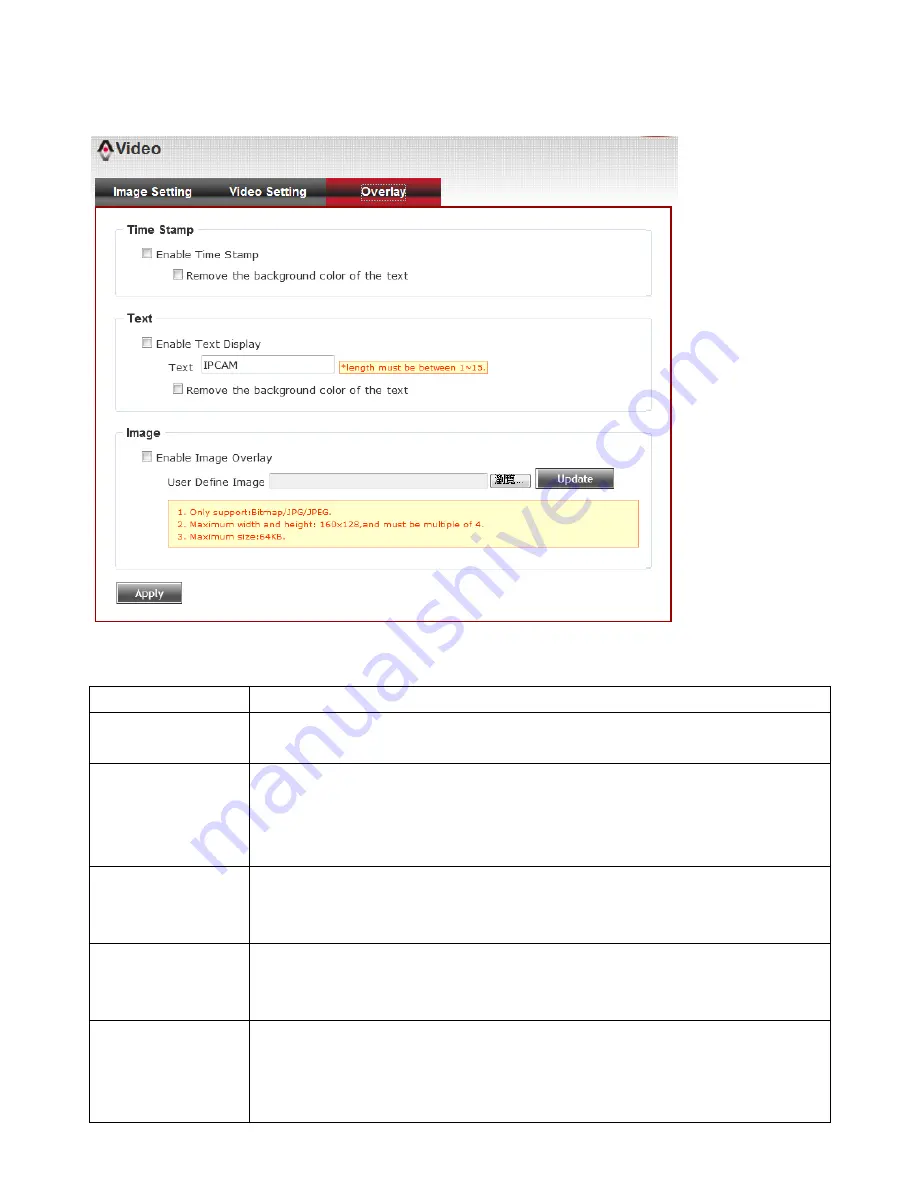
3-5-3 Overlay Setting 

You can adjust the video overlay parameters in this page. 


Here are the descriptions of every setup item: 

Item 

Description 

Enable Time 
Stamp 

Check this box to enable overlaying time stamp on video. 

Remove the 
background color 
of the text 
(for Time Stamp) 

Check this box to remove time stamp’s background color. You may 
find this will help the readability of time stamp text in some cases. 

Enable Text 
Display 

Check this box to display certain text on video, this will help when you 
need to identify certain IP camera when you have a lot of IP cameras. 
Please input the text in ‘Text’ field. You can input up to 15 characters. 

Remove the 
background color 
of the text (Text)   

Check this box to remove custom text’s background color. You may 
find this will help the readability of text in some cases. 

Enable Image 
Overlay 

Check this box to overlay a specific image on video, so you can show 
certain text / picture on the video and help people to identify this IP 
camera. 
Click ‘Browse’ button to pick a picture on your computer, then click 

Summary of Contents for PT-31E

Page 1: ...PT 31E PT 31W User Manual 11 2012 v1 1...

Page 2: ...t to revise this publication and to make changes from time to time in the contents hereof without the obligation to notify any person of such revision or changes The product you have purchased and the...

Page 3: ...on 20 3 1 System 20 3 2 Security 22 3 3 Network 24 3 3 1 General Setup Page 24 3 3 2 Advanced Setup Page 26 3 3 3 Wireless 28 3 5 Video 35 3 5 1 Image Setting 35 3 5 2 Video Setting 36 3 5 3 Overlay S...

Page 4: ...4 4 3 5 Event 86 4 3 6 Security 88 4 4 Video Playback 91 4 4 1 Advanced Search 93 4 4 2 Event Search 96 4 4 3 Video Playback 100 Chapter V Troubleshooting 103 Federal Communication Commission Interfer...

Page 5: ...ork camera 1 x Power adapter 1 x Ethernet cable 1 x Mounting kit 1 x CD with utility software and user manual 1 x Quick installation guide 1 x Detachable antenna PT 31W only 1 2 Getting Familiar with...

Page 6: ...Off Ethernet cable disconnected Flash Transferring data Right Power LED On IP camera is switched on Off IP camera is switched off Please note These LEDs can be switched off regardless the operation st...

Page 7: ...rd slot Inserts SD card for video recording Maximum 32GB of SD HD card supported PT 31W Item Description 1 Audio out Connects to external audio amplifier to output voice Use 3 5mm audio cable 2 DC12V...

Page 8: ...supported 7 Connector for detachable antenna Connect the detachable antenna when wireless connection is required DI DO PIN ASSIGNMENT Item Description GND Signal ground DO Digital Output 1 DI1 Digita...

Page 9: ...sert mounting plate B into the slot at the bottom of the network camera Step 3 Screw mounting plate B to the network camera via the 2 holes indicated by the arrows Step 4 Mount the network camera on t...

Page 10: ...mounted on the wall the cables can pass through mounting plate A as in the picture Step 7 Connect an Ethernet cable to the network camera via the Ethernet port Note PT 31E PoE model supports the IEEE...

Page 11: ...wer adapter into a wall socket The camera s LED lights should light up after a few seconds and the camera will test its pan and tilt motor within 1 minute Please do not obstruct the network camera whi...

Page 12: ...ell phone 3GPP player By default the network camera automatically obtains an IP address from the DHCP server on your local network Check your DHCP server s IP address lease table to find the network c...

Page 13: ...ge a certain IP Camera s IP address you can also click on the IP Camera you wish to change IP address then click Change IP button to change select IP Camera s IP address setting If you no longer need...

Page 14: ...username is admin lower case and password is 1234 by default Click OK button or press ENTER key on your keyboard when you finish entering username and password When you connect to IP Camera for the fi...

Page 15: ...pted that Windows Firewall has blocked some features of this program Click Allow access or IP Camera will not be able to function properly When you re installing Internet Explorer plugin you may also...

Page 16: ...amera you can refer to chapter 2 4 for instructions on Setup Wizard which will guide you to complete the software setup of your new IP Camera 2 3 Viewing Live Video After ActiveX control is installed...

Page 17: ...on Open Configuration menu Language Open language menu you can switch web interface to other language Available languages English Simplified Chinese Traditional Chinese Original size Fit screen Switch...

Page 18: ...computer algorithm to enlarge the video and some details may lost If you need to focus on detail of specific objects in video view please use optical zoom ring on lens set of IP camera Enable Disable...

Page 19: ...s In Client Settings menu you configure basic IP camera settings like data transfer protocol and data storage folder To access Client Settings menu click Client Settings button on the left The followi...

Page 20: ...ton and you ll be prompted to select a folder Prefix When saving video files the characters you typed in Prefix field will be used as leading characters of video file s name For example the default se...

Page 21: ...Configuration menu which provides various kinds of system setting To access configuration menu click Configuration button on the left The Configuration submenu will appear please pick a setup item yo...

Page 22: ...t the time zone of residence from dropdown menu to keep correct date and time Daylight Saving If the area you live uses daylight saving check this box otherwise do not check this box to keep time corr...

Page 23: ...ettings click Apply button to save changes 3 2 Security In this menu you can configure IP camera s login account There are three kinds of account Administrator Can view IP camera s video and make chan...

Page 24: ...ed Account List Here lists all users existed in IP camera If you want to remove one user click it in the list and then click Remove button If no user is existed New Account message will be shown here...

Page 25: ...ere 3 3 1 General Setup Page Set up IP address for this IP camera This IP camera supports both IPv4 and IPv6 IP address Here are the descriptions of every setup item Item Description LAN Select this o...

Page 26: ...can leave this field blank You can leave this field blank if you only wish to use IPv4 or IPv6 IP address Enable UPnP Discovery Check this b ox to enable other devices on network to discover the prese...

Page 27: ...MS software so they can receive this IP camera s video RTP Data Port Input RTP data port number here When you finish with above settings click Apply button to save changes 3 3 2 Advanced Setup Page Yo...

Page 28: ...deo here Multicast audio port Input port number for audio here Multicast RCTP audio port Input port number for RCTP audio here Multicast TTL Input TTL value for multicast here Bonjour If you re using...

Page 29: ...ider User name Input user name used to login dynamic IP service provider Password Input the password used to login dynamic IP service provider The user name and password should be under 16 characters...

Page 30: ...e displayed at the same time if the access point you expected to connect does not appear you may have to click Refresh button for several times until it appears The descriptions of all fields is liste...

Page 31: ...e the radio channel is auto selected according to the channel that wireless access point uses You can only select the channel number when network type is Adhoc Authentication It includes None Open Sys...

Page 32: ...If you have wireless access point s WPS PIN code you can input it here and press Start PIN button to start to establish PIN style WPS connection Wireless Setting Wi Fi Connection using WPS Method 1 US...

Page 33: ...n web browser and logo in wireless network camera Go to network Wireless setting page And find Wi Fi Protected Setup WPS item Step 4 Please find the pin Code on both setting page and key in it in each...

Page 34: ...P list Here lists all IP address that can build connections to this IP camera If you want to remove a set of IP address from the list click on the IP address and click Remove button IP Address Accepte...

Page 35: ...starting and ending IP address of IP address you wish to deny connections here IP camera will deny connections established from these IP address If you want to specify one IP address only input the sa...

Page 36: ...lay which can be accessed by tabs on the top 3 5 1 Image Setting You can adjust the image parameters in this page Here are the descriptions of every setup item Item Description Brightness Contrast Sat...

Page 37: ...is hanged bottom up by camera holder You can click both Vertical and Horizontal box at the same time Power Line Frequency Select the frequency of power line of the place you re using this IP camera Th...

Page 38: ...elect video frame rate Please note that some frame rate is not available when video encoder is H 264 When network speed is insufficient select a lower frame rate will help Rate Control Select video bi...

Page 39: ...Display Check this box to display certain text on video this will help when you need to identify certain IP camera when you have a lot of IP cameras Please input the text in Text field You can input u...

Page 40: ...Here are the descriptions of every setup item Item Description Enable Microphone Check this box to enable microphone If you don t want to hear voice from IP camera you can uncheck this box to disable...

Page 41: ...y button to save changes 3 7 Motion This IP camera is capable to detect object s motion so IP camera will only record when there s motion and save disk storage space Motion detection is performed by e...

Page 42: ...ange motion detection area s title text so you can identify it Please note that you have to click Apply button and the text will change Percentage Select the percentage of pixel change that will trigg...

Page 43: ...his code must be identical to pan tilt camera cradle s address code Use Custom Protocol When the pan tilt camera cradle does not support Pelco D protocol you can define a protocol s detail by this fun...

Page 44: ...e You can also click Test button to send command string for testing When you finish with above settings click Apply button to save changes 3 9 Event When there s an event you can use this setup page t...

Page 45: ...You can click Modify button to edit an existing event or Remove to delete an existing event To create a new even just click New button to add an Event setting To add a new event click New button and...

Page 46: ...ox and select time from dropdown list If you select Always as time this event will be activated during all the day Enable FTP Check this box and IP camera will save file on FTP server refer to FTP Ser...

Page 47: ...when event is triggered in Pre Event and Post Event For example if you set Pre Event to 2 and Post Event to 3 and an event is triggered at 14 10 30 then the video file will be 5 seconds long starting...

Page 48: ...work file server also support samba server function Here are the descriptions of every setup item Item Description FTP Server Check this box to enable FTP server upload FTP Server Input FTP server s I...

Page 49: ...e default value 25 Sender Email Address Input the sender s email address that will appear in the Email send by IP camera This will help you to identify the Email sent by this IP camera and may help wh...

Page 50: ...mediately Samba Server Check this box to enable Samba server file upload Samba Server Address Input Samba server s IP address or hostname Path Input the path where you want to save file on Samba serve...

Page 51: ...em Item Description Enable External storage Recording Check this box to record video on SD card Maximum Size of Each File Input the maximum size of every video file from 1MB to 50MB IP camera will sta...

Page 52: ...n you place the order of the IP camera module Once the module equipped SD card slot and SD card is inserted the UI will show the capacity of the SD card like the image hereunder There are two UI pages...

Page 53: ...52 Set the time range then click Search then shows the records like below...

Page 54: ...k the usage log of IP camera here In this page you can click 1 First page Final page Jump to first final page of log 2 Previous Next Jump to previous or next page of log 3 Remove Clear log You ll be p...

Page 55: ...Info You can check the information and network settings of this IP camera These information are very useful when you need to repair or fix the problem of this IP camera An example of device info page...

Page 56: ...ng Backup Backup IP camera s setting and save it on your computer Backup to Micro SD card device Backup IP camera s setting and save it on Micro SD card A Micro SD card must be inserted into Micro SD...

Page 57: ...button to select a firmware image file on your computer first then click Upgrade button 3 15 Language You can change the display language of web interface Click Language button and select one language...

Page 58: ...Please follow the following instructions to setup EdiView on Windows Vista 7 operating system Please note You must login as system administrator when you re installing EdiView 1 Locate EdiView setup f...

Page 59: ...58 2 You ll see a User Account Control security warning message appear click Yes to continue 3 Click Next to continue 4 Click Install to begin installation...

Page 60: ...59 5 ase wait while installation is being performed This may take few minutes to done please be patient...

Page 61: ...start automatically 7 A new setup window will appear please click Next button to continue 8 You can select a folder on your computer to install EdiView by clicking Change button or simply click Next...

Page 62: ...61 9 Click Install to continue 10 Installation will take few minutes please be patient...

Page 63: ...62 11 Click Finish when you see this message EdiView is ready to use now 12 MSDE Microsoft SQL Database Engine installation procedure will start at the same time Please wait until it completes...

Page 64: ...63 13 You ll be prompted that this program has compatibility issues click Run program to continue...

Page 65: ...o reboot the computer 15 A new icon will appear on your computer s desktop you can double click on it to start EdiView 4 2 EdiView Interface To start EdiView double click EdiView icon on your computer...

Page 66: ...65...

Page 67: ...66 You ll see a User Account Control security warning message appear click Yes to continue EdiView login window will appear Default user ID is admin and default password is 1234 click OK when ready...

Page 68: ...67 The main window of EdiView will appear Split screen mode selector Function Keys Date Time Remaining disk space Snapshot camera selection Exit Camera View...

Page 69: ...ode All control buttons will be hidden only IP camera s video will be displayed To leave full screen mode press Esc key on your keyboard Camera Scan When you click this button EdiView will display the...

Page 70: ...n to use the picture as background picture To add a camera right click on the background picture and select Add Camera A new window will appear Select the camera you wish to add from Camera dropdown l...

Page 71: ...procedures listed above Configuration Enter EdiView configuration page See next chapter for detailed instructions Playback Playback recorded video A new video playback window will appear See chapter...

Page 72: ...e EdiView All camera s video will displayed in Camera View area This example picture shows a 4 split camera view with only 2 IP cameras configured To select an IP camera click its video and it will be...

Page 73: ...hen you click pan tilt control arrow Zoom Optical zoom control Click or to control zoom level Exposure Exposure control Click or to control exposure level Cruise control Click Go button to start camer...

Page 74: ...em wide settings Schedule Configure schedule recording Event Configure event recording Security Configure EdiView user list Detailed descriptions of every sub menu will be given in following chapters...

Page 75: ...74...

Page 76: ...ew seconds or few minutes until the search is complete and all IP cameras found on your local area network will be listed In this example an IP camera has been found at IP address 192 168 2 3 If this...

Page 77: ...ot located on local area network you have to input the details of IP camera manually 1 Input the network settings of IP camera including IP address HTTP port number user name password 2 Click button l...

Page 78: ...IP cameras in the list Remove Remove selected IP camera When you selected an IP camera in the list you can also click Update to list button to update its information like IP address and user name pas...

Page 79: ...recording behavior for this IP camera Monitor only not record EdiView will not record video of this IP camera Round The Clock EdiView will record video of this IP camera all the time Motion Detection...

Page 80: ...ton Click Reset button to reset motion detection blocks to default setting You can also change the color of block if its color is similar to the IP camera s video and makes you hard to identify the bl...

Page 81: ...OK button to save changes you made or click Cancel button to discard all settings you made 4 3 3 System You can configure system wide configurations in this sub menu The descriptions of every setup it...

Page 82: ...ocations Lists all data storage space configured You can all modify spaces below Browse Select a drive or folder on your computer for recording data storage You can also create a new folder when you r...

Page 83: ...Login Input the user ID and password to login EdiView automatically This function is useful when you want to start recording automatically when computer starts User ID Input user ID used to login EdiV...

Page 84: ...be sent within the interval you specified here even a new event is detected User Input the user name for SMTP authentication Input only when it s required by your SMTP server you can leave it blank i...

Page 85: ...84 4 3 4 Schedule You can configure recording schedule in this sub menu When you enter this sub menu for first time click Add Job button to add a new schedule recording job...

Page 86: ...riod in a week of this schedule There are total 48 x 7 blocks in a week schedule where every block represents half an hour You can use mouse to click on the block to add or delete time period If recor...

Page 87: ...ek you can use this function to specify a time period Select Start and End date time and click Add Modify button to add the time period to the list You can also select an existing time period and make...

Page 88: ...ent select an event in the list and click Remove button The descriptions of every setup items are listed as follow Item Description Select Camera Select the IP camera to define its event detail Alarm...

Page 89: ...here EdiView is installed To add a new sound file copy the wav file to the following directory C Program Files EdiView media You can click Play button to play the sound file you selected Alarm Remark...

Page 90: ...are two kinds of user in EdiView Administrator and user Administrator can configure EdiView while user can only view video of camera and perform limited system configuration schedule record and video...

Page 91: ...and cannot be changed You can only change admin s password in Administrator s Password and Confirm Password field Please input the same password in both fields for confirmation To add a user click Add...

Page 92: ...era View Operation Allows multi camera view Camera Map Operation Allows to show E MAP Scheduling User can start or stop schedule recording Recording User can start or stop video recording Playback Use...

Page 93: ...A new window will appear To play a recorded video you can use one of following two functions Please refer to following chapters for detailed instructions of every search mode Advanced Search Event Sea...

Page 94: ...or recorded video within specific time period and get a list of record modes of all IP cameras When you enter this menu please specify start time and stop time You can input 0 23 in Hour in a day fiel...

Page 95: ...cture a recorded video of Camera 1 has been found at 12 o clock A blue mark indicates it s a Round Clock manual recording Other record type include Blue Manual Recording Green Recording is triggered b...

Page 96: ...95 And the video will be prepared for playback...

Page 97: ...96 4 4 2 Event Search You can search for video for playback by triggering event round the clock motion detection or digital input...

Page 98: ...Round Clock Motion Detection and I O Mode Digital Input You can check all boxes you wish to search for 3 Camera You can check all cameras you wish to search for video To select camera ID more than 16...

Page 99: ...98 When you finish click Search button to search for recorded video and a list similar to this will appear You can select the video clip you wish to play and click Play button...

Page 100: ...99...

Page 101: ...scription Close Window Click X mark to close video playback window Video Playback Control You can use following buttons to control video playback Skip to the beginning position of video Skip to previo...

Page 102: ...from 1 4 to 4x speed You cannot adjust video playback speed when video is playing Search Capture Click or button to search for video see chapter 3 2 3 3 for detailed instruction Click button to take...

Page 103: ...ng location or click Print to print current image to printer To back to previous menu click Cancel click Reset to reset image parameters back to default value Time Current time will be displayed here...

Page 104: ...itched on the LED lights on IP Camera will light up No IP Camera found 1 Auto search function only works on IP Cameras located on local area network No image 1 If the place where IP camera is installe...

Page 105: ...posure limits human proximity to the antenna shall not be less than 2 5cm 1 inch during normal operation Federal Communications Commission FCC RF Exposure Requirements SAR compliance has been establis...

Page 106: ...zungen gem den Richtlinien 2004 108 EC 2006 95 EC Spanish El presente equipo cumple los requisitos esenciales de la Directiva 2004 108 EC 2006 95 EC Italian Questo apparecchio conforme ai requisiti es...

Page 107: ...lowed European Standard 2004 108 EC European Standard 2006 95 EC EN 55022 2006 A1 2007 IEC 60950 1 2005 2nd Edition Am 1 2009 EN 61000 3 2 2006 EN 60950 1 2006 A11 2009 A1 2010 EN 61000 3 3 2008 EN 55...

Page 108: ...02 RE1 The following European standards for essential requirements have been followed ETSI EN 301 489 17 V2 1 1 2009 05 EN 55022 2006 A1 2007 ETSI EN 301 489 1 V1 8 1 2008 04 EN 61000 3 2 2006 A1 2009...

Page 109: ...e that they too receive or can get the source code And you must show them these terms so they know their rights We protect your rights with two steps 1 copyright the software and 2 offer you this lice...

Page 110: ...of physically performing source distribution a complete machine readable copy of the corresponding source code to be distributed under the terms of Sections 1 and 2 above on a medium customarily used...

Page 111: ...ime to time Such new versions will be similar in spirit to the present version but may differ in detail to address new problems or concerns Each version is given a distinguishing version number If the...

Page 112: ...111...

Reviews: