11
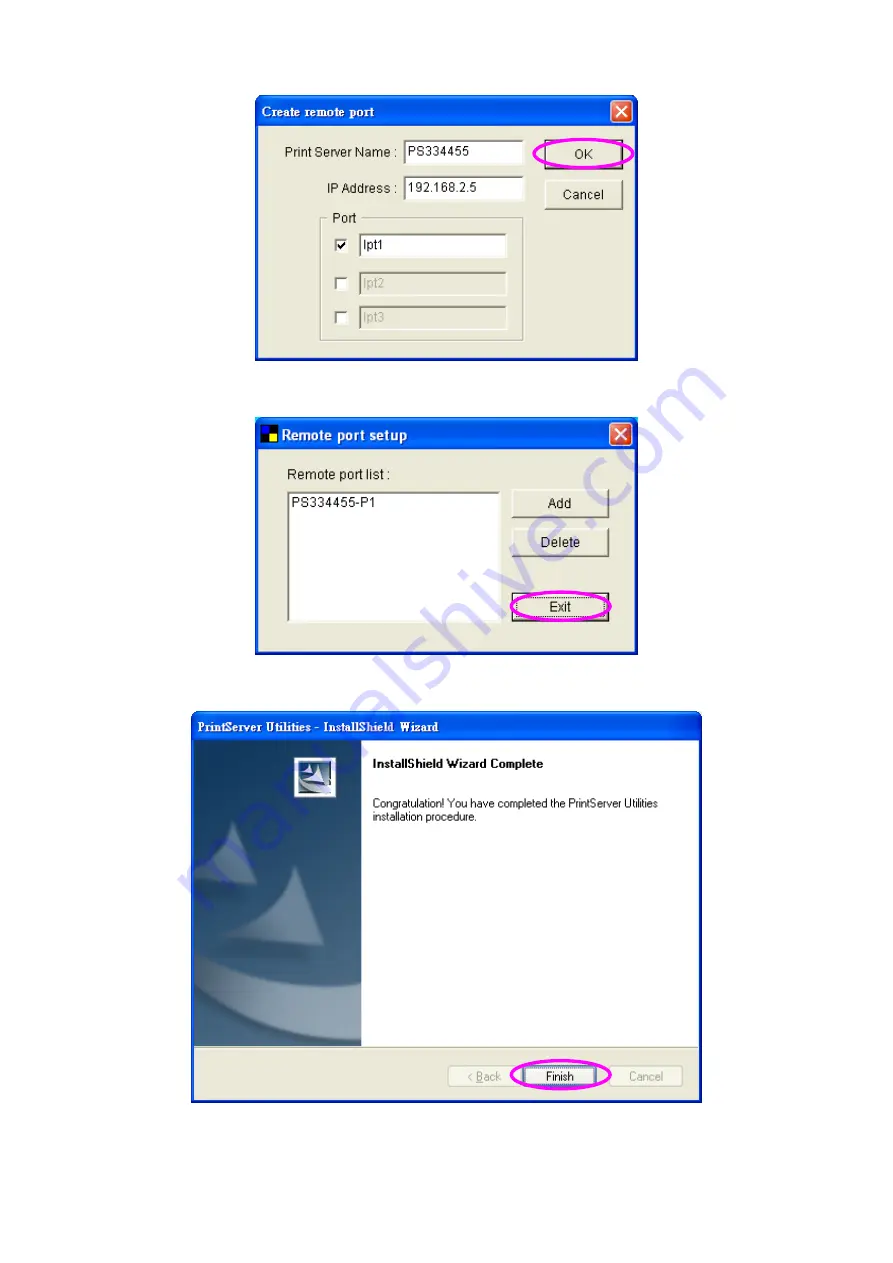
8. The network port of the print server is set completely. Click “Exit”.
9. Click “Finish” to complete the installation.
Page 1: ...E Et th he er rn ne et t W Wi ir re el le es ss s 1 11 1b b g g P Pr ri in nt t S Se er rv ve er r w wi it th h S St to or ra ag ge e S Se er rv ve er r N NA AS S Quick Installation Guide Version 1 0...
Page 2: ...llez trouver l anglais QIG ci joint dans le CD driver I It ta al li ia an no o Incluso nel CD il QIG in Inglese M Ma ag gy ya ar r Az angol telep t si tmutat megtal lhat a mell kelt CD n N Ne ed de er...
Page 3: ...EE 802 3u Wired Ethernet and IEEE 802 11g b 2 4GHz Wireless LAN standards Share USB Mass Storage or Printer to all PCs through Wired or Wireless Network Compatible with all major operating systems Win...
Page 4: ...ld connect the USB mass storage or printer to any one of two ports for files or printer sharing Note 1 Please plug the external power to your USB mass storage devices Note 2 Please plug the USB mass s...
Page 5: ...into your CD ROM drive The Autorun exe program should be executed automatically If not run Autorun exe manually from Autorun folder in the CD 2 The following screen will be displayed Click Setup Utili...
Page 6: ...lick Next to continue 5 The wizard will try to determine your network settings automatically If a DHCP Server is present within the network the wizard will automatically obtain and configure the netwo...
Page 7: ...ally Please click Next once you have found appropriate network settings for the server By default the network settings are as follows IP Address 192 168 2 5 Subnet Mask 255 255 255 0 6 Review the netw...
Page 8: ...aving the settings and rebooting please wait for a while 8 The configuration is finished For more settings please click Advanced Settings to get into the web management of the server Or click Finish t...
Page 9: ...a Print Server Setup tool for you to add the network port of the server to your computer automatically After you have added the network port you can run the standard Add Printers procedures in the Wi...
Page 10: ...P IP network protocol Please follow the steps below to start installation 1 Insert the CD shipped along with the server into your CD ROM drive The Autorun exe program should be executed automatically...
Page 11: ...Next to install the utilities in the default folder or click Browse to specify the destination folder where you would like to install the utilities 5 The system will start to install the utilities aut...
Page 12: ...e and the IP Address of the server and also select the port number then click OK to add the print server port to your computer Print Server Name It is the last 6 digit of MAC ID with prefix PS IP Addr...
Page 13: ...11 8 The network port of the print server is set completely Click Exit 9 Click Finish to complete the installation...
Page 14: ...the procedure described below to add printer to the Windows Note that following Add Printer steps are running in Windows XP the steps in other Operating Systems are similar 1 Click Start and select P...
Page 15: ...ed to this computer and make sure that Automatically detect and install my Plug and Play printer is not selected Click Next 5 Choose the suitable Print Server Network Port which was created by the ins...
Page 16: ...e printer model and click Next If your printer is not in the list click Have Disk to install the driver of the printer After installation the printer model will be added to the list 7 Name your printe...
Page 17: ...ot It is recommended to print a test page Click Next 9 You have added the printer to the PC successfully The information of the printer is displayed in the windows Click Finish 10 Now you can start to...
Page 18: ...iles from the server 6 1 File Server To share the USB mass storage or USB Flash Disk from the server please follow the procedures below 1 Open your Web Browser and enter the IP address of the server t...
Page 19: ...s read write authority Folder Name Enter the name for shared folder Path Designated the shared folder path or enable to share all folders in the storage Description The comments or description for the...
Page 20: ...18...
Page 21: ...B storage device Double click My Network Places in Windows You will find the USB storage device Note If you cannot find the device in My Network Places you can click Start and select Run Enter IP Addr...
Page 22: ...e connections to a server or shared resource by the same user using more than one user name is not allowed Please make sure that you use one user name for one computer to access the same shared resour...
Page 23: ...en your Web Browser and enter the IP address of the server to logon to the web management of the server The default settings of the server are IP Address 192 168 2 5 User Name admin Password 1234 2 Se...
Page 24: ...er s read write authority User Select the user who has the right to access the FTP Server Path Designated the shared folder path Read Write Select Read Only or Read Write Note You can not set sharing...