


7
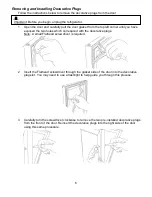
4. Remove the decorative plastic cap from the top left corner of the door and insert it into the
top right corner.
5. After the cap is inserted, carefully press the door gasket into its original position.
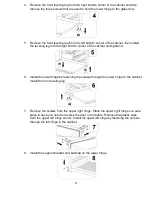
Installing and Removing the Shelves
To prevent damaging a door gasket, make sure to open the door all the way before pulling the
shelves out of their track.
To Install the Shelves:
1. Open the door completely.
2. Take note of the protective stoppers located on the right and left side of the back of
each shelf.
3. Lift either the left or right side of the shelf creating a 45° angle. Insert the shelf at the
desired track level and push back slowly until it stops in place.
4. Gently set the shelf down in place.
To Remove the Shelves
1. Open the door completely.
2. Make sure the shelf is pushed back completely (towards the real wall)
3. If necessary, make sure you remove all the contents sitting on the shelf.
4. Note the protective stoppers located on the right and left side of the back of each shelf.
5. Lift either the
left or right side of the shelf creating a 45° angle from its original position.
Make sure not to lift either side of the shelf too hard as it may come in contact with the inner
wall mount.
6. Pull the shelf forward until it is completely removed from the inner compartment. Set aside
safely.


