


Installing the Switch
3-2
3
Optional Rack-Mounting Equipment
If you plan to rack-mount the switch, be sure to have the following equipment
available:
• Four mounting screws for each device you plan to install in a rack—these are not
included
• A screwdriver (Phillips or flathead, depending on the type of screws used)
Mounting
A switch unit can be mounted in a standard 19-inch equipment rack or on a desktop
or shelf. Mounting instructions for each type of site follow.
Rack Mounting
Before rack mounting the switch, pay particular attention to the following factors:
• Temperature: Since the temperature within a rack assembly may be higher than
the ambient room temperature, check that the rack-environment temperature is
within the specified operating temperature range. (See page C-2.)
• Mechanical Loading: Do not place any equipment on top of a rack-mounted unit
• Circuit Overloading: Be sure that the supply circuit to the rack assembly is not
overloaded.
• Grounding: Rack-mounted equipment should be properly grounded. Particular
attention should be given to supply connections other than direct connections to
the mains.
To rack-mount devices:
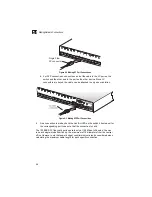
1.
Attach the brackets to the device using the screws provided in the Bracket
Mounting Kit.
Figure 3-1 Attaching the Brackets
2.
Mount the device in the rack, using four rack-mounting screws (not provided).
ES3526S
Summary of Contents for ES3526S
Page 2: ......
Page 4: ...ES3526S E082005 R01 150200052900A ...
Page 5: ......
Page 7: ...ES3526S E082005 R01 150200052900A ...
Page 15: ...viii ...
Page 27: ...Introduction 1 8 1 ...
Page 45: ...Making Network Connections 4 6 4 ...
Page 55: ...Specifications C 4 C ...
Page 63: ...Glossary Glossary 6 ...
Page 66: ......


