background image

12 | 

P a g e


Rear Piping Connections 

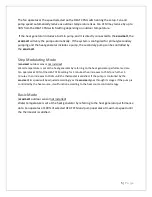
The heating coil may be reversed to allow rear piping:  


Remove upper door 


Disconnect supply air sensor from extension cable 


Slide out heating coil 


Re-mount supply air sensor and grommet to opposite end of heating coil 


Remove rear knock-outs 


Slide in heating coil 


Use plastic plugs (provided) to close up holes on upper door 


Ecosmart Mounting 

The 

ecosmart

 can be installed in up flow, down flow and left or right horizontal applications. 

Install the 

ecosmart

 with the door in place to make sure the cabinet remains square.  Flip the 

unit for down flow applications so that the top of the unit is now the bottom. No modification is 
required for any configuration.  
 
The 

ecosmart 

can be suspended from floor joists, rafters or concrete using rods, pipe, angle 

supports or straps. Units must be hung level to ensure quiet operation.  
 

CAUTION - Use any of the existing screw holes in the cabinet when using straps. If 
the existing screw is too short for securing a mounting strap, a longer screw should 
be used provided care is taken not to damage any internal components. Product 
warranty does not cover any damage or claims resulting from damage from longer 
screws or from the unit being improperly suspended.   


The cabinet is designed so that the return air can be located on either side of the cabinet, or 
from the bottom of the cabinet. Position a filter rack so that the filter is readily accessible.  A 
filter and filter rack are not included. Sides are marked for a standard 16 x 20 in filter rack. 


WARNING - Special care should be taken in the vicinity of the coil to avoid 
puncture. Screw into opening flange instead of top of cabinet when fastening the 
supply air duct.


Plumbing 

Install a sediment faucet or ball valve for use as a drain/purge valve. The drain valve must be 
located downstream of the pump and check valve, and upstream of the isolation valve (if 

Summary of Contents for ES50LVP

Page 1: ...P N 14000C ES50LVP ES90LVP MODULATING AIR HANDLER Installation Operation and Maintenance Manual Ecosmartair 105 Haist Avenue Unit 10 Vaughan ON L4L 5V6 905 857 9755 ecosmartair com ...

Page 2: ...ear Piping Connections 12 Ecosmart Mounting 12 Plumbing 12 Pump 13 PIPING DIAGRAMS 15 Tankless Water Heater Piping 15 Combi Boiler Piping 16 ELECTRICAL 17 Electrical Information 17 Electrical Connections Made to Quick Connects 17 Thermostat Wiring 18 Ecosmart ES50LVP ES90LVP Wiring Diagram 19 Miscellaneous Wiring 20 DIP SWITCH OPTIONS 21 Switch Locations 21 Outdoor Temperature Select 21 Heat CFM E...

Page 3: ...6 Pump Exerciser 27 SERVICE AND MAINTENANCE 27 Filter 27 Coils 27 Fan and Motor 27 Control and Blower Assembly Removal 27 TROUBLESHOOTING 28 Thermostat call error 28 External pump does not run 28 External pump is noisy at start up 28 Water heater temperature and pressure relief valve is weeping 28 Insufficient or no heat 29 Cold water at hot faucet 29 Fan runs for cooling but not for heating 29 He...

Page 4: ... damage WARNING Improper installation may create a condition where the operation of the product could cause personal injury or property damage Only a qualified contractor installer or service agency should install this product Improper installation adjustment alteration service or maintenance can cause injury or property damage Refer to this manual for assistance CAUTION This product must be insta...

Page 5: ...r to adjust for a wide variety of installations Various parameters are automatically monitored and fan and pump speeds vary simultaneously The ecosmart has a built in variable speed pump controller that can vary the speed of a standard single speed AC pump MODES OF OPERATION Three modes of operation are available 1 Full modulation full control of fan and pump requires outdoor temperature sensor 2 ...

Page 6: ... outdoor sensor not installed Water temperature is set at the heat generator by referring to the heat generator performance data Fan operates at 50 of the HEAT CFM setting for 5 minutes then increases to 75 for a further 5 minutes then increases to 100 until the thermostat is satisfied If the pump is controlled by the ecosmart its speed will be adjusted accordingly as the ecosmart goes through its...

Page 7: ...50 24 360 28 470 32 590 36 710 40 840 44 970 3 87 5 16 600 20 790 24 990 29 200 33 420 37 640 41 870 46 100 5 77 600 3 17 390 21 820 26 260 30 720 35 180 39 660 44 150 48 640 2 32 4 18 330 22 980 27 640 32 320 37 000 41 700 46 400 51 100 3 87 5 18 920 23 710 28 510 33 320 38 150 42 970 47 810 52 650 5 77 700 3 19 090 23 950 28 840 33 740 38 660 43 590 48 530 53 470 2 32 4 20 270 25 420 30 590 35 7...

Page 8: ...84 900 3 24 180 30 340 36 520 42 720 48 930 55 160 61 400 67 640 1 96 4 26 030 32 630 39 260 45 910 52 570 59 250 65 930 72 610 3 26 5 27 220 34 110 41 030 47 960 54 900 61 860 68 820 75 790 4 84 1 000 3 25 580 32 100 38 640 45 210 51 790 58 400 65 000 71 620 1 96 4 27 720 34 770 41 840 48 930 56 040 63 160 70 290 77 430 3 26 5 29 120 36 510 43 910 51 340 58 780 66 240 73 700 81 170 4 84 1 100 3 2...

Page 9: ...DATA INCHES Model Overall Dimensions W x D x H Supply Opening W x D Side Return Piping Location A B C D E F G H I J K ES50LVP 14 0 21 0 29 0 11 8 17 8 18 3 14 3 1 4 2 0 2 8 2 4 ES90LVP 21 0 21 0 29 0 18 8 17 8 18 3 14 3 1 4 2 0 2 8 2 4 ...

Page 10: ...lb 85 95 Shipping Dimensions W x D x H in 15 x 24 x 30 5 22 x 24 x 30 5 ES50LVP ECM blower performance CFM amps SWITCH SETTING 0 1 WC 0 2 WC 0 3 WC 0 4 WC 0 5 WC 300 CFM 298 0 36 315 0 55 338 0 70 342 0 91 348 1 1 400 CFM 352 0 45 384 0 66 392 0 85 408 1 04 411 1 22 500 CFM 478 0 7 491 0 92 497 0 95 511 1 34 519 1 56 600 CFM 615 1 13 624 1 35 630 1 61 643 1 86 655 2 13 700 CFM 681 1 47 698 1 74 72...

Page 11: ...00 CFM 1282 4 32 1286 4 74 1295 5 2 1305 5 73 1312 6 17 QUICK START UP PROCEDURES Refer to the superseding installation instructions before following the start up procedures 1 Fill the system with water Do not start the system 2 Purge all air from the system Isolation and purge valves are strongly recommended 3 Purge all air from the space heating loop by closing the isolation valve on the return ...

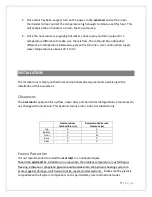
Page 12: ...requirements pertaining to the installation of this equipment Clearances The ecosmart is approved for up flow down flow and horizontal configurations Clearances do not change with orientation This hydronic furnace is for indoor installation only Clearance from Combustibles in Recommended Service Clearance in Top 0 0 Bottom 0 0 Front 0 24 Back 0 0 Sides 0 0 Freeze Protection It is not recommended t...

Page 13: ...quiet operation CAUTION Use any of the existing screw holes in the cabinet when using straps If the existing screw is too short for securing a mounting strap a longer screw should be used provided care is taken not to damage any internal components Product warranty does not cover any damage or claims resulting from damage from longer screws or from the unit being improperly suspended The cabinet i...

Page 14: ...roperly and purge valves and air eliminator devices are installed Following the flushing procedures in the Start up section will ensure that there is no air in the system after initial set up Follow recommendations supplied by the manufacturer of the heating source being used ecosmart includes a flow switch connection where a flow switch can be connected to allow for domestic water priority Note t...

Page 15: ...he possibility of sticking due to sediment and local codes Water Heater or Boiler Setup Follow the manufacturer s installation and start up instructions of the water heater or boiler Make sure the equipment is turned off during installation and service Make certain the equipment has been refilled and all air is purged from the system before turning on the heater WARNING When the system requires wa...

Page 16: ...15 P a g e PIPING DIAGRAMS Tankless Water Heater Piping ...

Page 17: ...16 P a g e Combi Boiler Piping ...

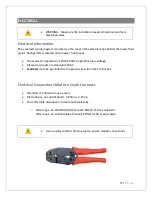
Page 18: ...VAC 60Hz single phase line voltage All control circuits are standard 24VAC ecosmart must be grounded via the green wire within the control box Electrical Connections Made to Quick Connects Stranded or solid wire may be used Male tab size on control board 0 250 in x 0 032 in Correct female disconnects to mate with male tabs o Wire range 22 18 AWG Red Panduit DNF18 250 or equivalent Wire range 16 14...

Page 19: ...18 P a g e Thermostat Wiring Any standard heat cool thermostat is compatible with the ecosmart Wire thermostat to lower right tabs as marked The ecosmart supports optional 2 stage cooling if required ...

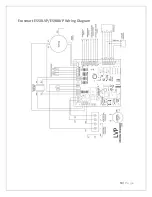
Page 20: ...19 P a g e Ecosmart ES50LVP ES90LVP Wiring Diagram ...

Page 21: ... for DHW fan and pump will shut down after 1 minute If flow switch is active longer than 30 minutes fan and pump will resume normal operation BOILER dry contacts to initiate heat source AUX 24V 24VAC output for humidifier or other accessory Active when heating is on OUTDOOR included outdoor temperature sensor connects here If sensor is not connected ecosmart assumes coldest temperature is present ...

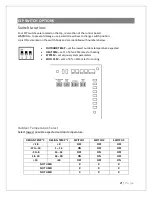
Page 22: ...w OUTDOOR TEMP set the lowest outdoor temperature expected HEAT CFM set 1 of 8 fan CFM rates for heating SYSTEM set various system parameters COOL CFM set 1 of 8 fan CFM rates for cooling Outdoor Temperature Select Select lowest possible expected outdoor temperature DESIGN TEMP C DESIGN TEMP F SWITCH 1 SWITCH 2 SWITCH 3 18 0 OFF OFF OFF 17 to 10 1 14 ON OFF OFF 9 to 0 15 32 OFF ON OFF 1 to 10 33 5...

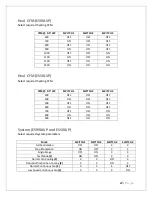
Page 23: ...WITCH 1 SWITCH 2 SWITCH 3 300 OFF OFF OFF 400 ON OFF OFF 500 OFF ON OFF 600 ON ON OFF 700 OFF OFF ON 800 ON OFF ON 900 OFF ON ON System ES990LVP and ES50LVP Select required system parameters Mode SWITCH 1 SWITCH 2 SWITCH 3 SWITCH 4 Full Modulation OFF OFF X X Step Modulation ON OFF X X Single Stage OFF ON X X Test Mode 1 ON ON X X Normal Fan Cooling 2 X X OFF X Dehumidification Fan Cooling 2 X X O...

Page 24: ... for 10 min and then reverts back to rate set by COOL CFM 3 Normal Continuous Fan runs at rate set by HEAT CFM switch Low speed Continuous Fan runs at 50 of rate set by HEAT CFM switch Cool CFM ES90LVP CFM 0 5 WC SWITCH 1 SWITCH 2 SWITCH 3 600 OFF OFF OFF 700 ON OFF OFF 800 OFF ON OFF 900 ON ON OFF 1000 OFF OFF ON 1100 ON OFF ON 1200 OFF ON ON 1300 ON ON ON Cool CFM ES50LVP CFM 0 5 WC SWITCH 1 SWI...

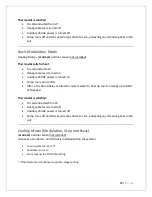
Page 25: ...ed R is disconnected from W Heat generator is turned off Auxiliary 24VAC power is turned off Pump turns off and fan speed ramps down to zero extracting any remaining heat in the coil Step Modulation Heating Mode ecosmart outdoor sensor not installed Thermostat calls for heat R is connected to W Heat generator is turned on Auxiliary 24VAC power is turned on Pump turns on 100 After a 15 second delay...

Page 26: ... on Pump turns on at 100 After a 15 second delay to allow for system water to heat up coil fan ramps up to HEAT CFM speed Thermostat is satisfied R is disconnected from W Heat generator is turned off Auxiliary 24VAC power is turned off Pump turns off and fan speed ramps down to zero extracting any remaining heat in the coil Cooling Mode Modulation Step and Basic ecosmart outdoor sensor not install...

Page 27: ...4 is OFF fan runs at selected HEAT CFM rate If SYSTEM switch 4 is ON fan runs at 50 of selected HEAT CFM rate If fan is set to OFF on thermostat fan runs at HEAT or COOL CFM settings Constant Low Fan Circulation Fan may be run at a low rate using system switch 4 as follows OFF fan runs at rate set by HEAT CFM switch ON fan runs at 50 of rate set by HEAT CFM switch Freeze Protection The ecosmart is...

Page 28: ...cuum or rinse as required A clogged or inadequate filter may void product warranty Replacement filter size is 16 x 20 x 1 Coils Air conditioning and heating coils should not require cleaning if the filter maintenance schedule is adhered to If a filter is damaged or collapses from plugging dust may foul the coils If this happens replace the filter and carefully vacuum the coils The fan may need to ...

Page 29: ...y will re start cooling External pump does not run In areas where hard water is present the pump may stick and fail to run Often closing the isolation valve on the return leg and opening the drain port so that water flows through the pump can free this If this fails to free the pump removal for cleaning or replacement is necessary The daily pump exerciser will help prevent pump sticking External p...

Page 30: ...ictions check if valve is stuck isolation valves could be too restrictive or left partially closed after purging or a closed valve Cold water at hot faucet When the heat source is a water heater the most probable cause is reverse flow through the heating loop from a stuck check valve repair or replace valve Fan runs for cooling but not for heating The room thermostat may be connected improperly Re...

Reviews: