background image

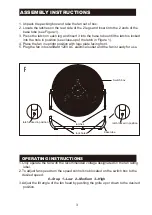
ASSEMBLY INSTRUCTIONS   

1. Unpack the packing box and take the fan out of box.

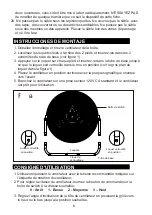
2. Locate the latches on the rear side of the 2 legs and insert into the 2 ends of the 

    base tube (see Figure 1).

3. Press the latch on each leg and insert it into the base tube until the latch is locked 

    into the hole in position (see close-up of the latch in Figure 1).

4. Place the fan in upright position with logo plate facing front.

5. Plug the fan into standard 120V AC electrical outlet and the fan is ready for use.

OPERATING INSTRUCTIONS

1.Only operate the fan with the recommended voltage designated on the fan rating 

    label.

2.To adjust fan speed turn the speed control knob located on the switch box to the 

   desired speed:  


0--Stop   1--Low   2--Medium   3--High

3.Adjust the tilt angle of the fan head by pushing the grille up or down to the desired 

    position.

3

latch locked in position

latches

lock holes

base tube

latch locked in position

Switch box

Summary of Contents for CT40100TB

Page 1: ...OWNER S MANUAL 20 INCH HIGH VELOCITY FLOOR FAN OWNER S MANUAL MODEL FE50 E2 CT40100TB 1 ...

Page 2: ...malfunctions or has been dropped damaged in any manner 10 The use of attachments not recommended or sold by the appliance manufacturer may cause hazards 11 Do not let the cord hang over the edge of a table counter or come in contact with hot surfaces or leave exposed to high traffic areas 12 Do not use outdoors 13 To disconnect grip plug and pull from wall outlet Never yank on cord 14 Always use o...

Page 3: ...n upright position with logo plate facing front 5 Plug the fan into standard 120V AC electrical outlet and the fan is ready for use OPERATING INSTRUCTIONS 1 Only operate the fan with the recommended voltage designated on the fan rating label 2 To adjust fan speed turn the speed control knob located on the switch box to the desired speed 0 Stop 1 Low 2 Medium 3 High 3 Adjust the tilt angle of the f...

Page 4: ...o gently wipe the outer surface of the fan 3 To clean between the grilles we recommend using a pipe cleaner flexible dustwand vacuum cleaner or compressed air to gently remove the dust 4 DO NOT immerse the fan in water and never allow water to drip into the motor housing 5 Be sure to use a soft cloth moistened with a mild soap solution ...

Page 5: ...discretion repair or replace within sixty 60 days after receipt of the product or the defective parts free of charge For your records staple your sales receipt to this manual and record the following DATE OF PURCHASE _______________________________________________ PLACE OF PURCHASE ______________________________________________ In the event of a warranty claim or if service is required for this un...

Page 6: ...VENTILATEUR DE PLANCHER HAUTE VITESSE DE 20 PO MODÈLE FE50 E2 CT40100TB 6 ...

Page 7: ...s pas fonctionner un appareil avec un câble ou une prise endommagé après un mauvais fonctionnement de l appareil ou après toute chute dommage de quelque façon que ce soit 10 L utilisation d accessoires non recommandés ni vendus par le fabricant de l appareil peut être dangereuse 11 Ne laissez pas le câble pendre au bord d une table d un comptoir ou entrer en contact avec des surfaces chaudes ou le...

Page 8: ...z les dans les 2 extrémités du tube de base voir figure 1 3 Appuyez sur le loquet sur chaque pied et insérez le dans le tube de base jusqu à ce que le loquet soit verrouillé dans le trou en position voir le gros plan du loquet dans la figure 1 4 Placez le ventilateur en position verticale avec la plaque signalétique orientée vers l avant 5 Branchez le ventilateur sur une prise secteur 120V CA stan...

Page 9: ...rface externe du ventilateur 3 Pour nettoyer entre les grilles nous vous recommandons d utiliser un cure pipe dustwand flexible aspirateur ou de l air comprimé pour retirer délicatement la poussière 4 N IMMERGEZ PAS le ventilateur dans l eau et ne laissez jamais de l eau s égoutter dans le bloc moteur 5 Assurez vous d utiliser un chiffon doux humidifié avec une solution de savon doux ...

Page 10: ...tion réparera ou remplacera dans les soixante 60 jours suivant la réception du produit ou remplacera les pièces défectueuses gratuitement Pour vos dossiers agrafez votre reçu de vente à ce manuel et notez ce qui suit DATE D ACHAT _______________________________________________ LIEU D ACHAT ______________________________________________ En cas de réclamation de garantie ou si un service est requis ...

Reviews: