background image


Step 3: Pedal mounting 
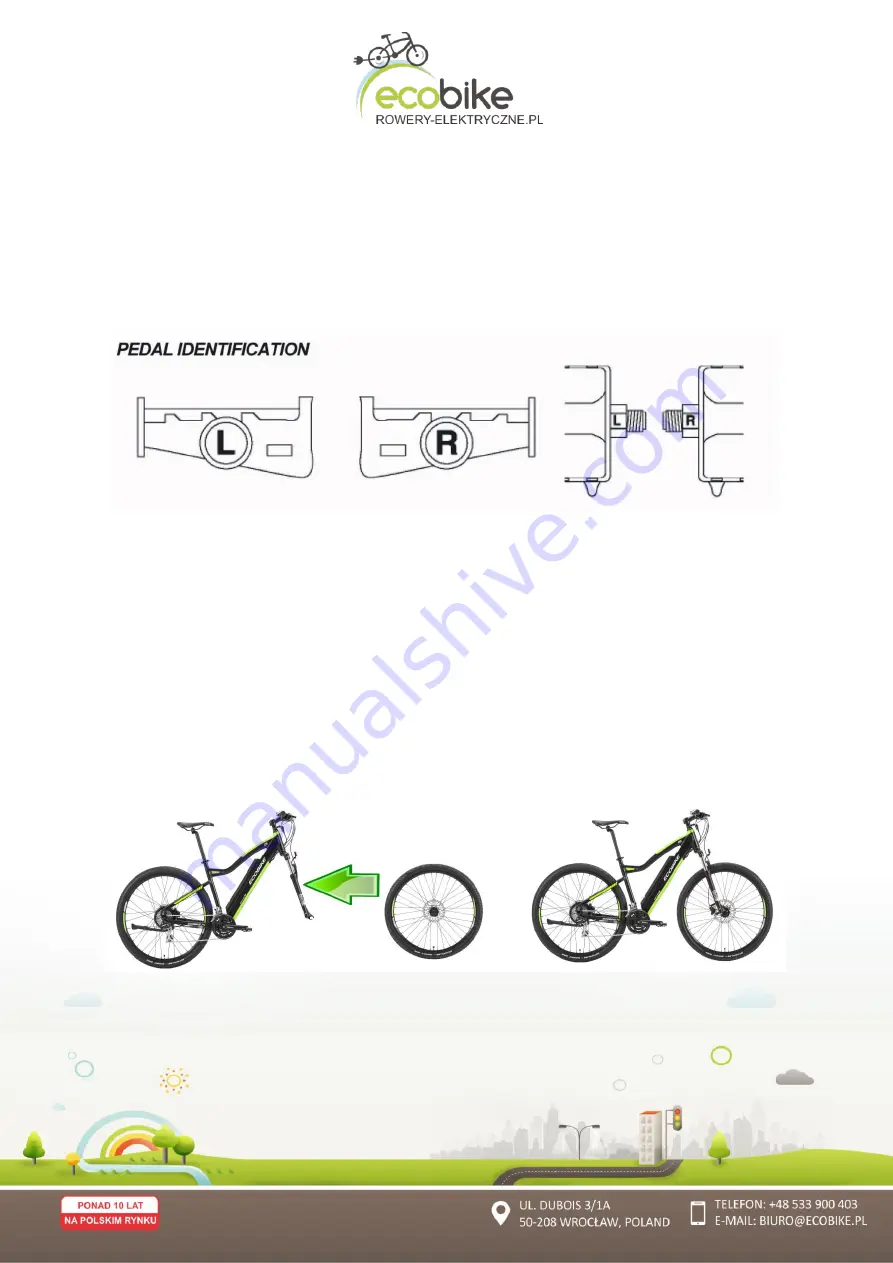
1) The pedals on the axle are marked with the letter "R" or "L". 
2) Tighten the pedal by the letter "R" clockwise in the clockwise direction. Then 
tighten it with key # 15 with a force of 34 Nm.


3) Tighten the pedal by the letter "L" on the left counterclockwise. Then tighten 
it with key No. 15 with a force of 34 Nm. 


Step 4: Adjust the brakes 
The brakes should be set up already at the factory, but the cables tend to 
deregulate, so they need to be checked after the first test drive. Adjustments 
should also be made during use of the bicycle in case of necessity. If you need 
additional consultation, please contact a professional cycling center. 
 
Step 5: Install the front wheel 
The front wheel is disassembled, so after opening the carton, remove the 
protective foil and fit on the front fork. 


Summary of Contents for S3

Page 1: ...Manual instruction for S3 ...

Page 2: ...tor 2 10 Cable definition 2 11 Auto sleep after 10 minutes 2 12 Error code table 3 Using the bike 3 1 Riding the bike 3 2 Self assembly 3 3 How to adjust the saddle height to suit the rider 3 4 Precautions required prior to each use 4 The battery 4 1 Li on battery 4 2 Installing and removing the battery 4 3 Charging the battery 4 4 Protecting the battery 4 5 Using the charger 5 Safety maintenance ...

Page 3: ...met For optimal safe and enjoyable use of the e bike make sure you thoroughly read this user guide before you first use it Use the e bike according to the user guide or it may shorten the life cycle Have a pleasant ride 2 Function display Bigstone C300S 2 1 About the user manual To ensure better performance of your e bike please read through the C300S LCD product introduction carefully before usin...

Page 4: ... The indicated contents are as below 1 MODE 2 Current display 3 Speed display 4 KM H MPH 5 Backlight indicator 6 6KM H work 7 Assist level selection 8 Error code indicator 9 SET operation 10 Distance indicator 11 Battery indicator 12 Cable definition 13 Auto sleep after 10 minutes 2 4 Full view area ...

Page 5: ...MODE again can open the backlight With display on press MODE for 1 5 seconds to turn off the power With the display off there is no battery consumption The leakage current is no more than 2 µA The panel will go to sleep when speed is less than 2 km h for 10 minutes 2 6 2 CURRENT DISPLAY That represents the discharging current of the controller currently each segment is 2A six segments is 12A ...

Page 6: ... hold UP for 1 5 seconds and turn on the backlight Click it again and turn off the backlight 2 6 6 KM H WORK Hold DOWN for 1 5 seconds and enter into the mode of power assist walk The e bike is traveling at 6Km h Display as shown below 2 6 7 ASSIST LEVEL SELECTION Click UP or DOWN to change the stages and output power ratio the output power range from level 1 to level 6 for the default the levels ...

Page 7: ... Error code table for details 2 7 Normal setting Hold DOWN UP 2 seconds to enter into the mode of setting Click MODE to choose setting parameters and click DOWN UP to exit setup 2 7 1 Reset trip distance trip time and max speed Click DOWN to clear trip distance trip time and max speed 2 7 2 Wheel diameter setting Select the accurate wheel diameter value to ensure the accuracy of display about spee...

Page 8: ...ding selection 1 ECO 2 NORMAL 3 POWER 2 7 5 Max speed setting Hold DOWN and UP for 5 seconds and enter into password in putting interface the password is 12 Click MODE to choose setting parameters and click DOWN UP to exit setup Throttle speed limit Click UP or DOWN to choose different throttle speed as Max speed limited ...

Page 9: ...h the display information In turn shows ODO and trip time trip distance max speed auto cycle display means auto cycle display 2 9 BATTERY INDICATOR When the battery capacity is high the six battery segments are all light When the battery is low the battery frame will flash It indicates that the battery is severely low and needs to be recharged immediately ...

Page 10: ...ing with the fault definition Error code definition 21 Current error or MOS damaged 22 Throttle error Start detection 23 motor no phase position 24 Hall error 25 Brake error Start detection 9 communication display receiving error 3 Using the bike 3 1 Riding the bike Before each start make sure that your bike is technically sound and check the following items in particular Properly tighten the scre...

Page 11: ... assembly Below you will find useful information about the installation of our bicycles especially those that require self assembly Step 1 Preparation Pull the bike out of the carton with all the components in it Be careful not to scratch your bike and be careful not to damage any cables or other components Make sure your bike does not miss any items Step 2 Assemble the seat 1 Unscrew the clamping...

Page 12: ...No 15 with a force of 34 Nm Step 4 Adjust the brakes The brakes should be set up already at the factory but the cables tend to deregulate so they need to be checked after the first test drive Adjustments should also be made during use of the bicycle in case of necessity If you need additional consultation please contact a professional cycling center Step 5 Install the front wheel The front wheel i...

Page 13: ...to suit the rider 3 4 Precautions required prior to each use Verify that the brakes and the front rear lights are all working properly Also check the pressure of the tires On derailleur geared bicycles the rear derailleur automatically tensions the chain ...

Page 14: ... use the bike frequently it is recommended that you inspect the state of the fork the frame the suspension and the fasteners The materials and components may be subject to different reactions to usage and wear If you have any doubts contact your dealer who will proceed with the necessary inspection 4 The battery 4 1 Li on battery ECOBIKE uses high quality lithium ion batteries in their bikes These...

Page 15: ...on the side of the battery and on the LCD display Charge the battery at ambient temperature on a non flammable and dry surface away from heat moisture or flammable materials Observe the following steps when charging the battery Insert the charger plug into the battery charging socket and then connect the charger cable to the power point When the charger light is red the battery is charging When th...

Page 16: ...nths repeat the operation The li on battery should be used at 10 C to 40 C 65 20 humidity stored at room temperature WARNING 1 Failure to observe section 4 4 3 may damage the battery 2 Never use any metal tools to connect the battery to the charger as it will short circuit and damage the battery 3 Never place batteries near fire or hot items 4 Never shake never hit and never throw the battery 5 Wh...

Page 17: ... is likely that freewheel will also have become worn and should also be replaced Take the chain off freewheel and rotate it with your hand If you hear a grinding noise of freewheel stops suddenly after spinning it it may need to be adjusted or to be replaced The nexus gear does not require any sort of maintenance Signaling device The bike is silent In order to alert others as to your presence you ...

Page 18: ...t exposed to humidity as it contains Electronic components Do not use a high pressure washer Maintenance Make sure your bike is safe for the environment Used parts must be disposed of in appropriate selective sorting recycling bins A battery which no longer works must be returned to your dealer so that he may pass it to a recycling company Replacing the rear light batteries remove the screw to acc...

Page 19: ...t baskets and storage pouch are not provided with the vehicle To order these accessories get in touch with your dealer Using only genuine replacement parts for safety critical components Have a pleasant ride ...

Page 20: ...vides the purchaser with a free removal by repairing physical defects defects in construction assembly or material defects occurring during normal operation 7 The warranty does not cover the replacement of faulty items 8 Only service points indicated by the Guarantor are eligible for damage assessment The rating is determined by the manufacturer which is the same for all users of the equipment 9 T...

Page 21: ...ser the Purchaser is obliged to deliver at his own expense to the point of purchase after prior cleaning of it from mud sand and other impurities 15 Complaint proceedings start when the advertised product reaches the service 16 The Contractor should complete the repair within 14 working days from the date of submission of the complaint Warranty repairs will be made directly to the dealer s warrant...

Reviews: