Ecoair DC14 Manual Download Page 11


© 2018 EcoAir                                                                                    11                                                                         All rights reserved 


MAINTENANCE


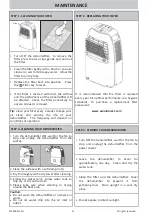
STEP 1 - CLEANING YOUR FILTER  


Turn  OFF  the  dehumidifier,    to  remove  the 
filter  press  the  two  clips  gently  and  pull  out 
the filter. 

Clean the filter lightly with a brush or vacuum 

cleaner or warm mild soapy water.  Allow the 
filter to air dry fully. 

Replace  the  filter  back  into  posi on.      Press 
the       Filter key to reset. 

If  the  filter  is  covered  with  dust,  the  airflow 
and the performance of the dehumidifier will 
be  affected.    Check  the  filter  periodically  to 
ensure all dust is removed.  

Tip: 

Clean your filter every 2 weeks to keep your 

air  clean  and  prolong  the  life  of  your 

dehumidifier.    The  frequency  will  depend  on 
condi ons of opera on. 

STEP 2 - REPLACING YOUR FILTER  


It  is  recommended  that  the  filter  is  replaced  
every  year  for  op mal  performance  and  hygiene 
standards.  To  purchase  a  replacement  filter 
please visit: 

www.ecoairdirect.com 


STEP 4 - STORING YOUR DEHUMIDIFIER  

Turn OFF the dehumidifier, wait for the fan to 
stop  and  unplug  the  dehumidifier  from  the 
power socket.  

Leave  the  dehumidifier  to  drain  for 

approximately  one  day.    Clean  and  dry  the 

water tank. 

Clean  the  filter  and  the  dehumidifier.  Cover 
the  dehumidifier  to  prevent  it  from 
gathering  dust.    Store  upright  in  a  cool  dry 
place.  

Do not expose to direct sunlight. 

STEP 3- CLEANING YOUR DEHUMIDIFIER  

Turn the dehumidifier OFF, wait for the fan to 

stop  and  unplug  the  dehumidifier  from  the 

socket.  

2. Clean the surface with a so  damp cloth. 
3. Dry thoroughly with a dry towel a er cleaning.  

4. Empty  the  water  tank.    Allow  water  tank  to 

drip dry or dry with a cloth.  

5. Please  take  care  when  cleaning  or  drying 

around the float area. 
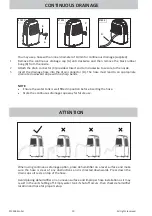
Cau on:  

x

Do  not  wash  the  dehumidifier  or  immerse  in 

water. 

x

Do  not  let  water  drip  into  the  air  inlet  or 

outlet.  

Clips 

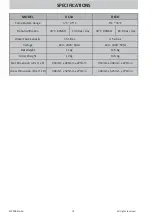
Summary of Contents for DC14

Page 1: ...UK EU DC14 DC18 Compressor Dehumidifier Domes c Dehumidifier C385 386 18092018 ...

Page 2: ...d to dispose of this appliance as domes c household waste For disposal a Contact your local council b The manufacturer will take back the old appliance for disposal when you replace it with a new product c Old products contain valuable resources which should be recycled as scrap metal Wild disposal of waste in forests and landscapes endangers your health when hazardous substances leak into the gro...

Page 3: ...ust be connected to the terminal which is marked with the le er N or coloured BLACK 2 The BROWN wire is LIVE and must be connected to the terminal which is marked with the le er L or coloured RED 3 The GREEN YELLOW is EARTH and must be connected to the terminal which is marked with the le er E or or coloured GREEN or GREEN YELLOW 4 Always ensure that the cord grip is posi oned and fastened correct...

Page 4: ...furniture musical instruments and artwork by drying it out too much HIGH HUMIDITY High humidity indoors causes damp and condensa on The damp le by condensa on can damage plaster wall paper furniture vehicles mber windows doors and clothes It can be harmful to our health when bacteria thrives causing mould and fungus MAINTAINING SAFE LEVELS OF HUMIDITY It is important to maintain a consistent humid...

Page 5: ...m the pow er supply grip the plug and pull from the power socket Never pull by the cord 11 Always empty the internal water tank before storing the appliance away 12 Close supervision is necessary when the appliance is used in the presence of children and pets 13 Do not run power cord under carpe ng or cover with rugs or runners Arrange the cord away from areas where it may become a trip hazard 14 ...

Page 6: ...80 RH 8 Laundry Con nuous CO Indicator Press repeatedly un l CO is displayed The green Laundry LED indicator stays on when in Laundry mode In Laundry mode the dehumidi fier will run con nuously 9 Filter Clean Indicator icon Indicates that the air filter needs cleaning or replacement Cleaning your filter regularly helps to prolong the life of the dehumidifier and gives you cleaner air 10 Filter Clean R...

Page 7: ...r a hallway As long as the internal doors are open the excess mois ture from all of the rooms in the house will migrate naturally towards the dehumidifier and be processed STEP 4 FAN MODE Low Select for low fan speed x Use for quiet opera on or when humidity has been reduced x Highly recommended for night use Select for high fan speed x Use for maximum moisture removal x Highly recommended for dryi...

Page 8: ...oximately 3 minutes This is to protect the dehumidifier and is not a fault Opera on will automa cally restart a er 3 minutes STEP 7 LAUNDRY CONTINUOUS CONTINUED FROM STEP 6 x Press un l the CO appears on dis play screen x Select desired fan speed x The dehumidifier will operate con nuously at its maximum dehu midifica on se ngs un l se ng is changed or the water tank is full Note If connected to a ho...

Page 9: ...ater tank from the purpose made outlet see step 3 picture to the right side Clean the water tank if needed Reinsert the water tank to the correct posi on as soon as possible to prevent water dripping from the dehumidifier NOTE x Clean the water tank with clean water if needed Do not use detergent solvent abrasive or hot water to avoid damaging the water tank or float x Do not remove or damage the flo...

Page 10: ... at a downward slope with no sharp bends NOTE x Ensure the water tank is well fi ed in posi on before inser ng the hose x Store the con nuous drainage cap away for future use STEP 1 STEP 2 STEP 3 B A C D When using con nuous drainage op on place dehumidifier on a level surface and make sure the hose is clear of any obstruc ons and is directed downwards Press down the drain cap so it rests on top of ...

Page 11: ...p mal performance and hygiene standards To purchase a replacement filter please visit www ecoairdirect com STEP 4 STORING YOUR DEHUMIDIFIER Turn OFF the dehumidifier wait for the fan to stop and unplug the dehumidifier from the power socket Leave the dehumidifier to drain for approximately one day Clean and dry the water tank Clean the filter and the dehumidifier Cover the dehumidifier to prevent it from...

Page 12: ...ctly Ensure the dehumidifier is on a flat even surface use a spirit level to check remove tank and replace correctly Water Leaking Damaged water tank Remove the water tank fill with water and place on a hard even surface to test for leaking The con nuous drainage is clogged or loose Dehumidifier opera ng in colder envi ronment Check the con nuous drainage hose and its connec on Ensure room is within o...

Page 13: ... 30 C 80 RH 14 Litres day 30 C 80 RH 18 Litres day Water Tank Capacity 3 5 Litres 3 5 Litres Voltage 220 240V 50Hz 220 240V 50Hz Net Weight 11 Kg 13 5 Kg Gross Weight 12 Kg 14 5 Kg Net Dimension W x H x D 353mm x 496mm x 225mm 353mm x 496mm x 225mm Gross Dimension W x H x D 396mm x 525mm x 274mm 396mm x 525mm x 274mm ...

Page 14: ...iance has been altered and damaged by owner or third par es d In the event of abuse whether physical or verbal abuse towards any member of staff 8 Warranty provision will be free of charge and we will decide whether this will take the form of a repair or the replacement of the appliance Small appliances that can be reasonably transported or posted may need to be handed over or shipped to our custom...

Page 15: ......

Page 16: ...66129930236 ...

Reviews: