


24
ABS Plastic Shrouds
•
The front tiller shroud, front shroud, and the rear shroud are formed from durable ABS
plastic and are coated with an advanced formula urethane paint.
•
A light application of car wax will help the shrouds retain their high gloss.
Motor Brushes
The motor brushes are housed inside of the motor assembly. They should be inspected periodically for
wear by your
authorized dealer only.
Wheel Replacement
If your scooter is equipped with pneumatic tires and you have a flat tire, you can have the tube
replaced.
If
your scooter is equipped with foam / solid tires, the entire wheel must be
replaced depending on the model. Contact your local dealer for information regarding replacement
wheels for your scooter.
Wiring Harnesses
•
Regularly check all wiring connections.
•
Regularly check all wiring insulation, including the charger power cord, for wear or damage.
•
Have your authorized dealer repair or replace any damaged connector, connection, or insulation
that you find before using your scooter again.
•
Even though the scooter has passed the necessary testing requirements for ingress of liquids,
you should keep electrical connections away from sources of dampness, including direct
exposure to water or bodily fluids and incontinence. Check electrical components frequently for
signs of corrosion and replace as necessary.
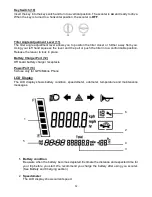
LCD Setting Procedure
1. Key switch off.
2. Keep pressing both head light button and half speed button for 3 seconds and key switch on
3. Release both head light button and half speed button, the display is now in setting mode.
4. Press hazard light button once at a time to choose the item you want to set. (The items are
AM/PM, hour, minute, °C/°F, km/mile and kph/mph.)
5. Press left indicator button or right indicator button to change the setting.
6. Leave all buttons for more than 5 seconds, the display will automatically go back to drive mode
and store the settings.
Console, Charger, and Electronic Controller Module
•
Keep these areas away from moisture.
•
Before operating your scooter, allow any of these areas to dry thoroughly if they have been
exposed to moisture.
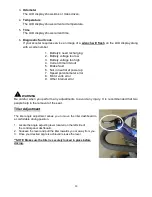
Storing your Scooter
If you plan on not using your scooter for an extended period, it is best to:
1.
Fully charge the batteries prior to storage.
2.
Disconnect the batteries from the scooter.
3.
Store your scooter in a warm, dry environment.
4.
Avoid storing your scooter where it will be exposed to extreme temperatures.
Always protect batteries from freezing temperatures and never charge a frozen battery. Charging a
frozen battery can result in damage to the battery.
Summary of Contents for Pioneer S148
Page 1: ...S148 Owner s Manual ...


