background image


Introd

uctio

Creat
e a VP

S an

Set 
it U
p w

ith


UBUNTU

 22.0

Con

nect to

 VP

via 

SSH via

 PuT

TY 

So

ftw

are


User 

cr

eatio

n fo

Store &

 Fo
rw

ard 

(S

&

F)


Generatin

g SSH

 ke

ys


Upload

ing co

nte
nt to


VP
S w
ith F

ile

Zil

la 

(FTP)


S&

F m
od

ul

(Rsyn

c)


3.


 CONNECT TO VPS VIA SSH VIA PuTTY SOFTWARE 

Once your VPS has been created and validated, 

the provider should provide you, via your 

email  account,  with  all  the  relevant  information  you  will  require  to  enter  in  the  PuTTY 
terminal

:  


IPv4 address of the VPS. 


Name of the VPS. 


Administrator account. 


User. 


Password. 


1.


You can access the server through a command line terminal (on Linux or Mac) or using 
third  party  software  on  Windows,  we  recommend  PuTTY,  which  will  be  used  in  this 
example. 

2.


Download the PuTTY software from its official website

https://www.putty.org/


3.


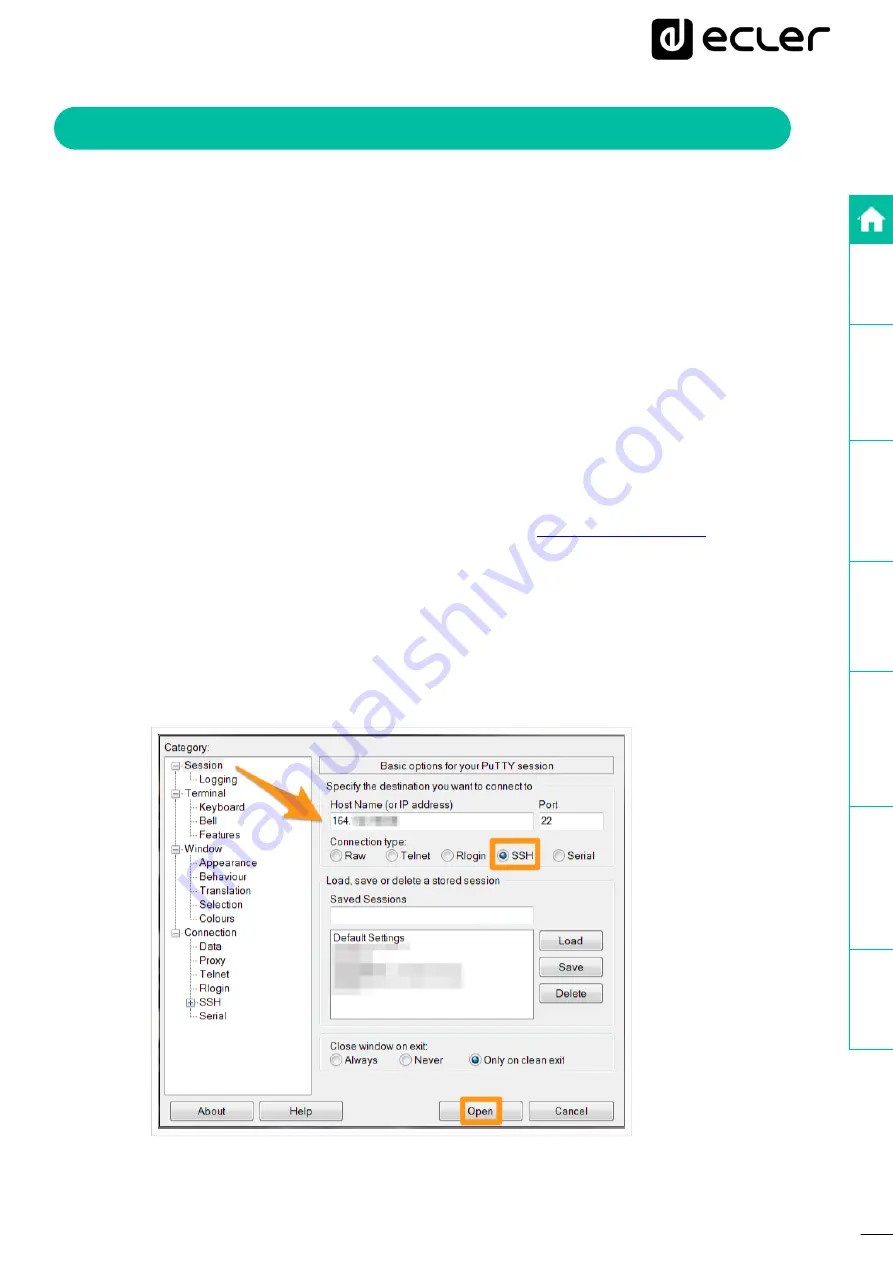
Open PuTTY and in the "Host Name (or IP address)" section enter the IPv4 address of 
the VPS you wish to connect to. 

4.


In the "Port" section, enter the communication port you have established, in this case we 
will use the default port "22".  

5.


Select "SSH" as the connection type 

6.


Click "Open" to start the SSH session. 


Summary of Contents for PLAYER ONE

Page 1: ...sk Sync S F VPS PLAYER ONE PLAYER ZERO Introduction Create a VPS and Set it Up with UBUNTU 22 04 Connect to VPS via SSH via PuTTY Software User creation for Store Forward S F Generating SSH keys Uploa...

Page 2: ...tent to VPS with FileZilla FTP S F module Rsync TABLE OF CONTENTS 1 INTRODUCTION 3 2 CREATE A VPS and SET IT UP WITH UBUNTU 22 04 4 2 1 Necessary tools 4 2 2 Necessary steps 4 3 CONNECT TO VPS VIA SSH...

Page 3: ...PLAYER devices Player ONE and Player ZERO to download remote audio content to local storage media USB uSD When it is active it checks a remote location that hosts audio content on a daily basis compar...

Page 4: ...e server It acts as an isolated server Unlike shared hosting it works as if it were your own private server 2 2 Necessary steps The steps may differ depending on the contracted VPS provider but the pr...

Page 5: ...ct and proceed to finalise the subscription 7 Once subscribed in the VPS configuration screen you will be able to adjust network settings add additional storage adjust security etc Configure these set...

Page 6: ...terminal IPv4 address of the VPS Name of the VPS Administrator account User Password 1 You can access the server through a command line terminal on Linux or Mac or using third party software on Window...

Page 7: ...keys Uploading content to VPS with FileZilla FTP S F module Rsync 7 Accept the security message 8 Enter your VPS username and password when prompted 9 You are now connected to your VPS 10 As you are...

Page 8: ...we must enter the following commands This procedure will restart your VPS and stop the SSH connection so you will need to reconnect via SSH sudo sh c echo HostKeyAlgorithms ssh rsa etc ssh sshd_confi...

Page 9: ...nerate the keys and press ENTER directly in response to each question without typing anything 2 Add the public keys to the authorised keys with the following command and then press ENTER cat ssh id_rs...

Page 10: ...NT TO VPS WITH FileZilla FTP 1 Download and install FileZilla on your computer 2 Open FileZilla and select File from the toolbar 3 Click on Site Manager and then on New site 4 In the Protocol section...

Page 11: ...o VPS via SSH via PuTTY Software User creation for Store Forward S F Generating SSH keys Uploading content to VPS with FileZilla FTP S F module Rsync 9 Click on Connect 10 Once connected you will be a...

Page 12: ...erating SSH keys Uploading content to VPS with FileZilla FTP S F module Rsync 11 To upload files to your VPS simply drag and drop files from your computer to the right hand window of FileZilla to plac...

Page 13: ...implement it in the S F module of your PLAYER 1 General Section Enabled In this section activate the S F Module Rsync by checking the box Time this is a very important point as this is where the exac...

Page 14: ...e Source Section In this section you must fill in all the data that we have previously configured and completed In our example Host 5 196 22 104 Port 22 Folder home saf sync Username saf Private Key k...

Page 15: ...al Target Section In this section you will indicate where Rsync will synchronise the files it receives from the SSH server either on a USB stick or SD card inserted in the PLAYER in FAT32 format a Ind...

Page 16: ...ts automatically and will start to dump and playback the contents to the storage previously indicated Example of display in Player ONE Player ZERO does not have a display and must therefore be monitor...

Page 17: ...racteristics are subject to variation due to production tolerances NEEC AUDIO BARCELONA S L reserves the right to make changes or improvements in the design or manufacturing that may affect these prod...

Reviews: