background image


16 

Chapter 1 • Installation instructions 
H66664 Revision C 


Figure 15: Positioning the washers and screws 

Figure 16: Placing the plate and tightening the screws 

1.6


System power requirements 

The terminal must be connected to a power supply with the requirements shown in 

Table 4

Table 4: System power requirements 

System Component


Power Requirement


Terminal input voltage minimum 

10 VDC 

Terminal input voltage maximum 

28 VDC 

Power cable length maximum 

30 m 

Power supply voltage suggested (with 

a power cable length < 10m) 

12 VDC 

Power supply voltage suggested (with 
a power cable length > 10m) 

19 VDC 

Power supply requirement 

16 W 

Power supply peak current 

3.5 A 


Note:

  Ensure the power source is fused at the source to protect 

against any short circuits in the terminal power wiring. A 5A 

slow blow fuse is recommended. 


Summary of Contents for Hughes 45 Series

Page 1: ...Hughes 45XX Install Guide H66664 Revision C May 18 2021 ...

Page 2: ... has made every effort to ensure the correctness and completeness of the material in this document Hughes Network Systems LLC shall not be liable for errors contained herein The information in this document is subject to change without notice Hughes Network Systems LLC makes no warranty of any kind with regard to this material including but not limited to the implied warranties of merchantability ...

Page 3: ...le mount kit 12 1 4 5 Cables and connectors options 12 1 5 Terminal installation using the optional mounting kits 13 1 5 1 Terminal installation using the magnetic mounting kit 13 1 5 2 Terminal installation using the fixed mounting bracket kit 14 1 6 System power requirements 16 1 7 Power and data cable 17 1 7 1 Custom connection power and data cable RJ45 wiring block 17 1 8 Vehicular installatio...

Page 4: ... injury Messages concerning property damage A NOTICE concerns property damage only NOTICE is used for advisory messages concerning possible property damage product damage or malfunction data loss or other unwanted results but not personal injury Safety symbols The generic safety alert symbol calls attention to a potential personal injury hazard It appears next to the DANGER WARNING and CAUTION sig...

Page 5: ...id your authority to operate this equipment Only use a soft damp cloth to clean the Terminal To avoid impaired Terminal performance please ensure the unit s antenna is not damaged or covered with foreign material like paint or labeling When inserting the SIM do not bend it or damage the contacts in any way When connecting the interface cables do not use excessive force In the Vicinity of Blasting ...

Page 6: ...nna front and sides and your pacemaker Refer to your pacemaker product literature for information on your particular device If you have any reason to suspect that interference is taking place turn off your Satellite Terminal immediately Hearing Aids Most new models of hearing aids are immune to radio frequency interference from Satellite Terminals that are more than 2 meters away Many types of old...

Page 7: ...Understanding safety alert messages H66664 Revision C 7 ...

Page 8: ...nstructions on setting up a Hughes 45XX Terminal for the first time 1 Unpack the box Without tearing the plastic around the 45XX lift it out of the box unfold the flaps and slide it out of the sleeve Save the box and packing material should you need to ship the 45XX at a later date 2 Remove the SIM door 3 Insert the satellite SIM card supplied by your service provider in the SAT SIM slot as shown ...

Page 9: ...Connect a Hughes cable 3501314 000x from the barrel connector to power and Ethernet using the cable pinout table below Figure 4 Cable Pinout Table 6 Ensure that the red wire is connected to always on 12VDC and that the white wire is connected to switched power e g vehicle ignition to power the 45XX on and off automatically as there is no power button on the 45XX Note The power supply must be rated...

Page 10: ...to install the terminal For your Hughes 45XX Terminal to function correctly it must be installed in a location that provides a clear view of the sky in all directions for a vehicular install and an unobstructed view to the satellite in a fixed install The terminal does not need to be pointed but it should be mounted on a roughly horizontal surface 1 4 Optional 45XX mounting hardware Please refer t...

Page 11: ...ng kit Table 1 Magnetic mounting kit Item Part Number Specifications Magnetic Mounting Kit 3501365 0001 Custom designed kit for mounting the terminal to a horizontal magnetic flat surface The kit contains all the parts needed to add magnetic mounting to the terminal 1 4 3 Fixed mounting bracket kit This kit may be used for mounting the Hughes 45XX Terminal to a vertical flat surface The mounting k...

Page 12: ... with nuts washers and lock washers Figure 9 Pole mount kit 1 4 5 Cables and connectors options Several ready made cables and connectors are available for connecting to the 45XX Hughes Terminal Table 3 Cable options in the catalog Item Part Number Specifications Power and data cable blunt wire 5 m 3501314 0002 Ready made cables for connecting the terminal to DC power and Ethernet data Power and da...

Page 13: ... the 4510 Terminal Two SIM trays will be provided in the kit box The nominal outer diameter of the 45XX cables is 8 50 0 30 mm The bend radius of the 45XX cables is 50 mm Figure 10 Cables and connectors options 1 5 Terminal installation using the optional mounting kits 1 5 1 Terminal installation using the magnetic mounting kit Using the magnetic mounting kit the Hughes 45XX Terminal can be instal...

Page 14: ... lbf in 4 Decide the install location of the terminal 5 Place the assembly so that the magnets are on top of the horizontal surface 6 Ensure the terminal is stable and not moving 7 Refer to the Quick Start Guide for more details on installing the SIM and setting up the terminal 8 Refer to the User Guide for further details Figure 12 Positioning the washers and screws Figure 13 Placing the plate an...

Page 15: ...he vertical surface 2 Place the bracket so that its four holes are flush with the identical holes on the terminal The holes on each side have the same dimensions 3 Position all washers so that they are touching the head of each screw Note Please note that the torque specification for the screws is 1 1 25 Nm 9 0 11 0 lbf in 4 Tighten all screws so that the washers are compressed 5 Ensure the termin...

Page 16: ...rements System Component Power Requirement Terminal input voltage minimum 10 VDC Terminal input voltage maximum 28 VDC Power cable length maximum 30 m Power supply voltage suggested with a power cable length 10m 12 VDC Power supply voltage suggested with a power cable length 10m 19 VDC Power supply requirement 16 W Power supply peak current 3 5 A Note Ensure the power source is fused at the source...

Page 17: ...shown in Figure 17 2 Connect the RJ45 wiring block to the internal wires of the power and data cable using a straight through connection Follow the information in Table 5 to achieve the correct connection between the wires 45XX power and data cable and the pinouts RJ45 Table 5 Pin out table Cable Pin Cable Wire Color Function Connection RJ45 Pinout 1a Green Ethernet RX Straight through 6 2a White ...

Page 18: ...ill be powered up or down when the vehicle s ignition is switched on or off Refer to Figure 19 for the power schematic Note If an ignition sense line is NOT used the modem will be powered independently of the ignition being switched on or off This could lead to the vehicle battery being completely discharged Table 6 Power plug pin out Pin Wire Color Function Details 1 White Remote switch ignition ...

Page 19: ... Hughes 45XX Terminal can be powered by a direct source See Section 1 6 and the terminal connector section for more details 1 9 2 Marine coating description To protect the Hughes 45xx terminals from the harsh marine environment please implement the following recommendations Obtain a high quality marine ceramic coating product such as the one in the picture below and found online at http www glidec...

Page 20: ...ackage Apply a second coat on the terminal as needed The second application is at the discretion of the customer This ceramic coating will help protect the 45xx from the corrosive effects of the saltwater marine environment 1 10 Fixed installation 1 10 1 Terminal power connection The Hughes 45XX Terminal can be powered by a direct source See Section 1 6 and the terminal connector section for more ...

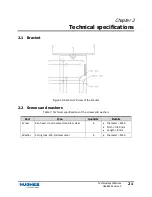
Page 21: ... Figure 20 Detailed 2D view of the bracket 2 2 Screws and washers Table 7 Technical specifications of the screws and washers Part Type Quantity Details Screw Pan head cross recessed stainless steel 4 Diameter M5 0 Pitch 0 80 mm Length 8 mm Washer Spring lock M5 stainless steel 4 Diameter M5 0 ...

Reviews: