Echoflex Installation Guide
Photo & CCT Sensors
Tests and Settings
Use the
[Teach]
button and color LEDs to navigate the Tests and Settings
menu. Remove the cover to access the
[Teach]
button located beside the
battery clip. The LEDs display through the front lens.
Note:
A battery is required to run tests or change settings. If you
cannot access the LED blink menu, install a good battery. See
for installation instructions.
•
(green LED)
•
(blue LED)
•
(red LED)
•
(blue and red LEDs)
The menu times out after two minutes of inactivity.
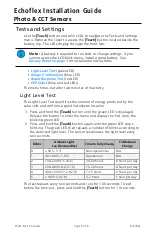
Light Level Test
The Light Level Test quantifies the amount of energy produced by the
solar cells and confirms a good installation location.
1. Press and hold the
[Teach]
button until the green LED is displayed.
Release the button to enter the menu and display the first item, the
blinking green LED.
2. Press and hold the
[Teach]
button again until the green LED stops
blinking. The green LED then repeats a number of blinks according to
the detected light level. The sensor reevaluates the light level every
two seconds.
Blinks
Ambient Light
Lux (Footcandles)
Time to Fully Charge
To Maintain
Charge
0
< 40 (< 3.7)
Non-operational
N/A
1
40–100 (3.7–9.3)
Operational
N/A
2
100–200 (9.3–18.6)
30–60 hours
8 hours per day
3
200–400 (18.6–37.2)
15–30 hours
4 hours per day
4
400–1000 (37.2–92.9)
7–15 hours
2 hours per day
5
> 1000 (> 92.9)
3–7 hours
1 hour per day
The test repeats every two seconds and runs for 100 seconds. To exit
before the time-out, press and hold the
[Teach]
button for 10 seconds.
Photo & CCT Sensors
Page 5 of 8
Echoflex


