background image

X7502310908

31

© 03/2014 ECHO Inc.

SRM-280U

MAINTENANCE

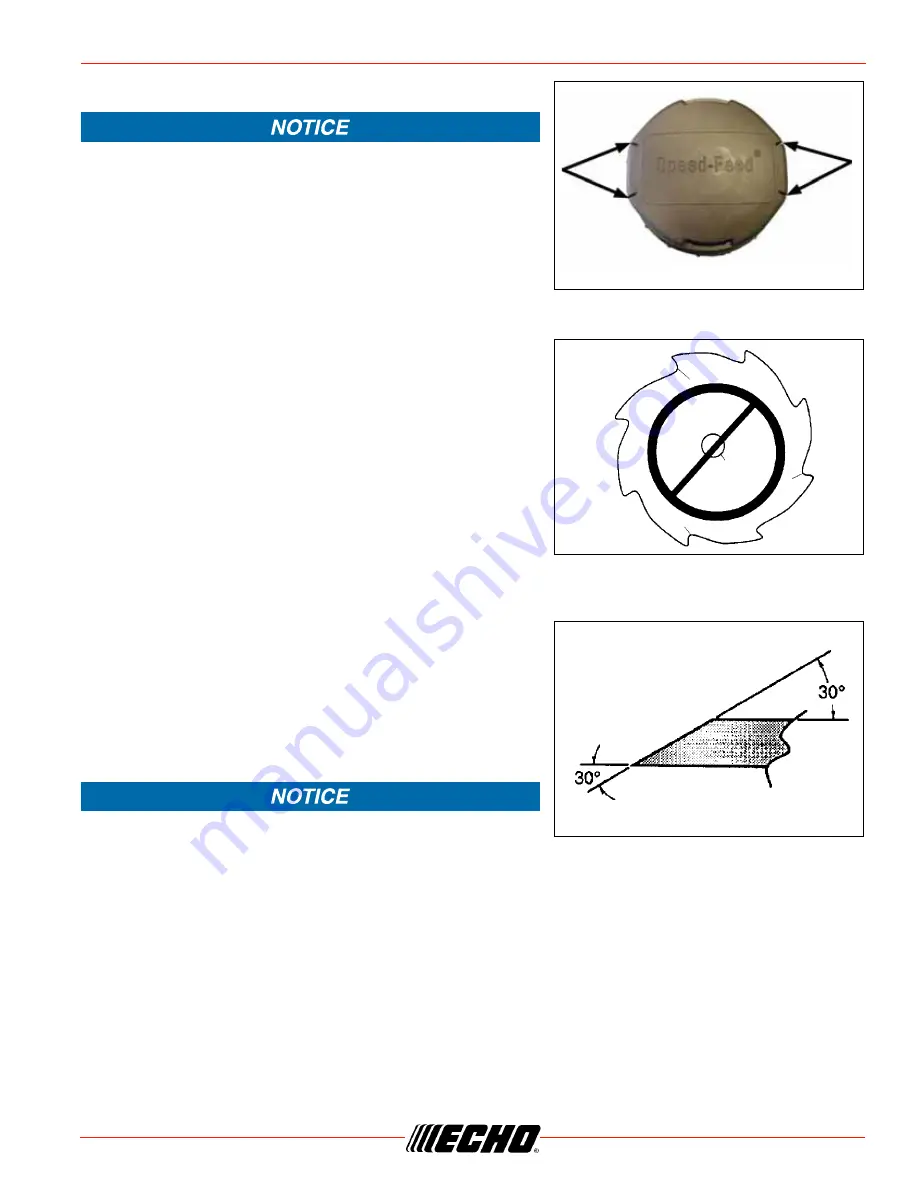
When the wear indicators located at the bottom of the 
Speed-Feed® head are worn smooth, or if holes appear, 
replacement of the cover or the entire Speed-Feed® head is 
required.

Sharpening Metal Blades

Three styles of metal blades are approved for use on the ECHO 
Brush Cutter. The 8-tooth blade can be sharpened during 
normal maintenance. The clearing blade and 80 tooth blade 
require professional service.

Before sharpening, CLOSELY inspect blade for cracks (look at 
the bottom of each tooth and the center mounting hole closely), 
missing teeth and bending. If ANY of these problems are 
discovered, replace the blade.

When sharpening a blade, always remove the same amount of 
materials from each tooth to maintain balance. A blade that is not balanced will cause unsafe handling due 
to vibration and can result in blade failure.

1. File each tooth at a 30 degree angle a specific number of 

times, eg. 4 strokes per tooth. Work your way around the 
blade until all teeth are sharp.

2. DO NOT file the ‘gullet’ (radius) of the tooth with the flat file. 

The radius must remain. A sharp corner will lead to a crack 
and blade failure.

If an electric grinder is used, use care not to overheat teeth, do 
not allow tips/tooth to glow red or turn blue. DO NOT place 
blade in cooling water. This will change the temper of the blade and could result in blade failure.

Wear Indicators

Summary of Contents for SRM - 280U

Page 1: ...catalytic muffler and surrounding cover may become extremely hot Always keep clear of exhaust and muffler area otherwise serious personal injury may occur The engine exhaust from this product contain...

Page 2: ...13 Plastic Shield Installation 13 Nylon Line Head Installation 13 To Advance Trimmer Line 14 Remove Nylon Line Head 14 Blade Installation 14 U Handle Installation 16 Throttle Linkage and Ignition Lead...

Page 3: ...re reference write them in the space provided below Model No _________________ SN ___________________ Service Service of this product during the warranty period must be performed by an Authorized ECHO...

Page 4: ...ls and key words and what they mean to you The safety alert symbol accompanied by the word DANGER calls attention to an act or condition which WILL lead to serious personal injury or death if not avoi...

Page 5: ...etor Adjustment Idle speed DO NOT smoke near fuel Primer Bulb Wear hand and foot protection Carburetor Adjustment Low speed mixture Choke Control Run Position Choke Open Choke Control Cold Start Posit...

Page 6: ...on the handles Gloves also reduce the transmission of machine vibration to your hands Breathing Protection Wear a face mask to protect against dust Hearing Protection ECHO recommends wearing hearing p...

Page 7: ...d If you experience discomfort redness and swelling of the fingers followed by whitening and loss of feeling consult your physician before further exposing yourself to cold and vibration Repetitive St...

Page 8: ...intain footing and balance at all times Do not stand on slippery uneven or unstable surfaces Do not work in odd positions or on ladders Do not over reach Avoid Hot Surfaces Keep exhaust area clear of...

Page 9: ...epaired by an authorized servicing dealer before using EMISSION CONTROL EXHAUST EVAPORATIVE EPA 2010 and Later The emission control system for the engine is EM engine modification and if the second to...

Page 10: ...the decal s is legible and that you understand and follow the instructions on it If a decal cannot be read a new one can be ordered from your ECHO dealer See PARTS ORDERING instructions for specific i...

Page 11: ...uel filter 14 FUEL TANK CAP Covers and seals fuel tank opening 15 RECOIL STARTER HANDLE Pull handle slowly until starter engages then quickly and firmly When engine starts return handle slowly DO NOT...

Page 12: ...Power Head Drive Shaft Assembly ____ 1 U handle assembly ____ 1 Operator s Manual ____ 1 Emission Control Warranty Statement ____ 1 Safety Manual ____ 1 Warranty Registration Card ____ 1 Plastic Shie...

Page 13: ...lower plate E and blade nut D for future use with blade conversions 4 Align plastic debris shield H with the drive shaft and install on the bottom of the gear housing flange 5 Place shield plate I on...

Page 14: ...assemble nylon line head 1 Align locking hole in upper plate with notch in edge of gear housing and insert head locking tool G 2 Remove line head J by turning it clockwise until head is completely off...

Page 15: ...lade nut clockwise to remove 4 Remove locking tool G 5 Loosely attach bracket K to shield L and attach shield to bottom of gear housing B with hardware provided 6 Tighten all shield hardware Install B...

Page 16: ...hold U handle in position until final adjustments are completed 4 Route throttle linkage and ignition lead assembly along shaft and clip as shown 5 Install throttle linkage cable into fan cover clip...

Page 17: ...air filter and cover Balance and Adjust Unit 1 Loosen harness clamp screw 2 Put on harness and attach unit to harness 3 Slide harness clamp up A or down until unit balances with head approximately 50...

Page 18: ...requirements Operation With Blades Blade use DEMANDS specific Brush Cutter configuration Operation without specified shield barrier bar or U handle and harness can result in serious personal injury Fo...

Page 19: ...e this blade for brush or heavy woody growth 80 Tooth Brush Blade is designed for cutting brush and woody growth up to 13 mm 1 2 in diameter 22 Tooth Clearing Blade is designed for dense thickets and...

Page 20: ...to extend engine life in all air cooled 2 stroke and 2 4 stroke hybrid engines Two Stroke Oil A two stroke engine oil meeting ISO L EGD ISO CD 13738 and J A S O FD Standards must be used Echo brand p...

Page 21: ...rbon emissions Some states may require the use of automatic fuel shut off containers to reduce fuel spillage After use DO NOT store a unit with fuel in its tank Leaks can occur Return unused fuel to a...

Page 22: ...y the unit on a flat area and keep movable attachment parts clear of all obstacles Firmly grasp throttle handle and throttle trigger lockout with left hand and fully depress throttle trigger to wide o...

Page 23: ...knee on drive shaft to stabilize unit during starting Do not apply excessive downward force or damage to unit can occur 3 Recoil Starter Lay the unit on a flat area and keep movable attachment parts...

Page 24: ...difficulty Some specialized tools may be required ECHO offers REPOWERTM Maintenance Kits and Parts to make your maintenance job easier Maintenance Intervals MAINTENANCE PROCEDURE LETTER CODES I INSPE...

Page 25: ...y Allow to dry completely before reuse Do not oil Dual Layer Air Filter Lightly brush debris from filter Soak heavily soiled filters in water detergent solution to loosen dirt then brush lightly Rinse...

Page 26: ...Clean the plug or replace with a new one DO NOT sand blast to clean Remaining sand will damage engine 3 Adjust spark plug gap by bending outer electrode 4 Tighten spark plug to 130 150 in lbf 150 170...

Page 27: ...rse order Exhaust System Spark Arrestor Screen Level 2 1 Remove spark plug lead 2 Remove muffler cover A 3 Place piston at Top Dead Center TDC to prevent carbon dirt from entering cylinder 4 Remove sp...

Page 28: ...Stop engine and re tighten mounting bolts or nuts to specifications Carburetor Adjustment Level 2 Engine Break In New engines must be operated a minimum duration of two tanks of fuel break in before c...

Page 29: ...cutting attachment should not move at idle otherwise serious personal injury may result Lubrication Level 1 Gear Housing 1 Clean all loose debris from gear case 2 Remove plug A and check level of grea...

Page 30: ...placement Wear Gloves or personal injury may result Cutoff knife is sharp Gearcase and surrounding area may be hot 1 Cut one piece of line to recommended length 080 2 0 mm dia 20 6 m 095 2 4 mm dia 20...

Page 31: ...ing If ANY of these problems are discovered replace the blade When sharpening a blade always remove the same amount of materials from each tooth to maintain balance A blade that is not balanced will c...

Page 32: ...32 X7502310908 03 2014 ECHO Inc SRM 280U MAINTENANCE 3 After sharpening teeth check each tooth radius for evidence of a square sharp corner Use the round rat tail file to renew the radius...

Page 33: ...k at end of plug wire No spark Stop switch off Electrical problem Interlock switch Turn switch to ON See your Echo dealer See your Echo dealer Spark at plug No spark Spark gap incorrect Covered with c...

Page 34: ...op switch in the OFF position 3 Remove accumulation of grease oil dirt and debris from exterior of unit 4 Perform all periodic lubrication and services that are required 5 Tighten all the screws and n...

Page 35: ...nd XTM ISO L EGD ISO CD 13738 and J A S O M345 FD two stroke air cooled engine oil Gasoline Use 89 Octane unleaded Do not use fuel containing methyl alcohol more than 10 ethyl alcohol or 15 MTBE Do no...

Page 36: ...warranty period and arrange for pick up or return of your unit after the repairs have been made For your nearest authorized ECHO servicing dealer call ECHO s Dealer Referral Center at 1 800 432 ECHO...

Page 37: ...A or California Emission Defect Warranty Explanation X G Only use gasoline which contains G Gasohol which contains a 6 7 J 9 is also approved The prescribed mixing ratio of gasoline to oil is listed o...

Page 38: ...38 X7502310908 03 2014 ECHO Inc SRM 280U NOTES NOTES...

Page 39: ...X7502310908 39 03 2014 ECHO Inc SRM 280U NOTES...

Page 40: ...ECHO INCORPORATED 400 Oakwood Road Lake Zurich IL 60047 www echo usa com 40 S82513007613 S82513999999...

Reviews: