background image

20

EN

13.  Do not place the sandwich maker on a hot surface or use it near a heat source (e.g. hot 

plates).

14.  Use only in accordance with the instructions included in this user's manual. This sand-

wich maker is designed only for home use.. The manufacturer takes no responsibility 
for damages caused by the incorrect use of this product.

15.  This product may not be used by any persons (including children) with mental disabili-

ties, weak strength or by inexperienced persons, unless they have been properly trained 
or schooled in the safe use of the product, or unless they are properly supervised by 
a qualifi ed person who is responsible for their safety. Children should be supervised to 
ensure that they do not play with the product.

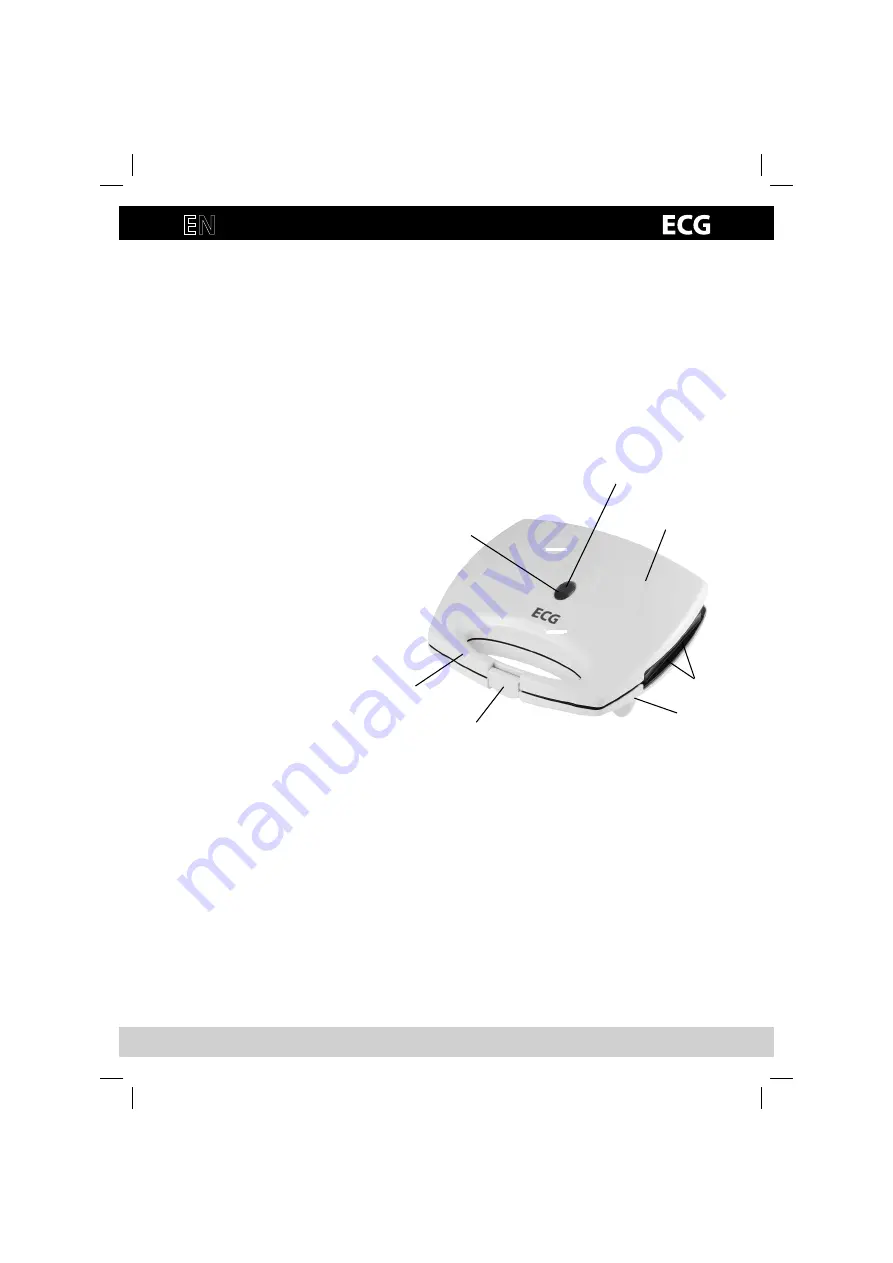
DESCRIPTION

1

2

3

7

4

5

6

1.  Power indicator (red)
2. Handle
3.  Safety latch
4.  Ready indicator (green)
5.  Top part
6.  Baking surfaces
7.  Bottom part

•    The power indicator light is red if the sandwich maker is connected to an electric power 

socket.

•  The ready indicator is green when the product is ready for toasting.
•   The safety latch locks the product automatically when it is closed.

BEFORE FIRST USE

1.  Clean the baking surfaces using a damp cloth or sponge.
2.  Lightly grease the baking surfaces with butter or a little oil.
3.  

Connect the sandwich maker to the power socket, the red power indicator will turn on. 
As soon as the green ready indicator light turns on the baking surfaces are suffi ciently hot.

4.  The product is ready to make toasted sandwiches.

Note: When using for the fi rst time there may some smoke may be emitted. This is normal, 
because this is the fi rst heating of the inside parts of the product. 

Summary of Contents for S 079

Page 1: ...SENDVIČOVAČ S 079 Před uvedením výrobku do provozu si důkladně pročtěte tento návod a bezpečnostní pokyny které jsou v tomto návodu obsaženy Návod musí být vždy přiložen k přístroji NÁVOD K OBSLUZE ...

Page 2: ... aby nedošlo k pří padnému úrazu elektrickým proudem 4 Sendvičovač by neměl být ponechán během chodu bez dozoru 5 Doporučujeme nenechávat sendvičovač se zasunutým přívodním kabelem v zásuvce bez dozoru Před údržbou vytáhněte přívodní kabel ze síťové zásuvky Vidlici nevytahujte ze zásuvky taháním za kabel Kabel odpojte ze zásuvky uchopením za vidlici 6 Nepoužívejte sendvičovač venku nebo ve vlhkém ...

Page 3: ...dou se spotřebičem hrát POPIS 1 2 3 7 4 5 6 1 Indikátor napájení červený 2 Rukojeť 3 Pojistka 4 Indikátor připravenosti zelený 5 Horní část 6 Opékací plochy 7 Spodní část Indikátor napájení svítí červeně pokud je sendvičovač zapojený do elektrické zásuvky Indikátor připravenosti svítí zeleně jakmile je zařízení připraveno k opékání Pojistka zajistí zařízení automaticky po jeho zavření PŘED PRVNÍM ...

Page 4: ...ší osobní chuti 6 Pro vyjímání hotového sendviče nepoužívejte kovové náčiní Nepoužívejte ostré kuchyň ské nástroje které způsobují oděr 7 Po ukončení používání sendvičovač odpojte ze zásuvky ve zdi Poznámka Během opékání se rozsvěcuje a zhasíná zelená kontrolka signalizující připravenost k opékání podle toho jak je udržována správná teplota pečicích ploch ČIŠTĚNÍ Před čištěním vždy vytáhněte přívo...

Page 5: ...systémem třídění odpadu Vyobrazený symbol na produktu nebo na obalu znamená že s produktem by nemělo být nakládáno jako s domovním odpadem Produkt odevzdejte na místo určené pro recyklaci elektrických a elektronických zařízení Správnou likvidací produktu zabráníte negativním vlivům na lidské zdraví a životní prostředí Recyklace materiálů přispívá k ochraně přírodních zdrojů Více informací o recykl...

Page 6: ...5 CZ ...

Page 7: ...ENDVIČOVAČ S 079 Pred uvedením výrobku do prevádzky si dôkladne prečítajte tento návod a bezpečnostné pokyny ktoré sú v tomto návode obsiahnuté Návod musí byť vždy priložený k prístroju NÁVOD NA OBSLUHU ...

Page 8: ...kutinami aby nedošlo k prípadnému úrazu elektrickým prúdom 4 Sendvičovač by nemal byť ponechaný počas chodu bez dozoru 5 Odporúčame nenechávať sendvičovač so zasunutým prívodným káblom v zásuvke bez dozoru Pred údržbou vytiahnite prívodný kábel zo sieťovej zásuvky Vidlicu nevyťahujte zo zásuvky ťahaním za kábel Kábel odpojte od zásuvky uchopením za vidlicu 6 Nepoužívajte sendvičovač vonku alebo vo...

Page 9: ...om hrať POPIS 1 2 3 7 4 5 6 1 Indikátor napájania červený 2 Rukoväť 3 Poistka 4 Indikátor pripravenosti zelený 5 Horná časť 6 Opekacie plochy 7 Spodná časť Indikátor napájania svieti na červeno pokiaľ je sendvičovač zapojený do elektrickej zásuvky Indikátor pripravenosti svieti na zeleno hneď keď je zariadenie pripravené na opekanie Poistka zaistí zariadenie automaticky po jeho zatvorení PRED PRVÝ...

Page 10: ...6 Na vyberanie hotového sendviča nepoužívajte kovové náčinie Nepoužívajte ostré kuchynské nástroje ktoré spôsobujú oder 7 Po ukončení používania sendvičovač odpojte zo zásuvky v stene Poznámka Počas opekania sa rozsvecuje a zhasína zelená kontrolka signalizujúca pripravenosť na opekanie podľa toho ako je udržiavaná správna teplota opekacích plôch ČISTENIE Pred čistením vždy vytiahnite prívodný káb...

Page 11: ...deným systémom triedenia odpadu Vyobrazený symbol na produkte alebo na obale znamená že s produktom by sa nemalo nakladať ako s domovým odpadom Produkt odovzdajte na miesto určené na recykláciu elektrických a elektronických zariadení Správnou likvidáciou produktu zabránite negatívnym vplyvom na ľudské zdravie a životné prostredie Recyklácia materiálov prispieva k ochrane prírodných zdrojov Viac in...

Page 12: ...SK 11 ...

Page 13: ...TER S 079 Vor der Inbetriebnahme dieses Geräts lesen Sie diese Anleitung und die darin enthaltenen Sicherheitshinweise sorgfältig durch Die Bedienungsanleitung muss dem Gerät immer beigelegt sein BEDIENUNGSANLEITUNG ...

Page 14: ...ist Vertrauen Sie alle Reparaturarbeiten einschließlich Austausch des Zuleitungskabels qua lifiziertem Servicepersonal an Demontieren Sie nicht die Schutzabdeckung des Geräts Es besteht die Gefahr eines Stromschlags 3 Schützen Sie das Gerät vor direktem Kontakt mit Wasser und anderen Flüssigkeiten um einen möglichen Stromschlag zu vermeiden 4 Der Sandwich Toaster sollte während des Betriebes nicht ...

Page 15: ...brauch vorgesehen Der Hersteller über nimmt keine Verantwortung für Schäden durch falsche Verwendung dieses Geräts 15 Dieses Gerät ist nicht zur Verwendung durch Personen einschließlich Kindern vorgese hen deren eingeschränkte physische sensuelle oder mentale Fähigkeiten Erfahrungen oder Kenntnisse keine sichere Verwendung des Geräts zulassen sofern keine Aufsicht bzw Einweisung bezüglich der Verw...

Page 16: ...lung richtig zwischen den Toastbrotscheiben verteilt sein 4 Klappen Sie die obere Toastplatte vorsichtig so auf das Sandwich herunter dass der Sand wich Toaster vollständig geschlossen ist 5 Öffnen Sie den Sandwich Toaster nach 2 3 Minuten und sehen Sie nach ob das Sandwich ausreichend getoastet ist Die Zubereitungsdauer für ein knusprig getoastetes Sandwich hängt von der Brotsorte den verwendeten...

Page 17: ...ll entsorgt werden darf Geben Sie das Produkt an einer entsprechenden Recycling Sammelstelle für elektrische und elektronische Geräte ab Durch die richtige Entsorgung des Produkts verhindern Sie negative Auswirkungen auf die menschliche Gesundheit und die Umwelt Wertstoff Recycling trägt zum Schutz der natürlichen Ressourcen bei Nähere Informationen zum Recycling dieses Produkts erhalten Sie bei I...

Page 18: ...17 DE ...

Page 19: ...NDWICH MAKER S 079 Read this user s manual and the safety instructions contained in it carefully before putting the product into operation The user s manual must always come with the product USER S MANUAL ...

Page 20: ... that you do not leave the sandwich maker with the power cord inserted in the power socket without supervision Before carrying out maintenance pull the power cord out of the power socket Do not pull the power plug from the power socket by pulling on the cord Pull the cord out of the power socket by holding the power plug 6 Do not use the sandwich maker outdoors or in a wet environment Do not touch...

Page 21: ...ith the product DESCRIPTION 1 2 3 7 4 5 6 1 Power indicator red 2 Handle 3 Safety latch 4 Ready indicator green 5 Top part 6 Baking surfaces 7 Bottom part The power indicator light is red if the sandwich maker is connected to an electric power socket The ready indicator is green when the product is ready for toasting The safety latch locks the product automatically when it is closed BEFORE FIRST U...

Page 22: ... type of bread the used fillings and your personal taste 6 Do not use metal utensils to remove the toasted sandwich Do not use sharp kitchen utensils that cause scratching 7 After finishing using the sandwich maker disconnect it from the wall socket Note While baking the green ready light turns on and off signalling readiness for baking depending on how well the temperature of the baking surfaces is...

Page 23: ...s with an implemented system for sorting waste The displayed symbol on the product or the packaging means that the products should not be handled as household waste Hand over the product to a location designated for the recycling of electric and electronic devices By correctly disposing of the product you will prevent negative effects on human health and the environment The recycling of material h...

Page 24: ...xpert cz zelená linka 800 121 120 zelená linka 800 121 120 ZStudio 2009 Dovozce neručí za tiskové chyby obsažené v návodu k použití výrobku Dovozca neručí za tlačové chyby obsiahnuté v návode na použitie výrobku The importer takes no responsibility for printing errors contained in the product s user s manual Der Importeur haftet nicht für Druckfehler in der Bedienungsanleitung des Produkts Distrib...

Reviews: