background image

Receiver - Wall-Mounted Shutter Module                                                              

Ref : RMV

July 2009 


page 2 


           RMV

General Security Note

For carefree and safe use of this product, please read this manual and safety information 

carefully and follow the instructions. Technical manipulation of the product or any changes 

to the product are forbidden, due to security and approval issues. 

Please take care to set up the device correctly - consult your user guide. WARNING: Do Not 

Open! Risk of Electrical Shock. Voltages in this equipment are hazardous to life. No user-

serviceable parts inside. Refer all servicing to qualified service personnel.

Important: the product must be used according the instructions in this manual and is not 

suitable for other purposes. 

Please avoid the following: strong mechanical wear and tear, high temperature, strong 

vibrations, and high humidity. 

Please also respect the additional security notes in the various user guide chapters. To 

ensure correct set up please read the manual and security notes carefully.

Allgemeine Sicherheitshinweise

Bitte lesen Sie diese Bedienungsanleitung und Sicherheitshinweise für eine problemlose 

und sichere Benutzung dieses Produktes und befolgen Sie die Anleitung. Technische 

Manipulationen und Veränderungen dieses Produktes sind aus Sicherheitsgründen und 

Zulassungen verboten. 

Bitte verwenden Sie das Gerät korrekt – beachten Sie die Bedienungsanleitung. 

WARNUNG: Nicht öffnen! Verletzungsgefahr durch elektrischen Schlag. In diesem Gerät 

gibt es lebensgefährliche Stromspannung. Enthält keine durch den Benutzer zu wartenden 

Teile. Lassen Sie alle Wartungen von geschulten Kundendiensttechnikern durchführen.

Wichtig: Das Produkt muss gemäß dieser Bedienungsanleitung benutzt werden, für andere 

Einsatzzwecke ist das Produkt nicht geeignet. 

Bitte vermeiden Sie folgendes: große Belastung und Zug, hohe Temperatur, starke Erschüt-

terung, und hohe Luftfeuchtigkeit. 

Bitte beachten Sie auch die zusätzlichen Sicherheitsanmerkungen in den verschiedenen 

Kapiteln dieser Bedienungsanleitung. Für eine korrekte Funktion lesen Sie bitte diese Bedi-

enungsanleitung und Sicherheitshinweise genau durch.

Veiligheidsvoorschrift

Lees voor een zorgeloos en veilig gebruik van dit product deze handleiding en de veilig-

heidsinformatie zorgvuldig door en volg deze op. Technische veranderingen of andere aan-

passing-en van het product zijn niet toegestaan om redenen van veiligheid en keuringen. 

Lees de gebruiksaanwijzing zorgvuldig voor het correct installeren van dit product. 

WAARSCHUWING: Niet openmaken! Risico van een elektrische schok. De spanning in deze 

apparatuur is levensgevaarlijk. Er bevinden zich geen door de gebruiker te onderhouden 

onderdelen in het product. Laat alle onderhoud door bevoegde onderhoudsmonteurs 

uitvoeren.

Summary of Contents for XDOM RMV

Page 1: ...er guide 5 Bedienungsanleitung 8 Gebruiksaanwijzing 11 Anv ndermanual 14 Guide utilisateur 17 Gu a del usario 20 Manual do utilizador 23 Manuale per l utente 26 RMV Receiver Wall Mounted Shutter Modul...

Page 2: ...en und Zulassungen verboten Bitte verwenden Sie das Ger t korrekt beachten Sie die Bedienungsanleitung WARNUNG Nicht ffnen Verletzungsgefahr durch elektrischen Schlag In diesem Ger t gibt es lebensgef...

Page 3: ...garna i de olika kapitlen i anv ndarhandboken F r att s kerst lla korrekt inst llning l s manualen och s kerhets noteringarna noggrant Conseils de s curit Lisez attentivement ce guide utilisateur afin...

Page 4: ...mportante o producto deve ser usado de acordo com as instru es neste manual e n o conveniente para outros prop sitos Evite o seguinte forte desgaste mec nico alta temperatura vibra es fortes humidade...

Page 5: ...Receiver Wall Mounted Shutter Module Ref RMV July 2009 page 5 RMV Notes...

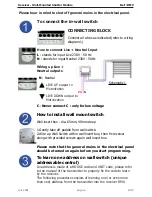
Page 6: ...general mains in the electrical panel Connect all wires as indicated refer to wiring diagram 1 L stands for input Live 230V 50 Hz N stands for input Neutral 230V 50Hz How to connect Live Neutral Inpu...

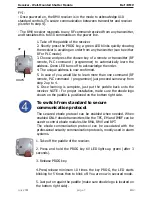
Page 7: ...he RMV receiver is in the mode to acknowledge X10 standard controls To secure communication beteween transmitter and receiver pls refer to step 4 The RMV receiver responds to any RF command received f...

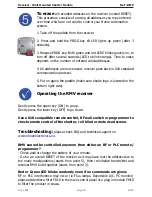
Page 8: ...ote control of the shutter roll blind or motorized screen Troubleshooting please check FAQ and technical support on www ebodeelectronics eu To erase all recorded adresses on the receiver overall RESET...

Page 9: ...RMA Bitte schalten Sie vor Beginn der Installation die Hauptsicherung aus Schlie en Sie alle Leitungen wie im Diagramm 1 bezeichnet an L steht f r Eingang L 230V 50 Hz N steht f r Eingang Nullleiter 2...

Page 10: ...LED blinkt kurz gr n um anzuzeigen dass der Empf nger auf einen Befehl von einem Sender Funk oder PLC wartet 3 Dr cken Sie die gew nschte Taste auf der Fernbedienung oder Sender Funk Fernbedienung PL...

Page 11: ...andschalter oder Programmierer f r die berpr fung der Fernsteuerung des Rollladens bzw der Sonnenblende Leinwand Troubleshooting Bei Problemen Pr fen Sie die FAQs und die Technische Unterst tzung auf...

Page 12: ...uw met de installatie begint Verbind alle draden zoals hieronder aangegeven Zie schema 1 L staat voor fase input 230V 50 Hz N staat voor nul input 230V 50Hz Verbinden van de Fase en Nul draad N Nul V...

Page 13: ...ken dat de ontvanger wacht op X10 commando dit kan zowel via RF als het lichtnet zijn 3 Zend de gewenste adres code om het adres the leren wanneer het adres correct ontvangen is zal de groen LED stopp...

Page 14: ...icht of apparaat in te schakelen Druk de onderste toets OFF in om het licht of apparaat uit te schakelen Gebruik een afstandbediening RF schakelaar of X10 programmer om te controleren of het licht app...

Page 15: ...elektriska panelen Anslut alla kablar s som indikeras se kabeldiagram 1 L st r f r levande ing ng 230V 50 Hz N st r f r neutral ing ng 230V 50Hz Hur du ansluter Levande Neutral ing ng N Nul Anslut ti...

Page 16: ...knappen En gr n LED lampa blinkar och visar att mottagaren v ntar p order fr n alla s ndare antingen i RF eller PLC l get 3 V lj och tryck ner knappen p en fj rrkontroll eller s ndare RF fj rrkontroll...

Page 17: ...a fj rrstyrning av motoriserad enhet s som reglage och utskjutbara enheter Probleml sning v nligen kolla FAQ och teknisk support p www ebodeelectronics eu F r att radera alla sparade adresser p mottag...

Page 18: ...re en provenance d une commande sans fil vers tous les r cepteurs hors de port e radio fr quence COUPER le courant au disjoncteur Principal Connecter les c bles au bornier comme indiqu voir sch ma 1 L...

Page 19: ...Appuyer sur la touche ON MARCHE de votre choix t l commande inter mural sans fil programmateur pour initialiser la voie 4 La LED arr te de clignoter et s teint 5 La voie choisie est d sormais initial...

Page 20: ...d CONSEILS base de connaissance disponible et mise jour sur www ebodeelectronics eu Effacer les voies initialis es sur l Inter Mural Encastrable retour en mode X10 automatiquement commun ment appel RE...

Page 21: ...ebe cortar la corriente en el panel el ctrico Conecte todos los cables como se indica consulte el diagrama de cableado 1 L entrada activa 230V 50 Hz N entrada neutral 230V 50Hz C mo conectar las entra...

Page 22: ...padear r pidamente indicando que el receptor espera una orden de cualquier transmisor puede ser en modo RF o corriente 3 Elija y pulse la tecla de un mando o transmisor mando RF comando programador PL...

Page 23: ...ncia de la persiana cortina enrollable o cortina motorizada Soluci n de problemas Consulte las preguntas m s frecuentes y el soporte t cnico en www ebode electronics eu Para borrar todas las direccion...

Page 24: ...ro el ctrico Ligue todos os fios de acordo com o indicado ver diagrama 1 L entrada de fase 230V 50 Hz N entrada de neutro 230V 50Hz Como ligar as entradas de fase e neutro N Neutro Liga o das sa das d...

Page 25: ...istemas de alarme Para sua informa o Uma vez ligado o receptor RMV encontra se em modo de recep o dos comandos X10 standard para assegurar as comunica es entre o transmissor e o receptor consulte o pa...

Page 26: ...or sem fios ou programador para verificar se consegue controlar o estore cortina tela Resolu o r pida de problemas Consulte a sec o de FAQ e suporte t cnico em www ebodeelectronics eu Para apagar todo...

Page 27: ...sto nel quadro elettrico Collegare tutti i fili come indicato vedi diagramma 1 di collegamento L corrisponde all ingresso Fase 230V 50 Hz N corrisponde all ingresso Neutro 230V 50Hz Come collegare gli...

Page 28: ...MV nella modalit di riconoscimento dei comandi standard X10 Per assicurare la comunicazione fra trasmettitore e ricevitore fare riferimento al punto 4 Il ricevitore RMV risponde ai comandi a Radiofreq...

Page 29: ...telecomando interruttore RF a parete controller per verificare il controllo remoto di persiane avvolgibili o schermi motorizzati Diagnostica guasti controllare le domande pi frequenti FAQ e il support...

Page 30: ...ed alle altre disposizioni perti nenti stabilite dalla direttiva 1999 5 CE Product category general consumer category 3 Date March 2009 Peter Schoon Product Manager BMB Device The use of the symbol i...

Page 31: ...nel keys or remotely via any ebode X10 compatible controller RPA RPL RPT Ideal for retro fit installations the classic X10 plugin module in a new and stylish jacket Control your appliance or lamps etc...

Page 32: ...www ebodeelectronics eu...

Reviews: