background image

6

 – CF-1LZ/CF-1TX

CF-1TX Electrical Installation

Before the clip-fit bracket is mounted to the wall, the electrical connections to your 

system should be made. 

Note:

 Observe all local and national codes when installing the CF-1TX.  


All connections must be made with the power amplifier turned off.

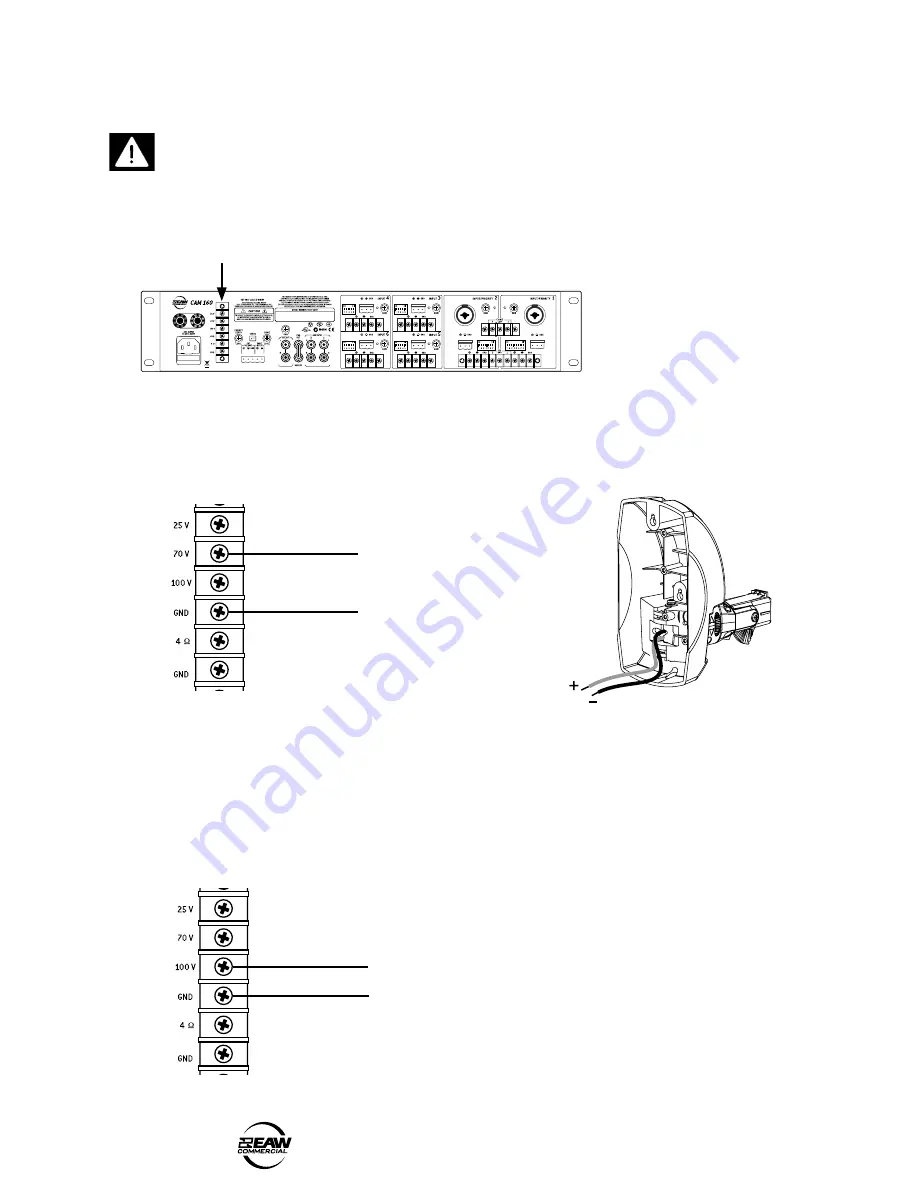
The following examples of 70 V and 100 V connections show an EAW Commercial 

CAM160, a typical mixer/amplifier. Its speaker-level output is a screw terminal strip, with 

outputs for 25 V, 70 V, 100 V, ground, and 4 ohm.

  70 V connection example

1.  Connect the amplifier’s 70 V terminal to the red (+) input wire on the CF-1TX.

2.  Connect the amplifier’s GND terminal to the black (–) input wire on the CF-1TX.

3.  Select the power tap as shown on the next page.

  100 V connection example

1.  Connect the amplifier’s 100 V terminal to the red (+) input wire on the CF-1TX.

2.  Connect the amplifier’s GND terminal to the black (–) input wire on the CF-1TX.

3.  Select the power tap as shown on the next page.

To CF-1TX red (+) wire
To CF-1TX black (–) wire

To CF-1TX red (+) wire

To CF-1TX black (–) wire

Summary of Contents for CF-1LZ

Page 1: ...INSTALLATION GUIDE CF 1LZ CF 1TX Clip Fit Bracket for SMS1990 Loudspeakers...

Page 2: ...tus has been exposed to rain or moisture does not operate normally or has been dropped 11 The entire sound system must be designed in compliance with the current standards and laws regarding electrica...

Page 3: ...ces Documentation Thoroughly document the mounting rigging design with detailed drawings and parts lists Analysis Have a licensed structural engineer or other qualified professional review and approve...

Page 4: ...eld securely in place It can be easily adjusted in vertical and horizontal angle and locked in place with a locking wheel This manual covers two brackets The CF 1TX has an internal transformer for con...

Page 5: ...face e g wall etc has the necessary mechanical characteristics to support the weight of the bracket and loudspeaker without the danger of it falling Always use support elements suitable for the materi...

Page 6: ...utput is a screw terminal strip with outputs for 25 V 70 V 100 V ground and 4 ohm 70 V connection example 1 Connect the amplifier s 70 V terminal to the red input wire on the CF 1TX 2 Connect the ampl...

Page 7: ...u are using a 70 V system the wattage ratings are 4 8 16 and 32 W If you are using a 100 V system the available wattage ratings are 8 16 and 32 W Make sure that you do not overload the amplifier This...

Page 8: ...dance does not drop below the minimum required by your power amplifier BREAKER CLIP LIMIT ON OFF STEREO SUBSONIC FILTERAT 30Hz ON OFF PUSH PUSH AMP MODE MONO BRIDGE CAUTION TO REDUCETHE RISK OF FIRE O...

Page 9: ...supplied It is recommended that you consult a rigging professional to determine the proper hardware for mounting the bracket Rotating the loudspeaker s input section if required The SMS1990 loudspeak...

Page 10: ...nt and locking mechanism has been designed to be easy to use a Rotate the locking wheel until the loudspeaker can be rotated horizontally and vertically Find the desired loudspeaker position and then...

Page 11: ...nsurance for all forms of cartage 5 EAW COMMERCIAL WARRANTY Warranty LOUD Technologies Inc requires its authorized EAW Commercial distributors to abide by the following warranty terms for all EAW Comm...

Page 12: ...lle MA 01588 USA TEL toll free within US Canada 888 337 7404 TEL outside US 425 892 6503 FAX 425 485 1152 www eawcommercial com 2007 LOUD Technologies Inc All Rights Reserved EAW Commercial is a regis...

Reviews: