background image

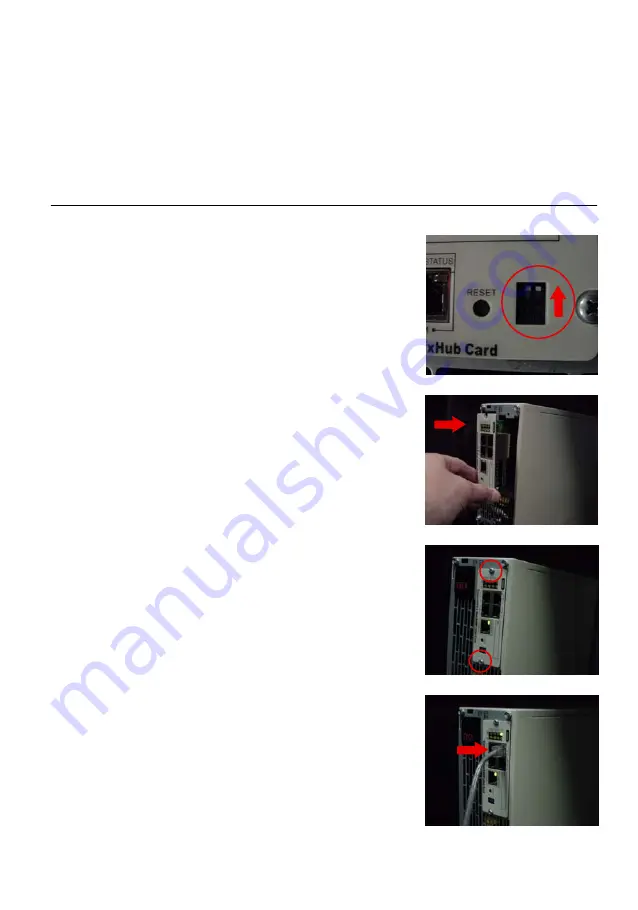
Figure 1. 

Verify DIP Switches

Figure 2. 

Install the ConnectUPS Card

Figure 3. 

Secure the ConnectUPS Card

Figure 4. 

Install the Ethernet Cable

Eaton

®

 ConnectUPS

t

 Web/SNMP Card (X and BD Models) Quick Start Instructions 164950185 Rev B

www.eaton.com/powerquality

5

Section 1

Install the Card

The hot-swappable ConnectUPS Web/SNMP Card can be
installed without turning off the UPS or disconnecting the load.

The following steps explain how to install the ConnectUPS-X or
ConnectUPS-BD:

1.

Verify that both DIP switches on the card are set to the 

0

(off) position (see Figure 1).

NOTE  

If you are setting up the ConnectUPS Card in a

DHCP environment, set DIP switch 2 to the 

1

 (on) position.

2.

Remove the X-Slot

t

 or BestDock

t

 cover on the UPS rear

panel. Retain the screws.

NOTE  

If there is another card already installed with an

attached communication cable, disconnect the cable and
then remove the card.

3.

To prevent electrostatic discharge (ESD), place one hand on a
metal surface such as the UPS rear panel.

4.

Slide the card into the open slot and secure with the screws
removed in Step 2 (see Figure 2 and Figure 3).

5.

Connect an active Ethernet cable (supplied) to the Uplink
Ethernet connector on the ConnectUPS-X or to the network
connector on the ConnectUPS-BD (see Figure 4).

6.

To configure the card locally using the supplied configuration
cable, continue to the following section, “Connect the Card.”

To configure the card remotely through a network using a
Web browser or Telnet (or similar) utility, refer to the

Connect

UP

S Web/SNMP Card User's Guide

 PDF on the

Software Suite CD.

Summary of Contents for Powerware Series

Page 1: ...Powerware Series Eaton ConnectUPS Web SNMP Card Quick Start Instructions X and BD Models...

Page 2: ...t Corporation HyperTerminal is a registered trademark of Hilgraeve Modbus is a registered trademark of Modicon IBM and AS 400 are registered trademarks of International Business Machines Inc All other...

Page 3: ...up the ConnectUPS Card in a DHCP environment the network administrator must set up the DHCP server to provide a static address each time the card makes a DHCP request Provide the network administrator...

Page 4: ...Eaton ConnectUPSt Web SNMP Card X and BD Models Quick Start Instructions 164950185Rev B www eaton com powerquality 4...

Page 5: ...ove the X Slott or BestDockt cover on the UPS rear panel Retain the screws NOTE If there is another card already installed with an attached communication cable disconnect the cable and then remove the...

Page 6: ...erTerminal 4 Select the appropriate serial connection such as COM1 See Figure 6 5 Set the serial line to 9600 baud No parity 8 data bits 1 stop bit and no flow control see Figure 7 6 Verify that the U...

Page 7: ...and 4 to set the Gateway Address and Network Mask 6 Change any other options as needed for your particular configuration by typing the corresponding number shown in the menu Each Configuration Menu se...

Page 8: ...se user guides for instructions Use the following procedure to install NetWatch software after you have installed and configured the card 1 Insert the Software Suite CD into the computer s CD ROM driv...

Page 9: ...wn your system see Figure 17 The default selection is recommended Select Next 11 The Event and Logging Options dialog opens see Figure 18 Select Next 12 Verify the configuration settings are correct a...

Page 10: ...Eaton ConnectUPSt Web SNMP Card X and BD Models Quick Start Instructions 164950185Rev B www eaton com powerquality 10...

Page 11: ......

Page 12: ...164950185B 164950185 B Eaton ConnectUPSt Web SNMP Card X and BD Models Quick Start Instructions 164950185 www eaton com powerq...

Reviews: