


Configuring the Card
Eaton Power Xpert Gateway PXGX PDP Card User’s Guide 164202122—Rev 1
27
7.
Click
Apply
and then
OK
to save the settings.
8.
Refresh the Web page to view the updated formats.
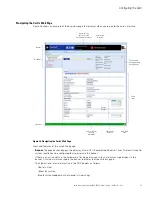
Configuring SNMP Options
This section describes the following SNMP configuration options:
l
Configuring community strings and trap recipients
l
Restricting SNMP access
l
Setting system location and system contact
l
Managing from an SNMP NMS
Community Strings and Trap Recipients
The PXGX PDP Card supports several event-related traps that can be reported to the SNMP network
management software. See Chapter 6, “MIB Files” on page 52 for more information.
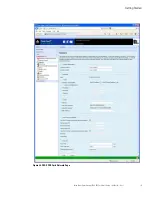
To configure the SNMP options:
1.
Select
SNMP
from the Configuration menu.
2.
SNMPv1 and SNMPv3 are supported and both versions are enabled by default. To modify, clear the check
box for the version to be disabled. The fields associated with the disabled version become unavailable
(dimmed).
3.
For SNMPv1 configuration, type a new community string in the appropriate field to change the community
strings.
The default community strings are
public
for read-only,
private
for read-write.
4.
For SNMPv3 configuration, enter a new read-only username and password and read-write username and
password in the appropriate fields. Passwords for SNMPv3 must be at least 8 characters long.
5.
To modify the
Trap recipient community
string field, type a new name. The default is “public”.
6.
Click
Add
to add a new trap recipient entry to the list. The Recipient field populates with the next available
number.
7.
Enter the trap recipient IP address or host name in the
IP/hostname
field.
Note:
When using host names, verify that the IP address of your network DNS Server is configured (see
“Network Configuration” on page 21).
8.
Click
Apply
and then
OK
to save the settings.
Note:
Select the Recipient drop-down menu to view all assigned trap recipients,
9.
Repeat Steps 6 through 8 for each additional trap recipient.
10. To remove a trap recipient:
a.
Click
Delete Last
.
b.
Click
OK
when prompted to remove the settings for the trap recipient entered last.
Changing SNMP Access
The default is to limit access to the card to trusted SNMP NMS hosts only.
To allow access that is unrestricted by hostname (though still qualified by community names or SNMPv3
passwords):
1.
Select
Access Control
from the Configuration menu.
2.
Clear the check box for
SNMP access restricted by IP/hostname
.
3.
Click
Apply
and then
OK
to save the settings.