54
9395P 250 kVA / 275 kVA / 300 kVA
User’s and Installation Guide
5 Installing options and accessories
5.1 Installing an optional HotSync CAN Bridge Card
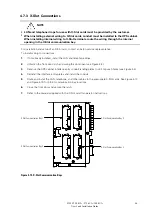
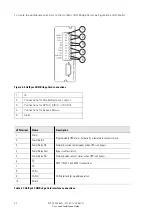
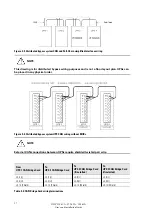
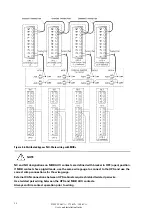
As an option, a HotSync Controller Area Network (CAN) Bridge Card, shown in Figure 5-1, can be
installed to provide connectivity for operational mode control of a parallel system. In addition, this card
can be used to connect optional system monitoring devices, such as a Remote Monitor Panel II, a
Relay Interface Module II, or a Supervisory Contact Module II, to the UPS.
Figure 5-1. HotSync CAN Bridge Card
NOTE
Only one HotSync CAN Bridge Card can be installed in the UPS. Multiple CAN cards are not
supported in standard distributed bypass systems.
To install the card:
1. Verify the UPS system is turned off and all power sources are disconnected. See Chapter 7: “UPS
operating instructions” for shutdown instructions.
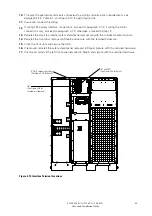
2. Unfasten the front door latch and swing the door open (see Figure
4-2).
3. If installing interface wiring through the left interface entry conduit landing, proceed to Step 4;
otherwise, proceed to Step 6.
4. Remove one top screw and two bottom screws securing the UPS left front panel (see Figure
4-2
).
Lift the panel straight up to remove it from the panel hanger bracket at the top of the
cabinet.
5. Remove the screws securing the protective cover panel covering the X-slot and remove the panel.
Retain the hardware for later use.
6. Install the HotSync CAN Bridge Card into an open X-Slot communication bay on the front of the
UPS. See Figure
4-
1
9 for X-Slot communication bay
locations.
Plug-in Terminal Block J3
Summary of Contents for Power Xpert 9395P 250 kVA
Page 1: ...User s and Installation Guide Power Xpert 9395P UPS 250 kVA 275 kVA 300 kVA...
Page 2: ......
Page 3: ...Power Xpert 9395P UPS 250 kVA 275 kVA 300 kVA User s and Installation Guide...
Page 168: ......
Page 169: ......
Page 170: ...614 01919 00...

