background image

29

Appendix

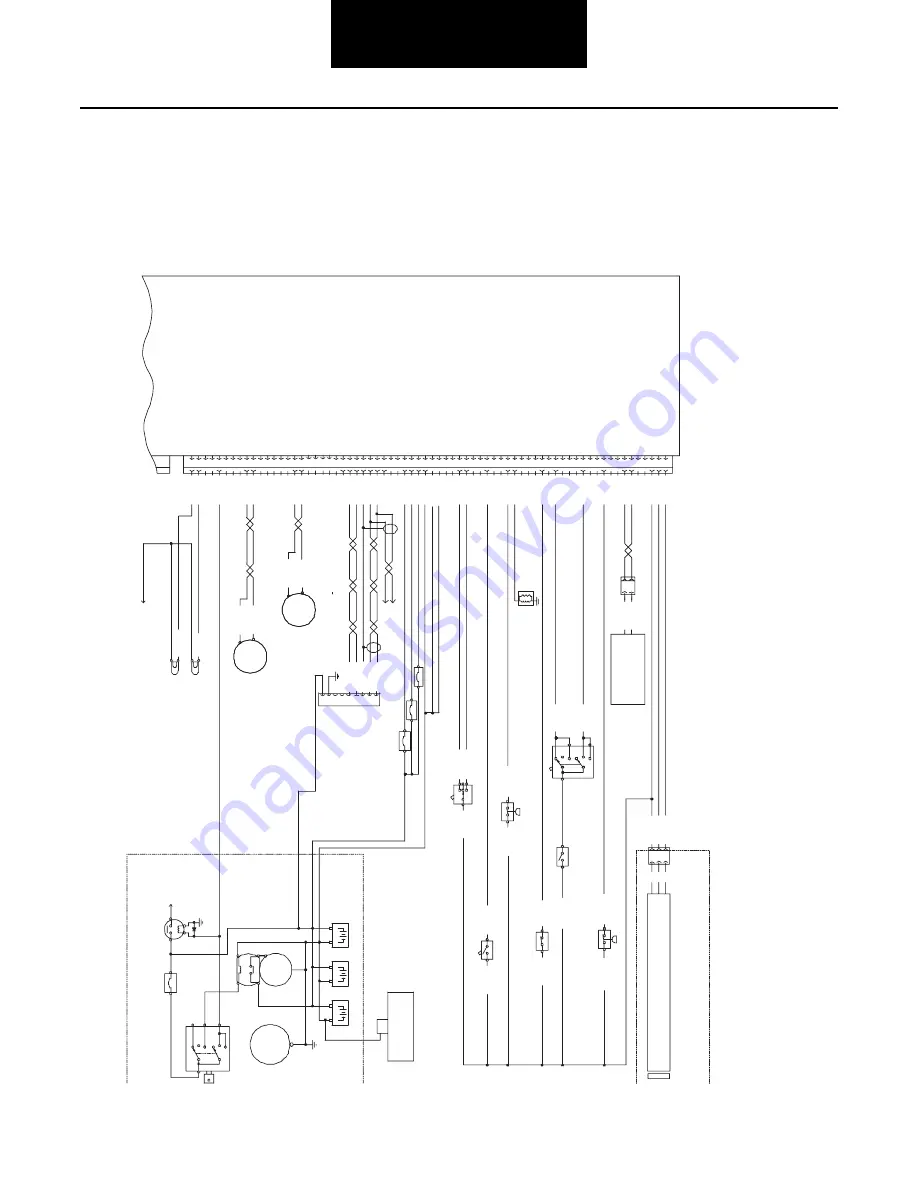
Wiring Diagrams

Caterpillar

C11, C13, C15, and C18 OEM Diagrams (2003)

C977-BU


E716-GY

G879-OR

C983-WH

C984-YL

CLUTCH PEDAL POSITION SWITCH

100mA

100mA

INPUT #11 (NOTE L)

INPUT #15 POSITIVE

RETARDER SOLENOID LOW/HI SWITCH

+5V

ENGINE COOLANT LEVEL NORMAL (NOTE G)

ENGINE COOLANT LEVEL LOW (NOTE G)

RETARDER SOLENOID MED/HI SWITCH

INPUT #15 NEGATIVE

VEHICLE SPEED IN POSITIVE (NOTE F)

VEHICLE SPEED IN NEGATIVE


INPUT #8 (NOTE L)

14 AWG GXL

14 AWG GXL

14 AWG GXL

ACCELERATOR PEDAL SENSOR/SWITCH SENSOR COMMO

+8V

ACCELERATOR PEDAL POSITION

22

63

23

 2

49

54

41

24

E971-GN

G834-PU

62

64

61

0.3A CURRENT LIMIT

0.3A CURRENT LIMIT

1

2

40

51

55

NOTE C: "SINGLE" WINDING MAGNETIC PICKUP SENSOR RECOMMENDED

NOTE B: FOR SPEEDOMETERS OR TACHOMETERS WITH A SINGLE SIGNAL INPUT

        TERMINAL, EITHER ONE OF THE TWO SIGNAL OUTPUT LINES FROM

        THE ECM CAN BE USED. LEAVE THE REMAINING LINE DISCONNECTED,

        DO NOT CONNECT TO GROUND

 5

 4

66

25

32

33

69

68

VEHICLE HARNESS CONNECTOR

P2 J2

H795-PK

C985-BU

C986-BR

L994-YL

659-PK

K998-BU

G880-PK

J906-BR

G881-BU

G882-WH

SERVICE BRAKE PEDAL POSITION SWITCH

INPUT #7 (NOTE L)

45

C992-PU

INPUT SENSOR COMMON #1

INPUT #5 (NOTE L)

INPUT #6 (NOTE L)

18

47

 6

46

L901-GY

G842-GY

G843-OR

G844-PK

C974-PU

C973-GN

E718-PK

E991-GY

G836-WH


CRUISE CONTROL ON/OFF SWITCH

INPUT #3 (NOTE L)

INPUT #4 (NOTE L)

59

60

 7

C975-WH

K982-YL

G841-GN

SET

RESUME

INPUT #1 (NOTE L)

INPUT #2 (NOTE L)

35

44

56

58

C978-BR

C979-OR

K999-GN

K980-PK

P1 J1

G835-OR

G808-BU

G809-GN


G845-PU

J1587 DATA LINK NEGATIVE

J1587 DATA LINK POSITIVE

J1939 DATA LINK SHIELD (NOTE K & NOTE M)

J1939 DATA LINK NEGATIVE (NOTE K & NOTE M)

J1939 DATA LINK POSITIVE (NOTE K & NOTE M)

UNSWBATTERY (NOTE D)

UNSWBATTERY (NOTE D)

-BATTERY

INPUT #9 

INPUT #10 

INPUT SENSOR COMMON #2

INPUT #14

52

53

65

67

27

26

 3

17

E717-GN

 101-RD

 101-RD

 229-BK

G933-YL

C453-YL

 993-BR

F713-OR

 9

 8

42

34

50

 1

14

48

TACHOMETER POSITIVE

TACHOMETER NEGATIVE

38

39

57

 450-YL

 451-BR

SPEEDOMETER POSITIVE

SPEEDOMETER NEGATIVE

OUTPUT #2

OUTPUT #3

OUTPUT #4


36

37

10

12

13

15

16

28

29

30

31

70

+/- 5 VOLTS

CHECK ENGINE LAMP

WARNING LAMP

OUTPUT #1

OUTPUT #9

IGNITION KEY SWITCH

INPUT #12

INPUT #13

E793-BU

E794-YL

A249-BK

K990-GN

K900-YL

SPEEDOMETER

NOTE E

NOTE H

NOTE B

ACCELERATOR PEDAL

POSITION SENSOR

40mA

5mA

BK

RD

WH

J403  P403

ACCELERATOR PEDAL SENSOR/SWITCH SENSOR COMMON

+8 V

ACCELERATOR PEDAL POSITION

B

A

C

H795-PK

H795-PK

A/C HIGH PRESS. SWITCH N/C

E971-GN

450-YL

451-BR

SIGNAL-

NOTE B

TACHOMETER

NOTE E

NOTE H

E793-BU

E794-YL

10A

PASSIVE

MAGNETIC

VEHICLE SPEED

SENSOR

G808-BU

G809-GN

H795-PK

H795-PK

E717-GN

E716-GY

SET/RESUME

NOTE J

NOTE D

NOTE D

ENGINE

BLOCK

COMPONENTS WITHIN THIS AREA ARE CATERPILLAR PROVIDED

CLUTCH PEDAL POSITION N/C

SERVICE BRAKE PEDAL POSITION N/C

(PEDAL RELEASED POSITION)

6.5mA NOTE H

CRUISE CONTROL ON/OFF

6.5mA

6.5mA

6.5mA

6.5mA

6.5mA

CHECK ENGINE LAMP

WARNING LAMP

+BATTERY

-BATTERY


J1587 D

LINK NEGATIVEATA 

J1587 D

LINK POSITIVEATA 

 J1939 DATA LINK Positive

J1939 DATA LINK Shield

J1939 DATA LINK Negative

D

H795-PK

G

C

F

SAE J1939/13 OFF-BOARD

DIAGNOSTIC CONNECTOR

B

A

TO VEHICLE

COMPONENTS

CIRCUITS WITHIN THIS AREA ARE RECOMMENDATIONS

SIGNAL-

START

ON

OFF

B

S

C

R

H795-PK

45.5mA MAX

G

S

MTR

BAT

STARTER

MOTOR

(12V)

BATTERY 2

N/O

RELAY

H795-PK

C985-BU

C986-BR

C978-BR

C979-OR

C977-BU

C992-PU

C975-WH

C973-GN

C974-PU

KEY SWITCH

659-PK

GROUND

L994-YL

ALTERNATOR

-

12V

+

-

12V

++

12V

-

BATTERY 3

BATTERY 1

NOTE F: IF AN ELECTRONIC SIGNAL IS PROVIDED IN PLACE OF A PASSIVE 

        MAGNETIC SENSOR, CONNECT THE ELECTRONIC SIGNAL INPUT TO

        THE +SIGNAL PIN, THE -SIGNAL PIN SHOULD NOT BE CONNECTED

        OR GROUNDED WITH ELECTRONIC SIGNAL INPUTS

NOTE D: THESE CONNECTIONS ARE UNSWITCHED, DIRECT CONNECTION

        T

O

 THE BATTERY I

S

 N

O

T RE

QU

IR

E

NOTE C

NOTE F

LO

MED

HI

ENGINE RETARDER

SOLENOID SELECTOR SWITCH

NOTE H

NOTE E: THE ECM SPEEDOMETER AND TACHOMETER OUTPUT SIGNAL LINE

        VOLTAGES ARE ZERO-CROSSING SQUARE WAVES. THE SPEEDOMETER

        SIGNALS AT J1-37 AND J1-36 ARE COMPLEMENTS OF EACH OTHER.

        THE TACHOMETER SIGNALS AT J1-38 AND J1-39 ARE COMPLEMENTS

        OF EACH OTHER. MAXIMUM SIGNAL AMPLITUDE OF J1-36, J1-37,

        J1-38, AND J1-39 IS +/-

10 VOLTS.  AMPLITUDE WILL BE 

        OR GREATER IF LOAD CURRENT IS LESS THAN 4mA.

(PEDAL RELEASED POSITION)

HI

TO +BATTERY

MED

LO

RETARDER SOLENOID ON/OFF SWITCH

13mA

COOLING FAN SOLENOID

OUTPUT #5

OUTPUT #6

OUTPUT #7

OUTPUT #8

11

19

20

21

G837-YL

G838-BR

G839-BU

G840-PU

 229-BK

-BATTERY

J

H

E

A249-BK

K990-GN

K900-YL

43

14 AWG GXL

TO CHASSIS J1939 DATA LINK 

 229-BK

14 AWG GXL

 101-RD

-BATTERY

UNSWBATTERY (NOTE D)

14 AWG GXL

14 AWG GXL

10A

10A

Summary of Contents for Fuller RTLO-11610B

Page 1: ...18B RTLO 18718B T2 RTLO 18913A RTLO 18913A T2 RTLO 18918B RTLO 18918B T2 RTLO 20913A RTLO 20918B RTLO 20918B T2 RTLO 22918B RTLOC 16909A T2 RTLOF 11610B RTLOF 11610B T2 RTLOF 12610B RTLOF 12610B T2 RTLOF 12713A RTLOF 12913A RTLOF 13610B RTLOF 13610B T2 RTLOF 14610B RTLOF 14610B T2 RTLOF 14613B RTLOF 14618A RTLOF 14713A RTLOF 14718B RTLOF 14913A RTLOF 14918B RTLOF 14918B T2 RTLOF 15610B RTLOF 15610...

Page 2: ...ied warranty or representation based on the enclosed information This symbol is used throughout this manual to call attention to procedures where carelessness or failure to follow specific instructions may result in personal injury and or component damage Departure from the instructions choice of tools materials and recommended parts mentioned in this publication may jeopardize the personal safety...

Page 3: ... Pneumatic Diagrams 13 18 speed Pneumatic Diagrams 14 Transmission Mounting Requirements 15 Mounting Transmission to Engine 16 Using Rear Supports 17 Typical Rear Support Designs 17 Electrical Requirements Top 2 Valve Electrical Requirements 18 Wiring Diagram OEM Responsibility 19 Caterpillar Programming 19 Detroit Diesel Programming 21 Line Inspection Line Inspection and Road Test Instructions 26...

Page 4: ...tion contact engine OEM Specific OEM installation requirements are shown in each section Failure to adhere to Eaton installation requirements may effect transmission performance and or warranty coverage Top 2 transmissions installed at OEM facilities must meet the requirements for standard manual Eaton Fuller transmissions out lined in Form FUL 169 Applications outside of these requirements must b...

Page 5: ...irements All wires are to be a minimum of 16 gauge GXL 4 Integral Coolers Reference Form FUL 169 Note 2 for transmission cooler requirements 5 Line Inspection All Eaton Top 2 transmission systems installed at OEM plants must pass the requirements outlined in the Line Inspection Form prior to shipment 6 Lubrication Requirements Transmission oil should meet specifications as outlined in TCMT 0020 Ro...

Page 6: ...3 Installation Requirements Space Requirements 10 speed Valve Location Note Refer to Transmission Mounting Requirements for Valve Spatial Requirements ...

Page 7: ... LENGTH A LENGTH B LENGTH C 11610 815 1 32 09 200 4 7 89 67 8 2 67 12610 815 1 32 09 200 4 7 89 67 8 2 67 13610 815 1 32 09 200 4 7 89 67 8 2 67 14610 823 2 32 41 208 5 8 21 75 9 2 99 15610 823 2 32 41 208 5 8 21 75 9 2 99 16610 823 2 32 41 208 5 8 21 75 9 2 99 ...

Page 8: ...5 Installation Requirements 9 13 speed Valve Location Note Refer to Transmission Mounting Requirements for Valve Spatial Requirements ...

Page 9: ...ing Requirements for Valve Spatial Requirements MODEL LENGTH A LENGTH B LENGTH C 12713 815 1 32 09 200 4 7 89 43 9 1 73 14713 823 2 32 41 208 5 8 21 51 8 2 04 16713 823 2 32 41 208 5 8 21 46 5 1 83 12913 840 7 33 09 226 1 8 9 69 6 2 74 14913 840 7 33 09 226 1 8 9 69 6 2 74 18913 840 7 33 09 226 1 8 9 69 6 2 74 ...

Page 10: ...nts MODEL LENGTH A LENGTH B LENGTH C 14918 840 7 33 09 226 1 8 9 69 6 2 74 16918 840 7 33 09 226 1 8 9 69 6 2 74 18918 840 7 33 09 226 1 8 9 69 6 2 74 20918 840 7 33 09 226 1 8 9 69 6 2 74 22918 840 7 33 09 226 1 8 9 69 6 2 74 ...

Page 11: ...icant Additives and friction modifiers are not recommended for use in Eaton Fuller transmissions Includes all Roadranger Approved comparable synthetic lubricant Proper Lubricant Level Note Failure to adhere to Eaton Installation Requirements may effect transmission performance and or warranty coverage Note The quantity for proper fill level will vary from model to model Make sure lubricant is leve...

Page 12: ...1 2 below normal can have on safe operating angles Operating the vehicle 1 2 low on lubricant reduces the safe degree of grade by approximately 3 degrees 5 5 percent Note For transmissions with cooler s installed make sure lubricant is level with fill hole opening run the truck stop and check lubricant level Lubricant must be level with fill hole 12o 11o 20 10o 13 9o 16 8o 6o 51 5o 48 4o 35 3o 26 ...

Page 13: ...hould not be routed or attached at the bottom air tank fittings to avoid any chances of introduc ing moisture into the airline 6 Care should be used when routing the air supply to avoid kinks and close contact to heat sources 7 The transmission air supply must be connected to the air filter regulator mounted on the range cylinder cover Note The air filter regulator must not be removed during insta...

Page 14: ... line 1 4 air hose 1 4 air hose HI Range Inactive LO Range Pressured Range Cylinder 1 4 air hose Constant regulated air 55 65 PSI Air filter regulator Constant regulated air 55 65 PSI 1 4 air hose Splitter Cylinder 5 32 air line Lock High Except During Top 2 Function Top 2 Solenoid Valve HI Split Pressured LO Split Inactive 5 32 air line 5 32 air line Constant regulated air 55 65 PSI 5 32 or 1 8 a...

Page 15: ...12 Installation Requirements Installation Requirements 10 speed Pneumatic Diagrams Note Only solid lines are connected by the OEM Dashed lines are already plumbed ...

Page 16: ...13 Installation Requirements 13 speed Pneumatic Diagrams Note Only solid lines are connected by the OEM Dashed lines are already plumbed ...

Page 17: ...14 Installation Requirements Installation Requirements 18 speed Pneumatic Diagrams Note Only solid lines are connected by the OEM Dashed lines are already plumbed ...

Page 18: ...ut Yoke Flange Installation Note The output yoke flange is supplied with the transmission If the output Yoke flange must be replaced the following proce dure should be followed For detailed instructions refer to the proper transmission model service manual Select the proper output yoke per specified application remove plastic cover and inspect the slinger gold anodized ring and seal surface for da...

Page 19: ...ousing must be parallel during installation If the transmission is prop erly aligned and the clutch is installed properly very little force is required to slide the input shaft through the clutch and into the pilot bearing 5 If interference is encountered move the transmission away from the engine to investigate the cause The use of exces sive force to overcome misalignment may cause damage to the...

Page 20: ...ansmission support is required 1 The transmission nodal mounting pads are approved to be used as a rear engine support location 2 The OEM is responsible for nodal mount design 3 Torque transmission nodal mount capscrews 3 4 10 UNC to 180 190 lbs ft 224 258 N m of torque Typical Rear Support Designs ...

Page 21: ...s Electrical Requirements Top 2 Valve Electrical Requirements Mating connector description Designation Description Part Number Quantity Connector Body 12110293 1 J1 Cable Seal 12048086 3 Terminal 12048074 3 Secondary 12052845 1 ...

Page 22: ...e ratios are as follows Note XX appearing in the transmission model number refers to the XX x 100 Nominal Torque Capacity For example RTLO 14610B T2 has a nominal torque capacity of 14 x 100 or 1400 lbs ft Multi function Output 7 is programmed as the Shift Solenoid in the Output Selections Group Multi function Output 6 is programmed as the Lockout Solenoid in the Output Selections Group Caterpilla...

Page 23: ...ctrical Requirements Caterpillar Schematic Diagram Caterpillar Wiring Diagram Interconnection Table From Top 2 Solenoid Valve To Engine Control Module Connector P1 Description A 19 Lockout B none Engine Ground Stud C 20 Shift 19 20 ...

Page 24: ... and manually enter in the individual pin numbers as assigned to the Top 2 Lock Out Solenoid and the Top 2 Shift Solenoid drivers which then activates the Top 2 feature For further information contact your Detroit Diesel representative Programming Information Diagnostic tools can verify the configuration of the solenoids with functional identifiers that are noted below The Lockout solenoid is give...

Page 25: ...ments Electrical Requirements DDEC III and IV Schematic Diagram Select two of the available six Auxiliary Outputs for use as Lockout and Shift These two selected pins must be noted and used during the programming of the ECM ...

Page 26: ...23 Electrical Requirements DDEC V Schematic Diagram Dig Output V 5 Dig Output V 6 ...

Page 27: ...24 Electrical Requirements Electrical Requirements DDEC III IV and V Wiring Diagram Typical DDEC III and IV System Overview ECM DDEC III IV Vehicle Interface Connector Top 2 Valve ...

Page 28: ...ins listed may be used for Lockout and Shift After deciding which two pins will be used refer to the End of Line Programming information based on your engine type to complete the programming of the ECM DDEC V ECM Harness Connector DDEC III and IV OEM Vehicle Interface Connector Pins available for selection A 1 A 2 and F 3 ECM DDEC V Top 2 Valve 55 40 25 16 1 10 41 45 30 56 60 15 68 61 64 26 11 65 ...

Page 29: ...Manual on the www Roadranger com Literature Center 3 End of line Programming See page 19 page 21 page 29 or page 31 depending on your engine type Dyno Road Test 4 Verify correct clutch adjustment and correct pedal free travel per clutch manufacturer s requirements 5 Verify through normal operation that all transmission forward and reverse gears can be obtained Verify transmission makes automatic s...

Page 30: ...d reverse gears obtained Including Automatic Shifting Gears 6 Verify no transmission oil leaks 7 Verify Top 2 shift label Drivers Instructions book in cab 8 Oil type brand affixed to vehicle 9 Clear Fault Codes in Engine ECM Comments Final Inspection Date Signature Please send copy to Eaton Corp FAX 269 383 5520 ATTN Automation Installations Group or mail copy to Eaton Corp 13100 E Michigan Ave Ga...

Page 31: ...s not work however the transmission does make shifts in the AUTO position When Shift Lever is in the AUTO position the transmission does not make any automatic shifts Manual splitter shifts are normal The Splitter Button does not work and the transmission does not make automatic shifts in the AUTO position The Splitter Button does not work however the transmission does make shifts in the AUTO posi...

Page 32: ... SPEEDOMETER NOTE E NOTE H NOTE B ACCELERATOR PEDAL POSITION SENSOR 40mA 5mA BK RD WH J403 P403 ACCELERATOR PEDAL SENSOR SWITCH SENSOR COMMON 8 V ACCELERATOR PEDAL POSITION B A C H795 PK H795 PK A C HIGH PRESS SWITCH N C E971 GN 450 YL 451 BR SIGNAL SIGNAL NOTE B TACHOMETER NOTE E NOTE H E793 BU E794 YL 10A PASSIVE MAGNETIC VEHICLE SPEED SENSOR G808 BU G809 GN H795 PK H795 PK E717 GN E716 GY SET R...

Page 33: ...9 BK K990 GN K900 YL SPEEDOMETER NOTE E NOTE H NOTE B ACCELERATOR PEDAL POSITION SENSOR 40mA 5mA BK RD WH J403 P403 ACCELERATOR PEDAL SENSOR SWITCH SENSOR COMMON 8 V ACCELERATOR PEDAL POSITION B A C H795 PK H795 PK A C HIGH PRESS SWITCH N C E971 GN 450 YL 451 BR SIGNAL SIGNAL NOTE B TACHOMETER NOTE E NOTE H E793 BU E794 YL 10A PASSIVE MAGNETIC VEHICLE SPEED SENSOR G808 BU G809 GN H795 PK H795 PK S...

Page 34: ...NPUT K 2 ESS TRANS OR FIRE TRUCK PUMP PRESSURE OR EXHAUST TEMP DATA LINK DATA LINK PWM FAN OR OI ALARM OR PWM TRANSMISSION SENSOR SUPPLY 5VDC SENSOR RETURN DIGITAL INPUT K 3 DIGITAL OUTPUT A 1 C B A C B A WIRE NO 953 440 925 926 927 900 901 CAVITY A B C D E F G H J LABEL BATTERY GROUND 12 24V J1939 DATA LINK J1939 DATA LINK J1939 SHIELD DATA LINK DATA LINK PLUG P N 23507136 PLUG P N 23507136 COLOR...

Page 35: ... REQUIRED All information subject to change without notice Rev 6 05 7SA821 0506 Copyright 2005 DETROIT DIESEL CORPORATION 55 40 25 16 1 10 41 45 30 56 60 15 68 61 64 26 11 65 46 31 INPUT SENSOR SUPPLY 1 INPUT WITH 1 5kΩ PULL UP SENSOR RETURN 1 NOT USED FOR DIGITAL INPUTS RESISTORS ARE INTERNAL TO ECU V 16 V 59 IDLE VALIDATION SENSOR RETURN 2 CAVITY DASH PANEL V 9 RETURN SIGNAL VEHICLE SPEED SENSOR...

Page 36: ...N m 8 bolt opening 50 65 lbs ft 68 88 N m Reverse switch 9 16 18 20 25 lbs ft 27 34 N m Neutral switch cap 3 4 16 20 25 lbs ft 27 34 N m Speedometer electronic sensor 3 4 16 10 15 lbs ft 14 20 N m Lubricant fill plug 1 NPT 60 75 lbs ft 81 101 N m Lubricant drain plug 3 4 NPT 45 55 lbs ft 61 75 N m Lifting bracket capscrew 3 8 16 35 45 lbs ft 47 61 N m Rear bearing cover capscrew 3 8 16 35 45 lbs f...

Page 37: ...r Kit MD 100 Eaton Service Parts 1 800 826 HELP 4357 Part No Description MD 200 Engine Tools Contact your local engine representative for the latest tools specifications Troubleshooting Guide TRTS 0070 Service Manuals TRSM 0550 RTLO 10 speed Models TRSM 0670 RTLO 13 speed 18 speed and Convertible Models Illustrated Parts Lists See model specific listing Driver Instructions TRDR 0550 RTLO 10 speed ...

Page 38: ...h engines 400 H P and above and GCW s over 90 000 lbs With engines 400 H P and above and 1400 lbs ft or greater torque With engines 450 H P and above With engines 1500 lbs ft and above In all cases cooler must have sufficient capacity to maintain oil temperatures below 250 F at worst case operating conditions Additional Application Requirements for Approval of RTLOC 1X909A T2 Application must be f...

Page 39: ...Body Type Trailer Type Trailers Area of Operation Country s State Province Region Road Usage Highway Secondary City Off Highway Off Road Maximum Grade on Which Vehicle will be Required to Operate TRANSMISSION FEATURE OPTION REQUIREMENTS CHECK BOX OF APPROPRIATE CONFIGURATION PTO Usage None 6 Bolt Engine Split Shaft Countershaft 6 Bolt 8 Bolt Aux PTO Model PTO Driven Equipment PERSON SUBMITTING REQ...

Page 40: ...atures and specifications listed in this document are subject to change without notice and represent the maximum capabilities of the software and products with all options installed Although every attempt has been made to ensure the accuracy of information contained within Eaton makes no representation about the completeness correctness or accuracy and assumes no responsibility for any errors or o...

Reviews: