


6
Application Note Establish Ethernet connection between easyE4 and easySoft V7
04/2020
AP050013EN
www.eaton.com
3
IP settings of the easyE4
There are three ways to change the IP settings of the easyE4 –
•
by transferring a *.e70 project (3.1),
•
via the "Search for devices" window (0) or
•
via the keyboard (device variant with display) (
Fehler! Verweisquelle konnte nicht gefunden
werden.
).
3.1
IP settings in the register „
Ethernet
“ (View „
Project
“)
The IP settings defined in the *.e70 project are transferred to the easyE4 when the *.e70 project is
transferred and thus overwrite the existing IP settings in the easyE4.
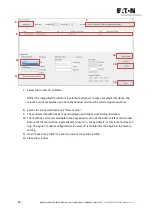
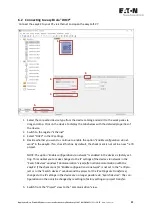
When creating a new *.e70 project, you define the IP settings of the easyE4:
1.
Select in the “
Project
” view the appropriate device type from the device catalog on the left
and add it to the work pane using drag and drop.
2.
Click on the device on the work pane to display the tabs with the detailed properties of the
device at the bottom. Switch to the "
Ethernet
" tab.
3.
Here you can choose between the IP settings: "
Auto-IP
", "
Set IP address
" and "
DHCP
" and en-
ter the information required depending on the selection, such as IP address, etc.
4.
Decide whether you want to enable the option "
Enable configuration via network
" in the
easyE4. If yes, check this box. By default, the check mark is not set in a new *.e70 project.
3.
2.
4.
1.
Summary of Contents for easyE4 series
Page 2: ......


