background image

2

Installation Instructions – C4RV/C6RV Commercial Recessed Compact Fluorescent Remodel 

Installation Instructions - C4RV/C6RV Commercial Recessed Compact Fluorescent Remodel

705024INS     ADP140610     www.eaton.com

INSTALLATION

To Install Rough-In Section

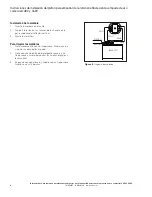
1.  Remove J-box arm from mount bar. (Figure 2.)
2.  Insert J-Box into ceiling. Remove J-Box cover and 

connect supply lead wires per wiring diagram  

(Figure 4.) and in accordance with your local electrical 

code(s) or NEC.

3.  Insert Remodel ring into hole in ceiling by pinching 

springs upward.

4.  Reattach J-Box arm to mount bar. J-Box should rest on 

ceiling. Tighten Screw. (Figure 3.)

Trim Installation

1.  Insert trim into ring.
2.  Align 2 screws in keyhole slots at the top of the vertical 

reflector.

3.  Tighten screws.

To Clean Trims

1.  Gently wipe with soft, clean,dry lint-free cloth to 

remove dust.

2.  Wipe with mild detergent solution on a soft, clean cloth 

to remove fingerprints and stains.

3.  Rinse with clean water and dry with soft, clean, dry  

lint-free cloth.

Figure 2.   

J-Box

Mount 

Bar

Flex 

Orientation

Figure 3.   

RED

RED

BLUE

BLUE

BALLAST

WHITE

BLACK

Figure 4.   

Wiring Diagram

Summary of Contents for Cooper Lighting Portfolio C4RV

Page 1: ...minaire fixture or in a way that may entrap heat Note N This fixture should be supported by main runners or other structure that is capable of supporting fixture weight of 10 Ibs IMPORTANT SAFEGUARDS...

Page 2: ...r NEC 3 Insert Remodel ring into hole in ceiling by pinching springs upward 4 Reattach J Box arm to mount bar J Box should rest on ceiling Tighten Screw Figure 3 Trim Installation 1 Insert trim into r...

Page 3: ...encastr Ne l utilisez pas dans des endroits dangereux ou proximit d l ments chauffants lectriques ou gaz 2 N utilisez pas cet quipement d autres fins que celles pr vues 3 L installation doit respecter...

Page 4: ...deux vis dans les fentes en trous de serrure situ es au sommet du r flecteur vertical 3 Serrez les vis Pour nettoyer les garnitures 1 Essuyez d licatement avec un chiffon doux propre sec et non peluch...

Page 5: ...ara montaje empotrado solamente No la utilice en ubicaciones peligrosas ni cerca de estufas de gas o el ctricas 2 No utilice este equipo para otro fin diferente al indicado 3 Instale nicamente de conf...

Page 6: ...oldura en el anillo 2 Alinee 2 tornillos en las ranuras de la chaveta en la parte superior del reflector vertical 3 Ajuste los tornillos Para limpiar las molduras 1 Frote suavemente con un trapo suave...

Page 7: ...pos e Toutes les autres marques de commerce sont la propri t de leur propri taire respectif Eaton es una marca comercial registrada Todas las marcas comerciales son propiedad de sus respectivos propi...

Reviews: