2
EATON
IB501001EN
Installation instructions
Installation Instructions - Arbor Bollard
INSTALLATION
Tools Required
Ratchet, a shallow 3/4” socket or 3/4” wrench for 1/2”
hex nuts, #2 Phillips head screw driver, torque wrench and
5/32” Allen wrench.
How to Install (Figure 1. - Figure 4.)
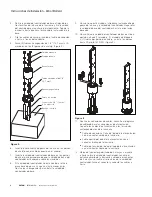
1. Install foundation anchors and conduit using supplied
anchor template as illustrated. (Figure 1.)
2. Remove Luminaire from packaging and set aside in a
safe place to prevent scratching or other damage to
housing or lens.
3. Remove base driver assembly by loosening three
screws from bottom of luminaire and pull driver
assembly from housing. Set luminaire aside until base
installation is complete.
4. Pull field wires, including ground wire through conduit.
5. Assemble (3) 1/2” hex nuts and (3) washers to the (3)
anchor bolts. (Figure 2.)
6. Insert the base rubber pad onto the anchor bolts with
exposed wire thru the middle.
7. Insert the base driver assembly onto the anchor bolts,
making sure the base driver assembly is sitting on the
washers.
8. If driver assembly is not leveled, remove rubber base
plate, and make minor adjustment to the three hex nuts
in order to level base driver assembly.
9. Once driver assembly is leveled, insert base rubber pad
and driver assembly. Rotate base driver assembly till
desired orientation.
Figure 2.
Figure 1.
Split Washer
Flat Washer
Electrical Base
Concrete Base
3/4” Conduit (2 Shown)
Anchor Bolts
Base Gasket
1/2 Hex Nut
Template
Anchor Bolts (3X)
3/4”Conduit (2X)
5.88 Max B
olt
Projection
Expose Atleast
10” of Wire (2X)
Lot Conduit
Project 1.00”
Max (2X)


