background image

619-00470-02-i (it)

Pagina 9

IT

ALIANO

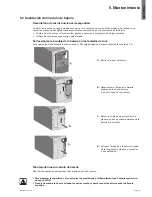
4. Utilizzo

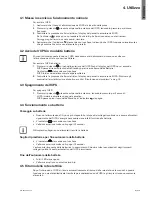
4.1 Messa in servizio e funzionamento normale

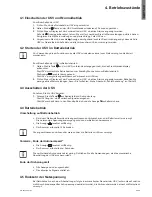
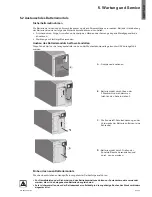
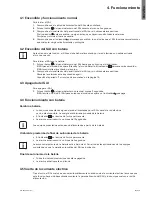
Per avviare l’UPS:

1.

  Assicurarsi che il cavo di alimentazione dell’UPS sia inserito nella presa.

2.

   Premere il pulsante   presente sul pannello anteriore dell’UPS, tenendolo premuto per almeno  

2 secondi.

3.

   Controllare la presenza di allarmi attivi sul display del pannello anteriore dell'UPS. 


 Se  l’indicatore 

 è acceso, non procedere finché tutti gli allarmi non saranno stati rimossi. 


Correggere gli allarmi e, se necessario, riavviare.

4.

   Assicurarsi che l’indicatore 

 si accenda con luce fissa, indicando che l’UPS funziona normalmente e 

che gli eventuali carichi sono alimentati e protetti.

4.2 Avvio dell’UPS in modalità batteria

Prima di utilizzare questa funzione, l’UPS deve essere stato alimentato almeno una volta con  

l'alimentazione di rete con uscita abilitata. 

Per avviare l’UPS a batteria:

1.

   Premere il pulsante 

 sul pannello anteriore dell'UPS finché il display dell'UPS non si accende.


L’UPS passa attraverso la modalità Standby per arrivare alla modalità Batteria.  

L’indicatore


si accende con luce fissa.


L’UPS inizia così ad alimentare le apparecchiature.

2.

   Controllare la presenza di allarmi attivi sul display del pannello anteriore dell'UPS. Risolvere gli 

eventuali allarmi attivi prima di continuare. Ved. "Risoluzione dei problemi" a pag. 10.

4.3 Spegnimento dell’UPS

Per spegnere l’UPS:

1.

  Premere il pulsante   presente sul pannello anteriore, tenendolo premuto per 3 secondi.


 L'UPS inizierà a emettere un segnale acustico.  

L’UPS passa quindi in modalità Standby e l’indicatore   si spegne.

4.4 Funzionamento su batteria

Passaggio su batteria

• 

Quando l’alimentazione CA non è più disponibile, i dispositivi collegati continuano a essere alimentati 

ugualmente dall’UPS. L’energia necessaria viene infatti fornita dalla batteria.

• 

L'indicatore 

 si accende con luce fissa.

• 

L’allarme acustico emette un bip ogni 10 secondi.

Gli impianti collegati sono alimentati tramite la batteria.

Soglia di preallarme per fine autonomia della batteria

• 

L'indicatore 

 si accende con luce fissa.

• 

L’allarme acustico emette un bip ogni 10 secondi.

L'autonomia rimanente della batteria è in esaurimento. Chiudere tutte le applicazioni degli impianti  

collegati poiché l'arresto automatico dell'UPS è imminente.

Fine dell’autonomia della batteria

• 

Tutti i LED si spengono.

• 

L’allarme acustico non emette alcun bip.

4.5 Ritorno della rete elettrica

Dopo l’interruzione, l’UPS si riavvia automaticamente al ritorno della rete elettrica (a meno che questa 

funzione non sia stata disattivata tramite la personalizzazione dell’UPS) e gli impianti sono nuovamente 

alimentati.

Summary of Contents for 5SC 1000i

Page 1: ...5SC 500i 5SC 750i 5SC 1000i 5SC 1500i User s guide English Français Deutsch Italiano Español Português Русский Polski ...

Page 2: ......

Page 3: ...619 00470 02 i en ENGLISH Copyright 2013 EATON All rights reserved Service and support Call your local service representative 5SC 500i 5SC 750i 5SC 1000i 5SC 1500i Installation and user manual ...

Page 4: ...hazardous waste center This symbol indicates that you should not discard waste electrical or electronic equipment WEEE in the trash For proper disposal contact your local recycling reuse or hazardous waste center Information advice help UPS directives Safety IEC 62040 1 2008 EMC IEC 62040 2 2005 Performance IEC 62040 3 2010 CE mark EN 62040 1 2008 and EN 62040 2 2006 C1 Class B emission level CISP...

Page 5: ...5 UPS setting through the LCD 6 3 Installation 7 3 1 Unpacking and contents check 7 3 2 Communication ports 8 4 Operation 9 4 1 Start up and Normal operation 9 4 2 Starting the UPS on Battery 9 4 3 UPS Shutdown 9 4 4 Operation on Battery Power 9 4 5 Return of AC Input Power 9 5 Maintenance 10 5 1 Troubleshooting 10 5 2 Battery module replacement 11 6 Appendices 12 6 1 Technical specifications 12 ...

Page 6: ...ises over 50 of recycled cardboard Sacks and bags are made of polyethylene Packing materials are recyclable and bear the appropriate identification symbol 01 PET Materials Abbreviations Number in the symbols Polyethylene terephthalat PET 01 High density polyethylene HDPE 02 Polyvinyl chloride PVC 03 Low density polyethylene LDPE 04 Polypropylene PP 05 Polystyrene PS 06 Follow all local regulations...

Page 7: ...2 Rear panels 5SC 500i 5SC 750i INPUT OUTPUT Refer to the Bottom of the unit for caution markings RS232 OR 5 4 3 2 1 INPUT OUTPUT Refer to the Bottom of the unit for caution markings RS232 OR 5 4 3 2 1 5SC 1000i 5SC 1500i INPUT OUTPUT OUTPUT Refer to the Bottom of the unit for caution markings RS232 OR 5 4 3 2 1 INPUT OUTPUT Refer to the Bottom of the unit for caution markings RS232 OR 5 4 3 2 1 1...

Page 8: ...rnal fault 13 Output load level 14 Battery level 15 Input measurements 16 Output measurements 17 Measuring unit 2 5 UPS setting through the LCD Release scroll down button to select menu 5s 2s 2s 2s Output voltage Alarm Sensitivity 1 Example of setting Save the new value 10s 5s 5s LCD will shut off if there is no activity for 3 minutes 1 In low sensitivity mode Lo UPS will tolerate more fluctuation...

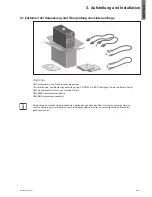
Page 9: ...s 3 User manual and IPSS Intelligent Power Software Suite CDROM 4 2 connection cables for the protected equipment 5 RS232 communication cable 6 USB communication cable Packing materials must be disposed of in compliance with all local regulations concerning waste Recycling symbols are printed on the packing materials to facilitate sorting ...

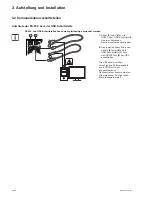
Page 10: ...unication ports cannot operate simultaneously 2 1 5 6 1 Connect the RS232 5 or USB 6 communication cable to the serial or USB port on the computer equipment 2 Connect the other end of the communication cable 5 or 6 to the USB 1 or RS232 2 communication port on the UPS The UPS can now communicate with EATON power management software ...

Page 11: ...y for active alarms Resolve any active alarms before continuing See Troubleshooting on page 10 4 3 UPS Shutdown To shut down the UPS 1 Press the button on the front panel for three seconds The UPS starts to beep The UPS then transfers to Standby mode and the indicator turns off 4 4 Operation on Battery Power Transfer to battery power The connected devices continue to be supplied by the UPS when AC...

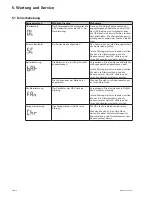
Page 12: ...esentative Battery fault The batteries in the UPS are disconnected Verify that all batteries are properly connected If error persists note the alarm message and the UPS serial number and then contact your service representative The end of battery life is reached Contact your service representative for battery replacement Fan fault The UPS has a fan fault Check that no object is blocking the fan If...

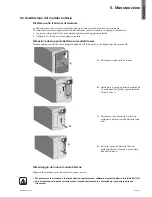
Page 13: ...eration must be performed when the UPS is switched OFF and unplugged from AC source A A Remove the front panel B B Disconnect the battery block by separating the two connectors never pull on the wires C C Remove the plastic protection cover in front of the battery one screw D D Pull the plastic tab to remove the battery block and replace it Mounting the new battery module Carry out the above instr...

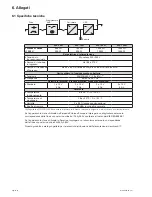
Page 14: ... 12 V 9 Ah 3 x 12 V 9 Ah Environment Operating temperature range 0 to 35 C 32 to 95 F Storage temperature range 15 to 40 C 5 to 104 F Relative humidity 0 to 90 without condensation Noise level 40 dBA in normal mode 1 Adjustable to 220 230 240 V must be set to the identical AC power source value When the appliance is used in EU area use an external circuit breaker in front of line with rating 16 A ...

Page 15: ...619 00470 02 i fr FRANÇAIS Copyright 2013 EATON Tous droits réservés SAV et assistance Contacter votre représentant SAV local Manuel d installation et d utilisation 5SC 500i 5SC 750i 5SC 1000i 5SC 1500i ...

Page 16: ...s jeter des équipements électriques ou électroniques usagés dans les ordures ménagères Pour plus d informations contacter votre centre local de recyclage réutilisation de déchets dangereux Informations conseils aide Directives relatives aux systèmes ASI Sécurité IEC 62040 1 2008 CEM IEC 62040 2 2005 Performances IEC 62040 3 2010 Marquage CE EN 62040 1 2008 et EN 62040 2 2006 C1 Niveau d émission c...

Page 17: ...glage de l ASI à l aide de l afficheur LCD 6 3 Installation 7 3 1 Déballage et vérification du contenu 7 3 2 Ports de communication 8 4 Fonctionnement 9 4 1 Mise en service et fonctionnement normal 9 4 2 Démarrage de l ASI sur batterie 9 4 3 Arrêt de l ASI 9 4 4 Fonctionnement sur batterie 9 4 5 Retour du réseau électrique 9 5 Maintenance 10 5 1 Dépannage 10 5 2 Remplacement du module batterie 11 ...

Page 18: ...plus de 50 de carton recyclé Les sacs et sachets sont en polyéthylène Les matériaux constituant l emballage sont recyclables et marqués du symbole d identification 01 PET Matériaux Abréviations Numéro dans les symboles Polyéthylène Téraphthalate PET 01 Polyéthylène Haute Densité HDPE 02 Polyvinyle Chloride PVC 03 Polyéthylène Basse Densité LDPE 04 Polypropylène PP 05 Polystyrène PS 06 Suivre les r...

Page 19: ...T Refer to the Bottom of the unit for caution markings RS232 OR 5 4 3 2 1 INPUT OUTPUT Refer to the Bottom of the unit for caution markings RS232 OR 5 4 3 2 1 5SC 1000i 5SC 1500i INPUT OUTPUT OUTPUT Refer to the Bottom of the unit for caution markings RS232 OR 5 4 3 2 1 INPUT OUTPUT Refer to the Bottom of the unit for caution markings RS232 OR 5 4 3 2 1 1 Port de communication USB 2 Port de commun...

Page 20: ... 13 Niveau de charge en sortie 14 Niveau de batterie 15 Mesures en entrée 16 Mesures en sortie 17 Unité de mesure 2 5 Réglage de l ASI à l aide de l afficheur LCD Relâcher le bouton de défilement pour sélectionner le menu 5s 2s 2s 2s Output voltage Alarm Sensitivity 1 Exemple de réglage Enregistre la nouvelle valeur 10s 5s 5s L afficheur LCD s éteint après 3 minutes d inactivité 1 En mode faible s...

Page 21: ... de l utilisateur et CD ROM IPSS Intelligent Power Software Suite 4 2 câbles de raccordement pour l équipement protégé 5 Câble de communication RS232 6 Câble de communication USB Les emballages doivent être éliminés conformément aux règlementations en vigueur concernant les déchets Ils portent des symboles de recyclage pour faciliter le tri 619 00470 02 i fr ...

Page 22: ...ionner simultanément 2 1 5 6 1 Connecter le câble de communication RS 232 5 ou USB 6 sur le port série ou USB de l équipement informatique 2 Connecter l autre extrémité du câble de communication 5 ou 6 sur le port de communication USB 1 ou RS232 2 de l ASI L ASI peut désormais dialoguer avec un logiciel d administration de personnalisation ou de sécurité EATON 619 00470 02 i fr ...

Page 23: ...ré des alarmes doivent d abord être résolus Voir la section Dépannage à la page 10 4 3 Arrêt de l ASI Pour arrêter l ASI 1 Appuyer pendant trois secondes sur le bouton sur la face avant L ASI commence à émettre un signal sonore L ASI passe alors en mode Veille et l indicateur s éteint 4 4 Fonctionnement sur batterie Transfert sur batterie Les équipements connectés continuent à être alimentés par l...

Page 24: ...tez votre SAV Défaut de batterie Les batteries sont déconnectées de l ASI Vérifiez que toutes les batteries sont correctement branchées Si l erreur persiste notez le message d alarme et le numéro de série de l ASI puis contactez votre SAV La fin de vie de la batterie est atteinte Contacter votre représentant SAV pour le remplacement de la batterie Défaut de ventilateur Le ventilateur de l ASI est ...

Page 25: ...doit être réalisée une fois l ASI mise hors tension et débranchée du secteur A A Retirer la face avant B B Débrancher le bloc batterie en séparant les 2 connecteurs ne jamais tirer sur les câbles C C Enlever le capot plastique de protection batterie fixé par 1 vis D D Extraire le module batterie en tirant sur la languette plastique et procéder à son remplacement Installation du nouveau module batt...

Page 26: ... Environnement Température de fonctionnement 0 à 35 C 32 à 95 F Température de stockage 15 à 40 C 5 à 104 F Humidité relative 0 à 90 sans condensation Niveau de bruit 40 dBA en mode normal 1 Ajustable sur 220 230 240 V doit être défini sur la valeur identique du réseau électrique d alimentation Lorsque l appareil est utilisé dans la zone UE utilisez un disjoncteur externe en début de ligne avec un...

Page 27: ...2 i de DEUTSCH Copyright 2013 EATON Alle Rechte vorbehalten Service Support Wenden Sie sich telefonisch an Ihren örtlichen Servicepartner Installations und Bedienungsanleitung 5SC 500i 5SC 750i 5SC 1000i 5SC 1500i ...

Page 28: ...r recycelbare Güter Mit diesem Symbol wird angezeigt dass Sie elektrische oder elektronische Ausrüstungen WEEE nicht in den Abfall werfen sollten Zur ordnungsgemäßen Entsorgung kontaktieren Sie bitte Ihre örtliche Annahmestelle für Sondermüll oder recycelbare Güter Informationen Ratschläge Hilfen Technische Normen in Bezug auf USV Sicherheit EN 62040 1 2008 EMV EN 62040 2 2005 Leistungen EN 62040 ...

Page 29: ...ie LCD 6 3 Aufstellung und Installation 7 3 1 Entfernen der Verpackung und Überprüfung des Lieferumfangs 7 3 2 Kommunikationsschnittstellen 8 4 Betriebszustände 9 4 1 Einschalten der USV und Normalbetrieb 9 4 2 Starten der USV im Batteriebetrieb 9 4 3 Ausschalten der USV 9 4 4 Batteriebetrieb 9 4 5 Rückkehr der Netzspannung 9 5 Wartung und Service 10 5 1 Fehlerbehebung 10 5 2 Austausch des Batteri...

Page 30: ...n Kartonnagen bestehen zu 50 aus Recylingpappe Sämtliche Beutel bestehen aus Polyethylen Alle verwendeten Materialien sind wiederverwertbar und mit dem Symbol gekennzeichnet 01 PET Material Kurzbezeichnung Kennziffer 01 PET im Symbol Polyethylenterephthalat PET 01 HD Polyethylen HDPE 02 Polyvinylchlorid PVC 03 Polyethylen niedriger Dichte LDPE 04 Polypropylen PP 05 Polystyrol PS 06 Verpackungsmate...

Page 31: ...16 1 x 5 9 x 8 3 2 2 Rückansicht 5SC 500i 5SC 750i INPUT OUTPUT Refer to the Bottom of the unit for caution markings RS232 OR 5 4 3 2 1 INPUT OUTPUT Refer to the Bottom of the unit for caution markings RS232 OR 5 4 3 2 1 5SC 1000i 5SC 1500i INPUT OUTPUT OUTPUT Refer to the Bottom of the unit for caution markings RS232 OR 5 4 3 2 1 INPUT OUTPUT Refer to the Bottom of the unit for caution markings R...

Page 32: ... 14 Batterieladestand 15 Eingangsmessungen 16 Ausgangsmessungen 17 Messeinheit 2 5 Einstellung der USV über die LCD Rasten Sie den Scroll Knopf aus um das Menü zu wählen 5s 2s 2s 2s Output voltage Alarm Sensitivity 1 Beispiel für eine Einstellung Speichern Sie den neuen Wert 10s 5s 5s Das LCD schaltet nach 3 Minuten ohne Betätigung ab 1 Im sensibilitätsreduzierten Modus Lo erlaubt die USV stärkere...

Page 33: ...lations und Bedienungsanleitung und CD ROM mit IPSS Intelligent Power Software Suite 4 2 Anschlusskabel für zu schützende Geräte 5 RS232 Kommunikationskabel 6 USB Kommunikationskabel Verpackungen müssen entsprechend den geltenden gesetzlichen Bestimmungen entsorgt werden Um die Sortierung zu erleichtern sind die Verpackungsmaterialien mit entsprechenden Symbolen gekennzeichnet 1 2 3 4 5 6 ...

Page 34: ...1 5 6 1 Kabel 5 oder 6 an die RS232 bzw USB Schnittstelle des zu schützenden Rechnersystems anschließen 2 Das jeweils andere Ende des Kabels 5 oder 6 an die USB Schnittstelle 1 bzw den RS232 Port 2 der USV anschließen Die USV kann nun über verschiedene Softwarepakete von EATON mit dem angeschlossenen Rechnersystem kommunizieren Überwachung Konfiguration Sicherheitsparameter 619 00470 02 i de ...

Page 35: ...e am Display auf der Vorderseite der USV ob aktive Alarme angezeigt werden Beheben Sie etwaige aktive Warnmeldungen bevor Sie fortfahren Siehe Abschnitt Fehlerbehebung auf Seite 10 4 3 Ausschalten der USV So fahren Sie die USV herunter 1 Drücken Sie dieTaste am Bedienfeld drei Sekunden lang Die USV fängt an ein akustisches Signal auszugeben Die USV wechselt dann in den Standby Betrieb und die Anze...

Page 36: ...örung Die Batterien in der USV sind nicht angeschlossen Vergewissern Sie sich dass alle Batterien ordnungsgemäß angeschlossen sind Ist die Störung weiter vorhanden sollten Sie sich die Alarmmeldung und die Seriennummer der USV notieren und Ihren Kundendienstvertreter anrufen Die Lebensdauer der Batterie ist abgelaufen Wenden Sie sich zum Batterieaustausch an Ihren Help Desk Ventilatorstörung Der V...

Page 37: ...lstromquelle getrennter USV durchgeführt werden A A Frontpaneel ausbauen B B Batteriemodul durch Lösen der 2 Steckverbinder abklemmen nicht an den Kabeln ziehen C C Die Kunststoff Schutzabdeckung an der Vorderseite der Batterie entfernen eine Schraube D D Batteriemodul durch Greifen der Kunststofflasche herausziehen und durch neues ersetzen Einbau des neuen Batteriemoduls Die oben beschriebenen Ha...

Page 38: ... V 7 Ah 2 x 12 V 9 Ah 3 x 12 V 9 Ah Umgebungs bedingungen Umgebungs temperatur 0 bis 35 C 32 bis 95 F Lagertemperatur 15 bis 40 C 5 bis 104 F Rel Luftfeuchtigkeit 0 bis 90 ohne Kondensation Geräuschpegel 40 dBA im Normalbetrieb 1 Auf 220 230 240 V einstellbar muss entsprechend dem Wert der Wechselstromquelle gewählt werden Bei Einsatz der USV in europäischen Ländern externen Leistungsschutzschalte...

Page 39: ...9 00470 02 i it ITALIANO Copyright 2013 EATON Tutti i diritti riservati Servizio ed assistenza rivolgersi al centro assistenza di zona Manuale d installazione e d uso 5SC 500i 5SC 750i 5SC 1000i 5SC 1500i ...

Page 40: ...iuti pericolosi Questo simbolo ricorda di non gettare nell immondizia i rifiuti da apparecchiature elettriche o elettroniche RAEE Per un corretto smaltimento rivolgersi al centro locale di riciclaggio riutilizzo o di raccolta dei rifiuti pericolosi Informazioni consigli guida Direttive sui dispositivi UPS Sicurezza IEC 62040 1 2008 CEM IEC 62040 2 2005 Prestazioni IEC 62040 3 2010 Marchio CE EN 62...

Page 41: ...UPS attraverso il pannello LCD 6 3 Installazione 7 3 1 Apertura dell imballaggio e verifica del contenuto 7 3 2 Porte di comunicazione 8 4 Utilizzo 9 4 1 Messa in servizio e funzionamento normale 9 4 2 Avvio dell UPS in modalità batteria 9 4 3 Spegnimento dell UPS 9 4 4 Funzionamento su batteria 9 4 5 Ritorno della rete elettrica 9 5 Manutenzione 10 5 1 Risoluzione dei problemi 10 5 2 Sostituzione...

Page 42: ... cartone riciclato I sacchetti e i sacchi sono in polietilene I materiali che costituiscono l imballo sono riciclabili e sono marcati con simbolo di identificazione Materiale Abbreviazione Numero nel simbolo Polietilene tereftalato PET 01 Polietilene ad alta densità HDPE 02 Cloruro di polivinile PVC 03 Polietilene a bassa densità LDPE 04 Polipropilene PP 05 Polistirene PS 06 Per l eliminazione del...

Page 43: ...5SC 500i 5SC 750i INPUT OUTPUT Refer to the Bottom of the unit for caution markings RS232 OR 5 4 3 2 1 INPUT OUTPUT Refer to the Bottom of the unit for caution markings RS232 OR 5 4 3 2 1 5SC 1000i 5SC 1500i INPUT OUTPUT OUTPUT Refer to the Bottom of the unit for caution markings RS232 OR 5 4 3 2 1 INPUT OUTPUT Refer to the Bottom of the unit for caution markings RS232 OR 5 4 3 2 1 1 Porta di comu...

Page 44: ...atteria 12 Guasto interno 13 Livello carico uscita 14 Livello batteria 15 Misure ingresso 16 Misure uscita 17 Unità di misurazione 2 5 Impostazione dell UPS attraverso il pannello LCD Rilasciare il pulsante di scorrimento verso il basso per selezionare i menu 5s 2s 2s 2s Output voltage Alarm Sensitivity 1 Esempio di impostazione Salvare il nuovo valore 10s 5s 5s L LCD si spegne in assenza di attiv...

Page 45: ... le istruzioni per l uso e la suite IPSS Intelligent Power Software Suite 4 2 cavi di collegamento per l apparecchiatura protetta 5 Cavo di comunicazione RS232 6 Cavo di comunicazione USB Gli imballi devono essere eliminati nel rispetto della regolamentazione in vigore per i rifiuti Per facilitarne il trattamento differenziato i vari materiali recano appositi simboli di riciclaggio ...

Page 46: ...onare contemporaneamente 2 1 5 6 1 Collegare il cavo di comunicazione RS232 5 o USB 6 alla porta seriale o USB dell apparecchiatura informatica 2 Collegare l altra estremità del cavo di comunicazione 5 o 6 alla porta di comunicazione USB 1 o RS232 2 dell UPS L UPS è ora in grado di dialogare con un software di amministrazione di configurazione o di sicurezza EATON 619 00470 02 i it ...

Page 47: ...el pannello anteriore dell UPS Risolvere gli eventuali allarmi attivi prima di continuare Ved Risoluzione dei problemi a pag 10 4 3 Spegnimento dell UPS Per spegnere l UPS 1 Premere il pulsante presente sul pannello anteriore tenendolo premuto per 3 secondi L UPS inizierà a emettere un segnale acustico L UPS passa quindi in modalità Standby e l indicatore si spegne 4 4 Funzionamento su batteria Pa...

Page 48: ... Le batterie nell UPS sono scollegate Verificare che tutte le batterie siano collegate correttamente Se il problema persiste prendere nota del messaggio di allarme e del numero di serie dell UPS quindi rivolgersi al centro assistenza di zona La batteria è giunta a fine vita Rivolgersi al centro assistenza di zona per richiedere la sostituzione della batteria Guasto ventola L UPS presenta un guasto...

Page 49: ...e deve essere eseguita quando l UPS è spento e scollegato dalla sorgente CA A A Rimuovere il pannello anteriore B B Scollegare il gruppo batteria separando i 2 connettori evitando rigorosamente di tirare i cavi C C Rimuovere la protezione in plastica sulla parte anteriore della batteria una vite D D Estrarre il gruppo batteria tirando sulla linguetta di plastica e procedere alla sostituzione Rimon...

Page 50: ...Temperatura funzionamento 0 a 35 C 32 to 95 F Temperatura di stoccaggio 15 a 50 C 5 to 104 F Umidità 0 a 90 senza condensazione Soglia di rumore 40 dBA in modalità normale 1 Regolabile a 220 230 240 V deve essere impostato sullo stesso valore della sorgente di alimentazione a corrente alternata Se l apparecchio viene utilizzato nell area dell Unione Europea impiegare un disgiuntore esterno in corr...

Page 51: ...70 02 i es ESPAÑOL Copyright 2013 EATON Todos los derechos reservados Servicio y asistencia Llame a su representante de servicio local Manual de instalación y del usuario 5SC 500i 5SC 750i 5SC 1000i 5SC 1500i ...

Page 52: ...sos o de recogida selectiva local Este símbolo indica que no debe desechar los equipos eléctricos o electrónicos WEEE en el contenedor común Para una correcta retirada contacte con el centro de recogida de residuos peligrosos o de recogida selectiva local Informaciones consejos ayuda Directivas SAI Seguridad IEC 62040 1 2008 EMC IEC 62040 2 2005 Rendimiento IEC 62040 3 2010 Símbolo CE EN 62040 1 2...

Page 53: ...n la pantalla LCD 6 3 Instalación 7 3 1 Desembalaje y comprobación del contenido 7 3 2 Puertos de comunicación 8 4 Funcionamiento 9 4 1 Encendido y funcionamiento normal 9 4 2 Encendido del SAI con batería 9 4 3 Apagado del SAI 9 4 4 Funcionamiento con batería 9 4 5 Vuelta de la corriente eléctrica 9 5 Mantenimiento 10 5 1 Corrección de anomalías 10 5 2 Sustitución del módulo de batería 11 6 Anexo...

Page 54: ...artón reciclado Las bolsas y las bolsitas son de polietileno Los materiales que forman el embalaje son reciclables y están marcados con el símbolo de identificación 01 PET Materiales Abreviatura Número en el símbolos Polietileno teraftalate PET 01 Polietileno de Alta Densidad HDPE 02 Polivinilo de Cloruro PVC 03 Polietileno de Baja Densidad LDPE 04 Polipropileno PP 05 Poliestireno PS 06 Cumplir co...

Page 55: ...seras 5SC 500i 5SC 750i INPUT OUTPUT Refer to the Bottom of the unit for caution markings RS232 OR 5 4 3 2 1 INPUT OUTPUT Refer to the Bottom of the unit for caution markings RS232 OR 5 4 3 2 1 5SC 1000i 5SC 1500i INPUT OUTPUT OUTPUT Refer to the Bottom of the unit for caution markings RS232 OR 5 4 3 2 1 INPUT OUTPUT Refer to the Bottom of the unit for caution markings RS232 OR 5 4 3 2 1 1 Puerto ...

Page 56: ...vel de carga de salida 14 Nivel de la batería 15 Mediciones de entrada 16 Mediciones de salida 17 Unidad de medición 2 5 Ajuste del SAI en la pantalla LCD Suelte el botón de desplazamiento para seleccionar el menú 5s 2s 2s 2s Output voltage Alarm Sensitivity 1 Ejemplo de ajuste Guarde el nuevo valor 10s 5s 5s La pantalla LCD se apagará si no registra actividad en un intervalo de tres minutos 1 Con...

Page 57: ...CD ROM del manual del usuario e IPSS Intelligent Power Software Suite 4 2 cables de conexión para los equipos protegidos 5 Cable de comunicación RS232 6 Cable de comunicación USB Los materiales de embalaje se deben desechar conforme a la normativa local sobre residuos Los símbolos de reciclado están impresos en los materiales de embalaje para facilitar la selección ...

Page 58: ... funcionar de forma simultánea 2 1 5 6 1 Conectar el cable de comunicación RS232 5 o USB 6 al puerto serie o al puerto USB del equipo informático 2 Conectar la otra extremidad del cable de comunicación 5 o 6 al puerto de comunicación USB 1 o RS232 2 del SAI El SAI ya podrá dialogar con un software de administración de personalización o de seguridad EATON 619 00470 02 i es ...

Page 59: ...vas antes de seguir Consulte el apartado Corrección de anomalías en la página 10 4 3 Apagado del SAI Para apagar el SAI 1 Pulse el botón del panel delantero durante al menos 3 segundos El SAI emite un pitido El SAI pasa entonces al modo de espera y el indicador se apaga 4 4 Funcionamiento con batería Cambio a batería Los equipos conectados siguen siendo alimentados por el SAI cuando la red eléctri...

Page 60: ...s baterías del SAI están desconectadas Verifique que todas las baterías estén conectadas correctamente Si el error persiste anote el mensaje de alarma y el número de serie del SAI A continuación póngase en contacto con su representante de servicio Se ha alcanzado el fin de la vida de la batería Contacte con su representante de servicio para sustituir la batería Fallo de ventilador El SAI tiene un ...

Page 61: ...operación debe llevarse a cabo cuando el SAI esté apagado y desenchufado de la fuente de CA A A Retirar el panel delantero B B Desconectar el bloque de batería separando los 2 conectores no tirar nunca de los cables C C Retirar la cubierta de protección de plástico que se encuentra delante de la batería un tornillo D D Extraer el bloque de la batería tirando de la lengüeta de plástico y proceder a...

Page 62: ... Ah 2 x 12 V 7 Ah 2 x 12 V 9 Ah 3 x 12 V 9 Ah Medio ambiente Temperatura de funcionamiento 0 a 35 C 32 a 95 F Temperatura de almacenamiento 15 a 40 C 5 a 104 F Humedad 0 a 90 sin condensación Nivel acústico 40 dBA en el modo normal 1 Ajustable a 220 230 240 V debe fijarse al mismo valor de la fuente de alimentación de CA Cuando se utilice el dispositivo en la UE use un disyuntor externo antes de c...

Page 63: ...0 02 i pt PORTUGUÊS Copyright 2013 EATON Todos os direitos reservados Serviço e assistência Telefone ao seu representante de serviço local Manual de instalação e do usuário 5SC 500i 5SC 750i 5SC 1000i 5SC 1500i ...

Page 64: ...erigosos local Este símbolo indica que não se deve eliminar resíduos de equipamentos elétricos ou eletrónicos REEE juntamente com o lixo doméstico normal Para o eliminar corretamente contate o seu centro de reciclagem reutilização ou de resíduos perigosos local Informação notícia ajuda Diretivas UPS Segurança IEC 62040 1 2008 CEM IEC 62040 2 2005 Desempenho IEC 62040 3 2010 Marca CE EN 62040 1 200...

Page 65: ...nstalação 7 3 1 Retirar e verificar os produtos contidos na embalagem 7 3 2 Portas de comunicação 8 4 Operação 9 4 1 Inicialização e operação normal 9 4 2 Colocar o UPS a funcionar com a bateria 9 4 3 Desligamento do UPS 9 4 4 Funcionamento com alimentação da bateria 9 4 5 Retorno de energia por entrada de CA 9 5 Manutenção 10 5 1 Solução de problemas 10 5 2 Substituição do módulo da bateria 11 6 ...

Page 66: ...e sacolas são feitos de polietileno Os materiais da embalagem são recicláveis e contêm o símbolo de identificação adequado 01 PET Materiais Abreviação Número 01 PET do símbolo Polietileno tereftalato PET 01 Polietileno de alta densidade HDPE 02 Cloreto de polivinilo PVC 03 Polietileno de baixa densidade LDPE 04 Polipropileno PP 05 Poliestireno PS 06 Siga todas as regulamentações locais para o desc...

Page 67: ...seiros 5SC 500i 5SC 750i INPUT OUTPUT Refer to the Bottom of the unit for caution markings RS232 OR 5 4 3 2 1 INPUT OUTPUT Refer to the Bottom of the unit for caution markings RS232 OR 5 4 3 2 1 5SC 1000i 5SC 1500i INPUT OUTPUT OUTPUT Refer to the Bottom of the unit for caution markings RS232 OR 5 4 3 2 1 INPUT OUTPUT Refer to the Bottom of the unit for caution markings RS232 OR 5 4 3 2 1 1 Porta ...

Page 68: ...a 14 Nível da bateria 15 Medições de entrada 16 Medições de saída 17 Unidade de medição 2 5 Configuração da UPS através do LCD Solte o botão de deslocar para baixo para seleccionar o menu 5s 2s 2s 2s Output voltage Alarm Sensitivity 1 Exemplo de configuração Guarde o novo valor 10s 5s 5s O LCD desliga se não houver atividade durante 3 minutos 1 No modo de baixa sensibilidade Lo a UPS tolerará mais...

Page 69: ...nça 3 Manual de utilizador e CDROM IPSS Intelligent Power Software Suite 4 2 cabos de ligação para o equipamento protegido 5 Cabo de ligação RS232 6 Cabo de comunicação USB Os materiais da embalagem devem ser reciclados em conformidade com os regulamentos aplicáveis resíduos Os símbolos de reciclagem estão impressos nos materiais de embalagem para facilitar a separação ...

Page 70: ...não podem funcionar simultaneamente 2 1 5 6 1 Conecte o cabo de comunicação RS232 5 ou USB 6 à porta serial ou USB do computador 2 Conecte a outra extremidade do cabo de comunicação 5 ou 6 à porta de comunicação USB 1 ou RS232 2 do UPS O UPS pode agora comunicar com o software de gerenciamento de energia da EATON 619 00470 02 i pt ...

Page 71: ... Resolva todos os alarmes ativos antes de prosseguir Consulte Resolução de problemas na página 10 4 3 Desligamento do UPS Para encerrar o UPS 1 Pressione o botão no painel frontal durante três segundos O UPS emite um sinal sonoro O UPS efetua então a transferência para o modo de espera e o indicador desliga se 4 4 Funcionamento com alimentação da bateria Transferência para a energia da bateria Os ...

Page 72: ...ia As baterias na UPS estão desligadas Comprove de que todas as baterias estão corretamente ligadas Se o erro subsistir tome nota da mensagem do alarme e do número de série da UPS em seguida contacte o seu representante de assistência Foi atingido o fim da vida útil da bateria Contacte o seu representante de serviço para obter uma bateria de substituição Falha da ventoinha A UPS tem uma falha da v...

Page 73: ...a nos modelos em torre Esta operação tem de ser efectuada quando a UPS está desligada OFF e separada da fonte de CA A A Remova o painel dianteiro B B Desligar a bateria bloco separando os dois conectores nunca puxar pelos fios C C Remova a cobertura de proteção plástica da parte dianteira da bateria um parafuso D D Puxar a guia de plástico para remover o bloco de bateria e o substituir Montagem do...

Page 74: ...12 V 9 Ah Ambiente Faixa de temperatura de operação 0 a 35 C 32 a 95 F Faixa de temperatura de armazenamento 15 a 40 C 5 a 104 F Húmidade relativa 0 a 90 sem condensação Nível de ruído 40 dBA no modo normal 1 Ajustável para 220 230 240 V tem de ser definido para o valor da fonte de alimentação CA idêntico Quando o aparelho é utilizado numa região da UE utilize um disjuntor de externo em frente da ...

Page 75: ...УССКИЙ Copyright 2013 EATON Все права защищены Обслуживание и поддержка Обращайтесь к своему местному представителю по обслуживанию Инструкции по установке и руководство пользователя 5SC 500i 5SC 750i 5SC 1000i 5SC 1500i ...

Page 76: ...и опасных отходов Этот символ указывает что Вам не следует утилизировать использованное электрическое или электронное оборудование WEEE в мусорную корзину Для выполнения правильной утилизации обращайтесь в свой местный центр по переработке повторному использованию отходов или утилизации опасных отходов Информация рекомендации помощь Директивы по ИБП Безопасность IEC 62040 1 2008 Эл магн совм IEC 6...

Page 77: ...2 5 Настройка ИБП с помощью светодиодов 6 3 Установка 7 3 1 Распаковка и проверка комплектации 7 3 2 Порты связи 8 4 Эксплуатация 9 4 1 Запуск и нормальная эксплуатация 9 4 2 Запуск ИБП на батарее 9 4 3 Выключение ИБП 9 4 4 Работа от аккумуляторной батареи 9 4 5 Восстановление напряжения сети 9 5 Техобслуживание 10 5 1 Поиск и устранение неисправностей 10 5 2 Замена блока батарей 11 6 Приложения 1...

Page 78: ...ты изготовлены из полиэтилена Материалы упаковки могут утилизироваться и отмечаются следующим идентификационным символом 01 PET Материал Сокращенное название Номер в символе Полиэтилентерефталат ПЭТ PET 01 Полиэтилен высокой плотности ПЭВП HDPE 02 Поливинилхлорид ПВХ PVC 03 Полиэтилен низкой плотности ПЭНП LDPE 04 Полипропилен ПП PP 05 Полистирол ПС PS 06 При утилизации материалов упаковки соблюда...

Page 79: ...0 16 1 x 5 9 x 8 3 2 2 Задние панели 5SC 500i 5SC 750i INPUT OUTPUT Refer to the Bottom of the unit for caution markings RS232 OR 5 4 3 2 1 INPUT OUTPUT Refer to the Bottom of the unit for caution markings RS232 OR 5 4 3 2 1 5SC 1000i 5SC 1500i INPUT OUTPUT OUTPUT Refer to the Bottom of the unit for caution markings RS232 OR 5 4 3 2 1 INPUT OUTPUT Refer to the Bottom of the unit for caution markin...

Page 80: ... Уровень выходной нагрузки 14 Уровень заряда батареи аккумуляторов 15 Измерения входа 16 Измерения выхода 17 Измерительный блок 2 5 Настройка ИБП с помощью светодиодов Отпустите кнопку прокрутки вниз чтобы выбрать меню 5s 2s 2s 2s Output voltage Alarm Sensitivity 1 Пример настройки Сохранитьновое значение 10s 5s 5s ЖК дисплей выключается при отсутствии активности в течение 3 минут 1 в режиме низко...

Page 81: ...зователя и IPSS Комплектом программ интеллектуального управления питанием 4 Два соединительных кабеля для защищаемого оборудования 5 Коммуникационный кабель RS232 6 Коммуникационный кабель USB Элементы упаковки должны утилизироваться в соответствии с действующими нормативными правилами касающимися отходов На каждом элементе имеется графический символ утилизации для облегчения сортировки ...

Page 82: ...ель связи RS232 5 или USB 6 к последовательному порту или порту USB компьютера 2 Соединить другой конец кабеля связи 5 или 6 с портом связи USB 1 или RS232 2 ИБП После установки программного обеспечения компании EATON для административного управления персонализации или обеспечения безопасности ИБП может взаимодействовать с компьютером 619 00470 02 i ru ...

Page 83: ...ели ИБП Перед тем как продолжить работу решите проблемы связанные с аварийными сигналами См Поиск и устранение неисправностей на стр 10 4 3 Выключение ИБП Для выключения ИБП 1 Нажимайте кнопку на передней панели в течение 3 секунд ИПБ начнет выдавать звуковой сигнал Затем АБП переходит в режим Ожидания а индикатор гаснет 4 4 Работа от аккумуляторной батареи Переход на батарею Когда исчезает напряж...

Page 84: ...тво сервисной службы Отказ батареи Батареи ИБП отключены Проверить правильно ли подключены батареи Если ошибка не устранена выписать сообщение тревоги и серийный номер ИБП и обратиться в представительство сервисной службы Срок службы аккумулятора завершился Обратитесь к своему представителю по обслуживанию для замены аккумулятора Отказ вентилятора Сбой в работе вентилятора ИБП Проверить не блокиру...

Page 85: ... батареи в моделях типа башня Необходимо выполнять данное действие после выключения ИБП и его отсоединения от сети переменного тока A A Снимите переднюю панель B B Отсоединить блок батарей разъединив 2 разъема запрещается тянуть за кабели C C Снимите защитную пластмассовую крышку в передней части батареи открутите один винт D D Вынуть блок батарей потянув за пластмассовый язычок и заменить блок Ус...

Page 86: ...9 А час 3 x 12 B 9 А час Условия окружающей среды Температура при работе от 0 до 35 C от 32 до 95 F Температура при хранении от 15 до 40 C от 5 до 104 F Относительная влажность от 0 до 90 без конденсации Уровень шума 40 дБА В нормальном режиме 1 Устанавливается на 220 230 240 В необходимо настроить на напряжение питания сети переменного тока Если прибор используется в регионе ЕС применяйте внешний...

Page 87: ...70 02 i pl POLSKI Prawa autorskie 2013 EATON Wszelkie prawa zastrzeżone Serwis i wsparcie Skontaktuj się ze swoim serwisantem regionalnym Instrukcja montażu i użytkowania 5SC 500i 5SC 750i 5SC 1000i 5SC 1500i ...

Page 88: ...lub gospodarką odpadami niebezpiecznymi Ten symbol oznacza że nie należy wyrzucać zużytego sprzętu elektrycznego lub elektronicznego WEEE do pojemnika na zwykłe odpady W celu właściwego pozbycia się odpadu prosimy o kontakt z regionalnym odbiorcą odpadów zajmującym się recyklingiem lub gospodarką odpadami niebezpiecznymi Informacje porady pomoc Dyrektywy UPS Bezpieczeństwo IEC 62040 1 2008 EMC IEC...

Page 89: ...omocą LCD 6 3 Instalacja 7 3 1 Rozpakowanie i sprawdzenie zawartości 7 3 2 Porty komunikacyjne 8 4 Praca 9 4 1 Uruchomienie i normalny tryb pracy 9 4 2 Uruchamianie UPS na baterii 9 4 3 Zakończenie pracy UPS 9 4 4 Praca na zasilaniu z baterii 9 4 5 Powrót zasilania z sieci elektrycznej 9 5 Obsługa 10 5 1 Wykrywanie i rozwiązywanie problemów 10 5 2 Wymiana modułu baterii 11 6 Załączniki 12 6 1 Spec...

Page 90: ...ez nas karton zawiera ponad 50 ponownie przetworzonej tektury Worki i torby wykonane są z polietylenu Materiały opakowania nadają się do powtórnego przetworzenia i są oznaczone odpowiednim symbolem identyfikacyjnym 01 PET Materiały Skróty Numery symboli Politereftalan etylenu PET 01 Polietylen o dużej gęstości HDPE 02 Polichlorek winylu PVC 03 Polietylen o niskiej gęstości LDPE 04 Polipropylen PP ...

Page 91: ...e tylne 5SC 500i 5SC 750i INPUT OUTPUT Refer to the Bottom of the unit for caution markings RS232 OR 5 4 3 2 1 INPUT OUTPUT Refer to the Bottom of the unit for caution markings RS232 OR 5 4 3 2 1 5SC 1000i 5SC 1500i INPUT OUTPUT OUTPUT Refer to the Bottom of the unit for caution markings RS232 OR 5 4 3 2 1 INPUT OUTPUT Refer to the Bottom of the unit for caution markings RS232 OR 5 4 3 2 1 1 Port ...

Page 92: ...a 14 Poziom naładowania baterii 15 Pomiary wielkości wejściowych 16 Pomiary wielkości wyjściowych 17 Jednostka pomiaru 2 5 Konfiguracja UPS za pomocą LCD Zwolnić przycisk przewijania w dół aby wybrać menu 5s 2s 2s 2s Output voltage Alarm Sensitivity 1 Przykładowa konfiguracja Zapamiętać nową wartość 10s 5s 5s Po 3 minutach braku aktywności panel LCD wyłącza się 1 W trybie małej wrażliwości Lo UPS ...

Page 93: ...stwa 3 Instrukcja dla użytkownika i IPSS Intelligent Power Software Suite CDROM 4 2 kable połączeniowe do zabezpieczanych urządzeń 5 Kabel komunikacyjny RS232 6 Kabel komunikacyjny USB Materiały do pakowania muszą być usunięte zgodnie z lokalnymi przepisami dotyczącymi odpadów Na materiałach opakowania nadrukowane są symbole recyklingu w celu ułatwienia sortowania ...

Page 94: ...ie mogą działać jednocześnie 2 1 5 6 1 Podłącz kabel komunikacyjny RS232 5 lub USB 6 do portu szeregowego lub USB w komputerze 2 Podłącz drugi koniec kabla komunikacyjnego 5 lub 6 do portu komunikacyjnego USB 1 lub RS232 2 w UPS UPS może teraz komunikować się z oprogramowaniem EATON do zarządzania zasilaniem 619 00470 02 i pl ...

Page 95: ...la aktywnych alarmów Rozwiąż wszystkie aktywne alarmy zanim przejdziesz dalej Sprawdź Wykrywanie i rozwiązywanie problemów na stronie 10 4 3 Zakończenie pracy UPS Aby wyłączyć UPS 1 Wciśnij przycisk na przednim panelu UPS i przytrzymaj przez 3 sekundy UPS zaczyna wydawać sygnał dźwiękowy UPS przełączy się na tryb czuwania a wskaźnik zgaśnie 4 4 Praca na zasilaniu z baterii Przełączenie się na zasi...

Page 96: ...tuj się z serwisan tem Usterka baterii Baterie UPS są odłączone Sprawdź czy wszystkie baterie są prawidłowo podłączone Jeśli usterka się utrzymuje spisz treść alarmu i numer seryjny UPS a następnie skontaktuj się z serwisan tem Bateria została zużyta W celu uzyskania zamiennika baterii skontaktuj się z serwisantem Usterka wentylatora Wystąpiła usterka wentylatora UPS Sprawdź czy nic nie blokuje we...

Page 97: ...h wieżowych Tę czynność należy wykonywać gdy UPS jest WYŁĄCZONY i odłączony od źródła AC A A Wyjmij przedni panel B B Odłącz blok baterii poprzez oddzielenie obu złącz nigdy nie ciągnij z kablami C C Zdejmij plastikową pokrywę ochronną z przodu baterii jedna śruba D D Pociągnij za plastikowy uchwyt aby wyciągnąć blok baterii i wymienić ją Montaż modułu nowej baterii Wykonaj powyższe instrukcje w o...

Page 98: ... Ah Środowisko Zakres temperatur pracy 0 do 35 C 32 do 95 F Temperatura przechowywania 15 do 40 C 5 do 104 F Wilgotność względna 0 do 90 bez kondensacji Poziom hałasu 40 dBA w normalnym trybie 1 Możliwość regulacji w zakresie 220 230 240 V musi być ustawione na taką samą wartość jak źródło zasilania prądem przemiennym AC Podczas stosowania urządzenia na obszarze UE na wejściu linii należy użyć zew...

Page 99: ...9 00470 02 i sv SVENSKA Copyright 2013 EATON Alla rättigheter förbehållna Service och support Kontakta din lokala servicerepresentant 5SC 500i 5SC 750i 5SC 1000i 5SC 1500i Installations och användarmanual ...

Page 100: ...ngscentral Den här symbolen betyder att du inte ska slänga avfall som utgörs av eller innehåller elektrisk eller elektronisk utrustning WEEE i soporna För att kassera produkten på rätt sätt kontakta närmaste återvinningscentral Information råd och hjälp UPS direktiv Säkerhet IEC 62040 1 2008 EMC IEC 62040 2 2005 Prestanda IEC 62040 3 2010 CE märkning EN 62040 1 2008 och EN 62040 2 2006 C1 Utsläpps...

Page 101: ...ayen 6 2 5 Ställa in UPS via LCD 6 3 Installation 7 3 1 Packa upp och kontrollera innehållet 7 3 2 Com portar 8 4 Användning 9 4 1 Uppstart och normal användning 9 4 2 Starta UPS en på batteri 9 4 3 Stäng av UPS en 9 4 4 Batteridrift 9 4 5 När strömmen kommer tillbaka 9 5 Underhåll 10 5 1 Felsökning 10 5 2 Byta batterimodul 11 6 Bilagor 12 6 1 Tekniska specifikationer 12 ...

Page 102: ... återvinningen Den kartong vi använder består till mer än 50 av återvunnen kartong Säckar och påsar är tillverkade av polyeten Förpackningsmaterialen är återvinningsbara och är märkta med rätt symbol 01 PET Material Förkortningar Nummer inuti symbolerna Polyetentereftalat PET 01 Polyeten med hög densitet HDPE 02 Polyvinylklorid PVC 03 Polyeten med låg densitet LDPE 04 Polypropylen PP 05 Polystyren...

Page 103: ... 5 9 x 8 3 2 2 Bakre paneler 5SC 500i 5SC 750i INPUT OUTPUT Refer to the Bottom of the unit for caution markings RS232 OR 5 4 3 2 1 INPUT OUTPUT Refer to the Bottom of the unit for caution markings RS232 OR 5 4 3 2 1 5SC 1000i 5SC 1500i INPUT OUTPUT OUTPUT Refer to the Bottom of the unit for caution markings RS232 OR 5 4 3 2 1 INPUT OUTPUT Refer to the Bottom of the unit for caution markings RS232...

Page 104: ...astningsnivå 14 Batterinivå 15 Inkommande mätningar 16 Utgående mätningar 17 Mätenhet 2 5 Ställa in UPS via LCD Släpp den nedåtriktade bläddringsknappen för att välja meny 5s 2s 2s 2s Output voltage Alarm Sensitivity 1 Exempel på inställning Spara det nya värdet 10s 5s 5s LCD panelen stängs av om ingen aktivitet registreras på tre minuter 1 I lågkänslighetsläge Lo tolererar UPS en större effektvar...

Page 105: ...g och CD ROM med IPSS Intelligent Power Software Suite 4 2 kablar för anslutning av sådan utrustning som ska skyddas 5 RS232 kommunikationskabel 6 USB kommunikationskabel Förpackningsmaterialet måste kasseras i enlighet med gällande bestämmelser för avfallshantering Återvinningssymbolerna är tryckta på paketeringsmaterialet så att det ska vara lättare att källsortera ...

Page 106: ... användas samtidigt 2 1 5 6 1 Anslut RS232 5 eller USB 6 kommunikationskabeln till serie eller USB porten på datorutrustningen 2 Anslut den andra änden på kommunikationskabeln 5 eller 6 till USB 1 eller RS232 2 kommunikationsporten på UPS en Nu kan UPS en kommunicera med EATON energisparprogram 619 00470 02 i sv ...

Page 107: ... att det inte visas några aktiva larm på frontpanelen Åtgärda eventuella aktiva larm innan du fortsätter Se Felsökning på sidan 10 4 3 Stäng av UPS en För att stänga av UPS en 1 Tryck in knappen på frontpanel i tre sekunder UPS en börjar pipa UPS en går sedan över till standbyläge och indikatorn slocknar 4 4 Batteridrift Övergång till batteridrift UPS en fortsätter att spänningsmata de anslutna en...

Page 108: ...står Kontakta sedan din servicerepresentant Batterifel Batterierna i UPS en är inte anslutna Kontrollera att alla batterier är ordentligt anslutna Skriv upp larmmeddelandet och UPS ens serienummer om felet kvarstår Kontakta sedan din servicerepresentant Batteriet är slut Kontakta din servicerepresentant angående utbytesbatteri Fläktfel Ett fläktfel har uppstått i UPS en Kontrollera att ingenting b...

Page 109: ...år endast utföras när UPS en är avstängd och har kopplats bort från strömkällan A A Ta bort frontpanelen B B Koppla ur batteriblocket genom att dra isär de båda kontakterna dra aldrig i ledningarna C C Ta bort plastskyddskåpan som sitter framför batteriet en skruv D D Dra i plastfliken för att ta bort batteriblocket och byta det Montera den nya batterimodulen Upprepa arbetsstegen ovan i omvänd ord...

Page 110: ...Ah 3 x 12 V 9 Ah Omgivning Drifts temperaturintervall 0 till 35 C 32 till 95 F Förvarings temperaturintervall 15 till 40 C 5 till 104 F Relativ luftfuktighet 0 till 90 utan kondensation Buller 40 dBA V normalnem načinu 1 Kan ställas om till 220 230 240 V det inställda värdet måste vara detsamma som växelströmskällans Om apparaten används inom EU området ska ett externt överspänningsskydd på 16 A 2...

Page 111: ...619 00470 02 i fi SUOMI Copyright 2013 EATON Kaikki oikeudet pidätetään Huolto ja tuki Ota yhteys paikalliseen huoltoedustajaasi 5SC 500i 5SC 750i 5SC 1000i 5SC 1500i Asennus ja käyttöopas ...

Page 112: ...li ilmaisee että sähkö tai elektroniikkalaitteita WEEE ei saa hävittää tavallisten jätteiden mukana Ota yhteys paikalliseen kierrätyskeskukseen tai vaarallistenjätteiden käsittelykeskukseen lait teiden hävittämiseksi asianmukaisesti Tietoja neuvo ohje UPS direktiivit Turvallisuus IEC 62040 1 2008 Sähkömagneettinen yhteensopivuus EMC IEC 62040 2 2005 Suorituskyky IEC 62040 3 2010 CE merkintä EN 620...

Page 113: ...itteen asetukset LCD näytön kautta 6 3 Asennus 7 3 1 Pakkauksen purkaminen ja sisällön tarkastus 7 3 2 Tietoliikenneportit 8 4 Käyttö 9 4 1 Käynnistys ja normaali toiminta 9 4 2 UPS laitteen käynnistys akulla 9 4 3 UPS laitteen sammutus 9 4 4 Käyttö akkuvirralla 9 4 5 AC tulovirran paluu 9 5 Huolto 10 5 1 Vianmääritys 10 5 2 Akkumoduulin vaihto 11 6 Liitteet 12 6 1 Tekniset tiedot 12 ...

Page 114: ... on kierrätyspahvia Pussit on valmistettu polyeteenistä Pakkausmateriaalit ovat kierrätettäviä ja ne on merkitty asianmukaisella tunnistesymbolilla 01 PET Materiaalit Lyhenteet Numero symboleissa Polyeteenitereftalaatti PET 01 Suurtiheyspolyeteeni HDPE 02 Polyvinyylikloridi PVC 03 Pientiheyspolyeteeni LDPE 04 Polypropeeni PP 05 Polystyreeni PS 06 Noudata kaikkia pakkausmateriaalien hävitystä koske...

Page 115: ...akapaneelit 5SC 500i 5SC 750i INPUT OUTPUT Refer to the Bottom of the unit for caution markings RS232 OR 5 4 3 2 1 INPUT OUTPUT Refer to the Bottom of the unit for caution markings RS232 OR 5 4 3 2 1 5SC 1000i 5SC 1500i INPUT OUTPUT OUTPUT Refer to the Bottom of the unit for caution markings RS232 OR 5 4 3 2 1 INPUT OUTPUT Refer to the Bottom of the unit for caution markings RS232 OR 5 4 3 2 1 1 U...

Page 116: ... Akkutila 12 Sisäinen vika 13 Lähdön kuormitustaso 14 Akun varaus 15 Tulon mittaukset 16 Lähdön mittaukset 17 Mittayksikkö 2 5 UPS laitteen asetukset LCD näytön kautta Valitse valikko vapauttamalla alaspäinvierityksen painike 5s 2s 2s 2s Output voltage Alarm Sensitivity 1 Asetusesimerkki Tallenna uusi arvo 10s 5s 5s LCD näyttö sammuu jos sitä ei käytetä 3 minuuttiin 1 Pienen herkkyyden tilassa Lo ...

Page 117: ...levyt Käyttöopas ja IPSS Intelligent Power Software Suite 4 2 suojattavien laitteiden liitäntäkaapelia 5 RS232 tiedonsiirtokaapeli 6 USB tiedonsiirtokaapeli Pakkausmateriaalit on hävitettävä noudattamalla kaikkia paikallisia jätteiden käsittelyä koskevia säännöksiä ja määräyksiä Kierrätyssymbolit on tulostettu pakkausmateriaaleihin lajittelun helpottamiseksi ...

Page 118: ...ää samanaikaisesti 2 1 5 6 1 Liitä RS232 tiedonsiirtokaapeli 5 tai USB tiedonsiirtokaapeli 6 tietokoneen sarja tai USB porttiin 2 Liitä tiedonsiirtokaapelin 5 tai 6 toinen pää UPS laitteen USB tietoliikenneporttiin 1 tai RS232 tietoliikenneporttiin 2 Nyt UPS laite voi olla tietoyhtey dessä EATONin virranhallintaoh jelmiston kanssa fi 619 00470 02 i ...

Page 119: ... laitteillesi 2 Tarkasta näkyykö UPS laitteen etupaneelin näytössä aktiivisia hälytyksiä Ratkaise ja poista mahdolliset aktiiviset hälytykset ennen kun jatkat eteenpäin Katso Vianmääritys sivulta 10 4 3 UPS laitteen sammutus UPS laitteen sammutus 1 Paina etupaneelin painiketta kolme sekuntia UPS laitteesta alkaa kuulua äänimerkki Tämän jälkeen UPS laite siirtyy tilaan Standby mode valmiustila ja m...

Page 120: ...hteys huoltoedusta jaan Akkuvika UPS n akut on kytketty irti Tarkasta että kaikki akut on kytketty asianmukaisesti Jos vika jatkuu kirjoita muistiin hälytysviesti ja UPS n sarjanumero ja sitten ota yhteys huoltoedusta jaan Akku on tullut käyttöikänsä päähän Kysy akun vaihtoon liittyviä lisätie toja huoltoedustajalta Tuulettimen vika UPS laitteessa on tuuletinvika Tarkasta ettei mikään esine tuki t...

Page 121: ...lleista UPS laitteen on oltava sammutettuna tämän toimenpiteen aikana ja kytkettynä irti lähteestä AC source A A Irrota etupaneeli B B Irrota akusto kytkemällä irti kaksi liitintä älä koskaan vedä johdoista C C Irrota akun edessä oleva muovisuojus yksi ruuvi D D Vedä muovikappaleesta jotta voit irrottaa ja vaihtaa akuston Uuden akkumoduulin asennus Suorita yllä mainittujen ohjeiden toimenpiteet pä...

Page 122: ...7 Ah 2 x 12 V 9 Ah 3 x 12 V 9 Ah Ympäristö Toiminta lämpötila 0 35 C 32 95 F Varastointi lämpötila 15 40 C 5 to 104 F Suhteellinen kosteus 0 90 ei kondensaatiota Melutaso 40 dBA normaalitilassa 1 Säädettävissä arvoon 220 230 240 V määritettävä vastaavaan AC virtalähdearvoon Kun käytät laitetta EU n alueella käytä johdon lähtöpäässä ulkoista suojakatkaisinta jolla on standardin IEC EN 60898 1 mukai...

Page 123: ......

Page 124: ...619 00470 02 i www eaton com Powerquality EATON 5SC ...

Reviews: