background image


Getting started


Step 1: 

Position the tripod 

Loosen the thumbscrew and pull down the three tripod legs completely so it stands firm and stable. 

ATTENTION

: Due to the stability of the tripod, the feet are sometimes difficult to pull apart.  

There is a risk that you may get your fingers caught. Always complete this step with adult supervision. 


Step 2: 

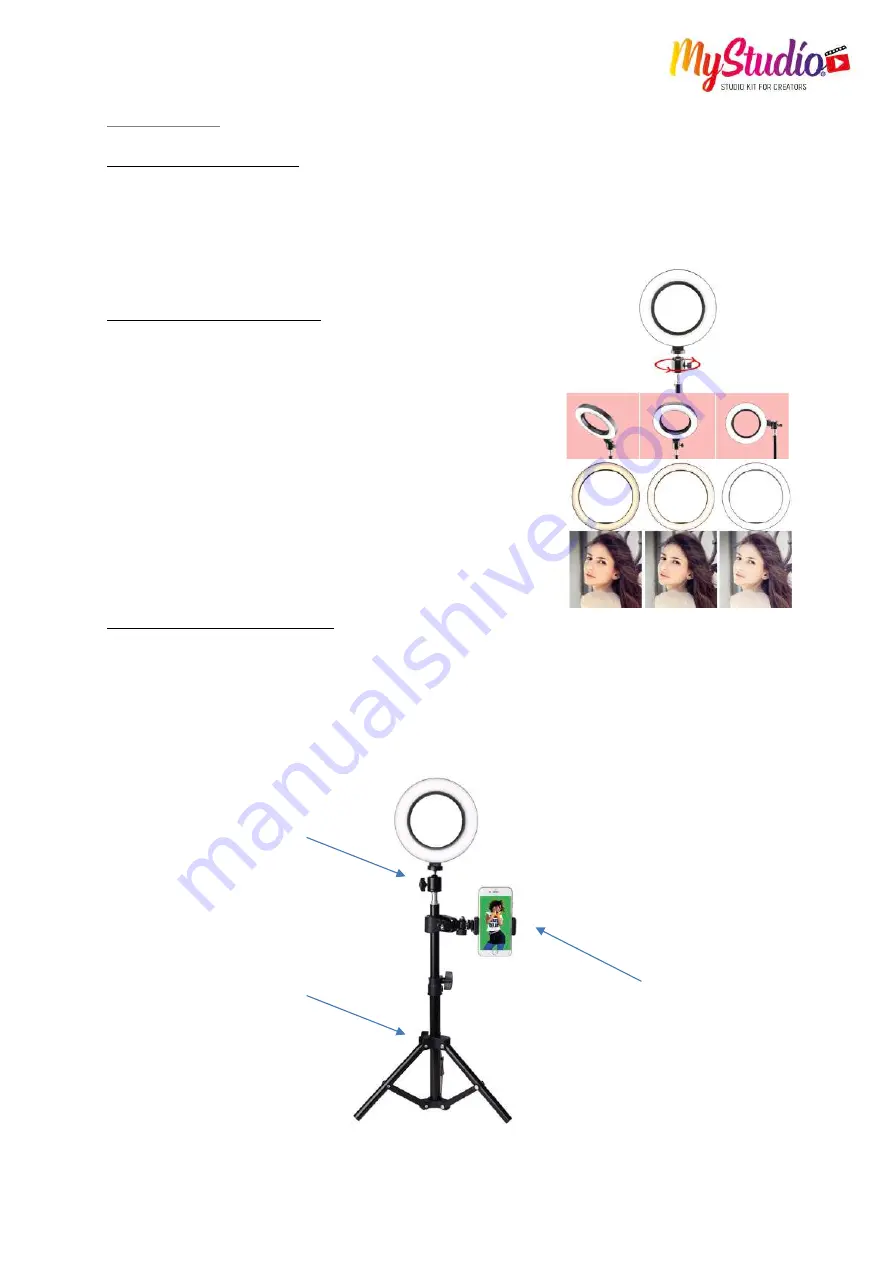
Mount the video light


Screw the LED ring light onto the supplied ball head and attach  
it to the tripod. 

The ring light is supplied with power using the supplied USB cable.       
You can connect the USB plug to the USB port of your computer  
or use a normal USB power supply or power bank. 

The light is switched on and off using the switch on the cable. Y 
ou can also use it to adjust the light colour temperature (warm white, 
universal white or daylight white) and brightness in ten steps. 


Step 3: 

Mount the smartphone


Mount the smartphone holder on the tripod shaft using the clamp mount.                                                                             
The smartphone mount is compatible with smartphones of up to 3.7“/9cm in width. 

ATTENTION

: Take care to ensure the smartphone is securely fixed in place.  

Ensure the smartphone is not at risk of falling from the mount.! 


1. Set up the tripod legs


2. Connect the ring light to 
the ball head and attach 
to the tripod


3. Mount and secure the 
smartphone in the cradle


Summary of Contents for MyStudio

Page 1: ...sen background There are no limits You decide against which background suits your creative mood and how often you want to change it WARNING Ask an adult to help you set up the tripod The tripod is heavy and you could pinch your fingers if you pull the tripod feet apart carelessly Be careful when mounting the smartphone in the holder Always ensure that the smartphone is securely fixed in place and ...

Page 2: ...SB plug to the USB port of your computer or use a normal USB power supply or power bank The light is switched on and off using the switch on the cable Y ou can also use it to adjust the light colour temperature warm white universal white or daylight white and brightness in ten steps Step 3 Mount the smartphone Mount the smartphone holder on the tripod shaft using the clamp mount The smartphone mou...

Page 3: ...droid smartphone USB Type C and iPhone Additional adapters are not included Step 5 Green Screen Hang the green screen in a suitable position behind you using the supplied clamps or suspension rings where required You are now ready to start Position yourself in front of the green screen and start recording Lights Camera ACTION TIP Ensure the tripod is placed in a position which allows the green scr...

Page 4: ...well the Apple App Store for iPhones 1 Stand in front of the green screen and the app will automatically change to the green colour background 2 Select and confirm your favorite background in the app or in your recordings Done Now you can record the video with your own background ATTENTION The CHROMAVID App is free of charge There is also a paid version available Please be aware of using apps that...

Page 5: ...n from inappropriate content Make sure that your child never discloses any personal information Be aware of hidden costs In principle all apps can make in app purchases possible Downloading protected content can lead to copyright infringement and is punishable by law Cyberbullying The simple and vast distribution possibilities of the Internet apparent anonymity and the habit of immediately sharing...

Page 6: ...e with the essential requirements and other relevant provisions of the European Directives The EC declaration of conformity can be downloaded here http www easypix info download pdf doc_mystudio pdf ATTENTION Small parts warning MyStudio is not suitable for children under the age of 3 due to the risk of suffocation from small parts ...

Reviews: