EasyPet EP-380R User Manual Download Page 14

stimulation.  When  trying  this  on  your  dog,  please  always  start  from  the  LOWEST 
level and increase the level gradually to find out the recognition level for the dog.  
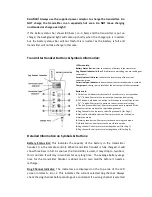
Short press button 

T

 to send out command to Dog A collar receiver. Dog A collar will 

start giving a static pulse stimulation at the selected level. A green LED light on the 
collar receiver should come up during this correction period. 

Short  press  "+"  or  "–"  to  adjust  the  level  setting  of  static  pulse  stimulation.  Short 

press button 

again to send out the new command. Dog A collar will start the static 

pulse stimulation at the newly selected level. A green LED light on the collar receiver 
should come up during this correction period. 

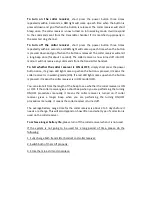
To  test  if  the  static  pulse  stimulation  is  working,

  attach  the  supplied  test  bulb  to 

both of  the  metal  prongs  on  the  collar receiver. The  test bulb  should  start flashing 
when the collar receiver is giving out static pulse stimulation.  (Please note the test 
bulb is  for test  purpose ONLY.  When the  collar  receiver  is  used  on the  dog,  please 
remove the test bulb from the collar receiver.) 

Tips:

  When on Level 99, you can quickly press plus “+” button once to go back to 

Level 1. When on Level 1, you can quickly press minus “– “button once to increase to 
Level 99.  

Note:

  For  multi-dog  training,  please  select  the  dog  you  would  like  to  train  by 

pressing A, B or C button. When LCD screen is showing the correct dog selected, then 
follow the above procedures to send out correction commands. 


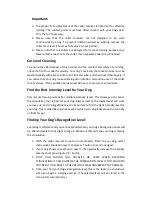
Step 6: Fit the Collar Receiver on the Dog 

To ensure a proper fit, please follow the steps below: 

1.


With your dog standing, centre the collar receiver where contact points are 
underneath your dog’s neck, touching the skin. If you dog has a long or thick 
coat, trim the hair around the contact points to ensure consistent contact. 

2.


The collar receiver should fit snugly, yet loose enough to allow one finger to 
fit between the  strap  and  your  dog’s  neck.    If the  strap  is too  long  for  your 
dog, cut off the excess length.  

3.


Allow your dog to wear the collar for several minutes, and then recheck the 
fit.  Check  the fit  again  as  your  dog  becomes  more  comfortable  wearing the 
collar receiver. 


Summary of Contents for EP-380R

Page 1: ...EasyPet EP 380R User s Manual Rechargeable Multi Dog Remote Training System Advanced Model of 1200 Meter Remote Range Fully Waterproof Submersible Collar Receiver Compact Lightweight and Convenient...

Page 2: ...3 dogs from 1 transmitter extra receivers required Remote range up to 1200 meters in open area Rechargeable transmitter handset Rechargeable fully waterproof collar receiver It is a heavy duty collar...

Page 3: ...different frequency These can be used for praise and warning for your dog Vibration Correction There are 10 levels of vibration corrections Level 1 is the weakest one and level 10 is the strongest one...

Page 4: ...T button is pressed to prompt the you to charge the transmitter Charging the Transmitter Plug the supplied wall charger into the wall socket and into the charger port of the transmitter which is locat...

Page 5: ...selected dog channel Always check the dog channel before sending out a command If a wrong channel is selected LCD Screen Info Battery Status Bar Indicates the capacity of battery in the transmitter D...

Page 6: ...Press and hold down the OFF button for 3 seconds this will turn off the transmitter handset When transmitter is ON short press or button will adjust the correction level setting on selected correctio...

Page 7: ...r to access the charger port Plug the supplied wall charger into the wall socket and into the charger port of the receiver A red LED light on the collar receiver will come up and stay on during chargi...

Page 8: ...follow the steps below Important Due to the compact size of the collar receiver the power button is designed in relatively small size you might find it easier to press down the button with your finge...

Page 9: ...if a green LED light comes up when the button is pressed it means the collar receiver is in working mode ON If a red LED light comes up when the button is pressed it means the collar receiver is in O...

Page 10: ...ange the registered channel for this collar receiver please follow the matching up procedures below 4 1 Switch on the transmitter handset and then choose either A B or C dog channel Note this will be...

Page 11: ...the power button on the collar receiver and start using the collar receiver from the registered channel If you find it difficult to hold down the power button on collar receiver properly during the wh...

Page 12: ...short press the vibration button on the transmitter and choose a valid correction level for vibration from Level 1 to Level 10 Level 1 is the weakest and Level 10 is the strongest Short press button T...

Page 13: ...t the new command Dog A collar will start bleeping at the newly selected level A green LED light on the collar receiver should come up during this correction period To test the static pulse stimulatio...

Page 14: ...ose ONLY When the collar receiver is used on the dog please remove the test bulb from the collar receiver Tips When on Level 99 you can quickly press plus button once to go back to Level 1 When on Lev...

Page 15: ...This remote training system has multiple intensity levels This allows you to choose the stimulation that is best for your dog Always start at the lowest level and work your way up For training efficie...

Page 16: ...tone vibration or stimulation corrections If you notice one situation in which your dog misbehaves repeatedly set up this situation as a training session This will dramatically increase your chances o...

Page 17: ...I do if my dog s neck becomes red and irritated A This condition is due to the contact points irritating the skin Discontinue use of the collar receiver for a few days If the condition persists beyon...

Page 18: ...on start flashing on and off not just flickering once it has received the command signal sent from the transmitter handset Problem No 3 The system doesn t have range or the range has been significant...

Reviews: