background image

18 


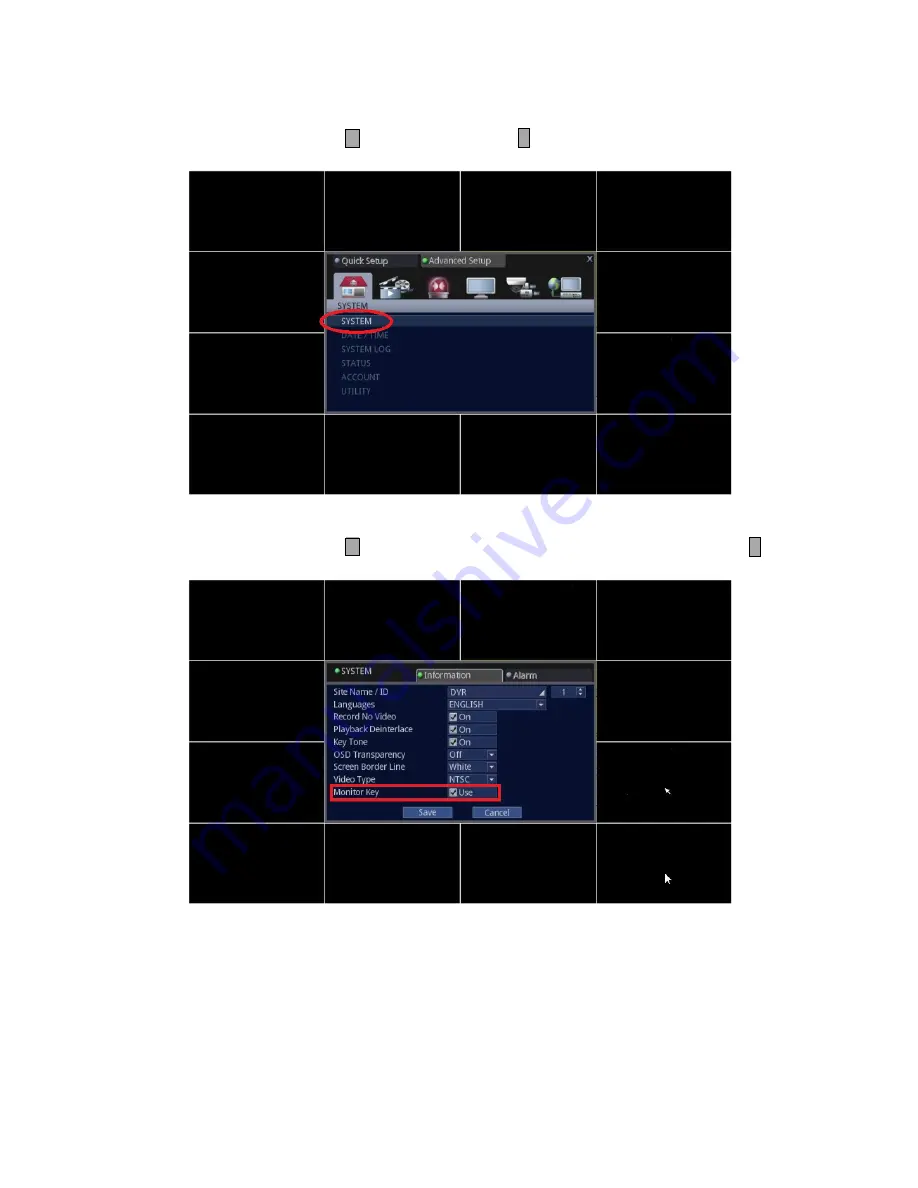
3. Access the sub-menu of SYSTEM. 

• Using Front Panel/Remote: Press 

 button twice and press 

 button. 

• Using Mouse: Click on the [SYSTEM].  


4. Uncheck to turn off [Monitor Key]. 

• Using Front Panel/Remote: Press 

 button multiple times to highlight [Monitor Key], and press 

 button. 

• Using Mouse: Click on the [Monitor Key] to uncheck the selection.  


Summary of Contents for ED-U1600

Page 1: ...QUICK SETUP MANUAL easynet Ultra Series DVR ED U1600 U3200...

Page 2: ......

Page 3: ...IMPORTANT STEP IF YOU ARE USING BNC TYPE MONITOR ONLY WHICH IS CONNECTED TO MAIN 2 6 HOW TO INITIALIZE THE HDD FOR RECORDING 7 HOW TO SET DATE TIME 11 QUICK RECORD SETUP 13 HOW TO DISABLE USE 2nd MONI...

Page 4: ...2 HOW TO SET REMOTE CONTROL ID Example How to program ID 1 Factory Default into the remote control It is a 3 step process Press ID button then press 1 button then finally press ID button again to save...

Page 5: ...3 HOW TO MOUNT THE HDD TO THE DVR 1 When you unpack the DVR box locate the removable HDD tray shown below 2 The removable HDD tray shown below needs to be inserted into the empty slot of the DVR...

Page 6: ...4 3 With the latch pointing upwards slide the tray into the slot 4 Lock the tray in the slot by applying downward pressure to the latch...

Page 7: ...5 5 Finally use the supplied tray key to lock the HDD tray into the chasis to prevent unauthorized removal...

Page 8: ...ront Panel Remote Press the POWER button for 3 seconds Using Mouse Not supported IMPORTANT STEP IF YOU ARE USING BNC TYPE MONITOR ONLY WHICH IS CONNECTED TO MAIN 2 Using Front Panel Remote Set the Fro...

Page 9: ...Follow the instructions below Using Front Panel Remote Press MENU button and press button Using Mouse Click on the Setup Menu icon 2 Select Advanced Setup Using Front Panel Remote Press button and but...

Page 10: ...mote Press button many to highlight UTILITY and press button Using Mouse Click on the UTILITY 4 Select Disk Manager Using Front Panel Remote Press button many to highlight Disk Manager and press butto...

Page 11: ...g Front Panel Remote Press button to acknowledge and to move on Using Mouse Click on the OK 7 Select INT 1 HDD Using Front Panel Remote Press button to highlight the Off status of INT 1 Then press but...

Page 12: ...Mouse Click on the Add 9 You are finished To exit menu and to start recording video Front Panel Remote Press and hold onto ESC button for 2 seconds Mouse Right click on your mouse twice 10 Begin reco...

Page 13: ...s started it is important to setup the time and the date 1 Follow the instructions below Using Front Panel Remote Press MENU button and press button Using Mouse Click on the Setup Menu icon 2 Access D...

Page 14: ...active internet connection is maintained Time Zone Select appropriate Time Zone for your location Format Allows the format and display of DATE Time to be customized Time Set or modify the Date and Ti...

Page 15: ...meras 1 Follow the instructions below Using Front Panel Remote Press MENU button and press button Using Mouse Click on the Setup Menu icon 2 Access the GLOBAL RECORD sub menu Front Panel Remote Press...

Page 16: ...owest and 4CIF being the best PPS 1 2 4 7 15 30 Refers to pictures per second for all cameras 1 being jerky and 30 being smooth real time video Quality Q1 Q2 Q3 Q4 Q5 Refers to detail level for all ca...

Page 17: ...re Quality Priority Mode it will automatically adjust its recording frame rate and resolution based on the number of days specified to give you the highest picture quality possible Frame Rate Smoother...

Page 18: ...nel Remote Press button to highlight Save and press button to save Mouse Click on Save to save 6 To exit out to the Live screen Front Panel Remote Press and hold onto ESC button for 2 seconds Mouse Ri...

Page 19: ...n However should you NOT want to take advantage of 2 nd Monitor Main 2 follow these instructions 1 Follow the instructions below Using Front Panel Remote Press MENU button and press button Using Mouse...

Page 20: ...Press button twice and press button Using Mouse Click on the SYSTEM 4 Uncheck to turn off Monitor Key Using Front Panel Remote Press button multiple times to highlight Monitor Key and press button Us...

Page 21: ...nel Remote Press button to highlight Save and press button to save Mouse Click on Save to save 6 To exit out to the Live screen Front Panel Remote Press and hold onto ESC button for 2 seconds Mouse Ri...

Page 22: ...or viewing video across a local area network or through the internet 1 Follow the instructions below Using Front Panel Remote Press MENU button and press button Using Mouse Click on the Setup Menu ico...

Page 23: ...Remote For DHCP Press button and press to check or uncheck For IP Netmask Gateway DNS1 DNS2 Port follow the instructions below These parameters are given by your Internet Service Provider or Network A...

Page 24: ...uctions below These parameters are given by your Internet Service Provider or Network Administrator on a corporate network environment Highlight and click the IP portion on the screen Virtual numeric...

Page 25: ...e Server Address given by your Internet Service Provider or Network Administrator Port 7000 is the factory default This port number is customizable and can be changed Host Name Type the address that i...

Page 26: ...nel Remote Press button to highlight Save and press button to save Mouse Click on Save to save 6 To exit out to the Live screen Front Panel Remote Press and hold onto ESC button for 2 seconds Mouse Ri...

Page 27: ...low the instructions below Using Front Panel Remote Press SEARCH button Using Mouse Click on the Search icon 2 Select Time Search Using Front Panel Remote Press button twice to highlight Time Search a...

Page 28: ...utton couple of times to highlight Start and press button Your desired video will start playing Using Mouse Click on the desired group such as Month Day Year Hour Minute Second and click on the part o...

Page 29: ...instructions below Using Front Panel Remote Press SEARCH button Using Mouse Click on the Search icon 2 Select Calendar Search Using Front Panel Remote Press button three times to highlight Calendar S...

Page 30: ...e same method for year and day Using Mouse Click on either the Year Date or Day and change to the desired value 4 Select your desired time of the day Using Front Panel Remote Press buttons to highligh...

Page 31: ...the Live screen Front Panel Remote Press button Mouse Click on the X Close HOW TO COPY VIDEOS INTO CD DVD USB 1 Follow the instructions below Using Front Panel Remote Press COPY button Using Mouse Cli...

Page 32: ...deo to be copied Channel By factory default Select All is checked therefore all the channels or cameras will be copied However should you want to copy only the specific cameras you can unselect Select...

Page 33: ...llow the instructions below Using Front Panel Remote Press SEARCH button Using Mouse Click on the Search icon 3 Choose your desired medium such as DVD or USB Using Front Panel Remote Use and press eit...

Page 34: ...32 4 DVR will search for video from your desired medium...

Page 35: ...33 5 DVR will display videos that are available on your desired medium 6 Follow Time Search method that is explained on page 25...

Page 36: ...ons below Using Front Panel Remote Press LOCK button Using Mouse Click on the Log In icon 2 You need to input admin password 0 0 0 0 0 0 for the DVR Using Front Panel Remote Use and press either butto...

Page 37: ...to highlight 0 then press button six times Finally use and press either button to highlight and press button Using Mouse Highlight 0 and click six times then highlight and click 4 Lastly when you sele...

Page 38: ......

Page 39: ......

Page 40: ...om unauthorized resellers htm NUVICO Corporate Headquarters 53 Smith Street Englewood NJ 07631 Tel 201 541 1605 Toll Free 866 523 1700 Fax 201 541 1620 sales nuvico com www nuvico com NUVICO Internati...

Reviews: