29
EN
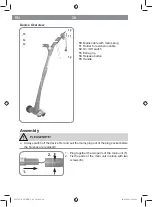
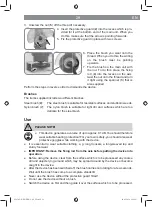
3. Unscrew the nut (
5
) off the thread if necessary.
4. Insert the protective guard (
2
) into the recess which is pro-
vided for it at the bottom end of the main unit. When you
do this, make sure that the arrow is pointing forwards.
5. Fix the protective guard in place with two screws.
6. Place the brush you want onto the
thread. When you do this, the writing
on the brush must be pointing
upwards.
7. Fix the brush on the main unit with
the nut. To do this, place the
fi
rod (
4
) into the recess on the axis,
twist the nut onto the thread and turn
it tight using the spanner (
3
) that is
also supplied.
Perform the steps in reverse order to dismantle the device.
Brushes
The items supplied include two different brushes:
Steel brush (
8
):
The steel brush is suitable for resistant surfaces and stubborn weeds.
Nylon brush (
7
):
The nylon brush is suitable for light dirt and surfaces which are too
delicate for the steel brush.
Use
PLEASE NOTE!
■
This device generates a volume of up to approx. 91 dB. You should therefore
wear suitable hearing protection! For your own safety, you should also wear
protective goggles while working with the device.
■
It is essential to wear suitable clothing, e. g. long trousers, a long-sleeved top and
sturdy footwear.
■
IMPORTANT: Remove the
fi
xing rod from the axis before putting the device into
operation.
■
Before using the device, clear from the surface which is to be processed any coarse
dirt and objects lying around which may be spread around by the device or become
caught in the device.
■
After the device has been switched off, the brush carries on rotating for a few seconds.
Wait until the brush has come to a complete standstill.
■
Never use the device without the protective guard
fi
tted!
■
Do not use the device without a brush.
■
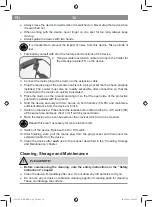
Switch the device on
fi
rst and then guide it over the surface which is to be processed.
02978_DE-EN-FR-NL_A5_V2.indb 29
02978_DE-EN-FR-NL_A5_V2.indb 29
14.05.2018 11:14:17
14.05.2018 11:14:17

