


WHAT IS IN THE BOX:
1x Instruction Manual
1x Electric Stove Fire heater
4x Legs
12x Screws
1x Door
2x Hinge pins
ASSEMBLING INSTRUCTION:
Please check all the parts are in the box and
no damage on the heater or parts before
assembling.
1. Turn product on one side.
2. Place a leg on each corner and secure by
attaching 3 screws to each leg. Repeat 4
times to put up 4 legs.
3. Turn the unit back up and stand upright.
4. Align door to the hinge sections on the front
of the unit. Once aligned, clip in place using
the hinge pins. Simply push the pins into
the aligned slots to hold the door in place
upright.
HOW TO OPERATE THE HEATER:
• Do not operate the heater if the plug is damaged or after it malfunctions, has been
dropped, or damaged in any manner.
• Place the heater on a flat source.
• To allow for maximum heat, air, and ventilation flow, allow at least one meter of
unobstructed space to the front and sides.
• Plug the heater into a wall power socket
(220-240V).
• Do not connect the heater to extension cords, multi-sockets or adaptors.
• Only plug it into wall socket directly.
• Do not touch glass panel.
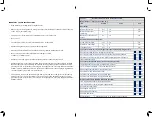
Operation Panel
Glass Panel
Press on/off button to ON position.
This powers the heater on and the
flame effect lights up. Please note
there is no heat generated at this time.
Adjust heat power by pressing I (Low
heat 900W) or II (High heat 1800W)
button
Adjust temperature by rolling Temp
Adj. wheel from min to max.
Adjust flame effect of by Dimming
wheel from min to max.
Switch
Function
Dimming
Flame effect adjustment
ON
Flame effect light
I
Low heat (900W)
II
High heat (1800W)
Temp Adj.
Temperature adjustment
Glowing Effect
Hot Air Vent


