


To order parts and supplies: 800.343.9353 >> eastwood.com
7
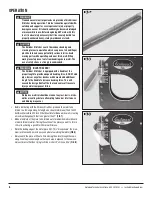
FIG. 10
• The “bunching” or “pocketing” that typically occurs when shrinking can
be quickly hammered out, or smoothed by inserting the metal deeper into
the jaws.
• Maximum control is achieved with the pressure exerted on the handle and
number of strokes used while forming the metal. Move the metal back and
forth along its length until the desired radius is obtained
(FIG 10)
.
NOTE:
The Shrinker and the Stretcher Jaws are “toothed” to allow them to
grip and “push” or “pull” the metal. These teeth leave slight markings which,
depending on the hardness of the metal, can be removed with an abrasive
cloth or wheel.
NOTE:
At this point, the basic operating instructions have been described
and practice using the Shrinker Stretcher on scrap material is highly recom-
mended. As with many metal working tools, a period of “trial and error” is
needed to achieve a degree of proficiency in their use. Remember, a little
time and material wasted at this step will avoid disappointing results on an
actual project.
STORAGE
• Remove Handle for safety.
• Apply a thin film of light oil or rust-preventive to all bare steel areas.
• Store in a clean, dust-free, dry, dampness free area preferably covered with plastic sheeting.
MAINTENANCE
Maintenance should be performed before each use.
• Clean dirt and debris from Jaw Gripping Teeth.
NOTE:
Forming aluminum will cause a buildup of aluminum in Gripping Teeth.
They must be cleaned with a wire brush periodically when working with aluminum.
• Check tightness of all hardware.
• Check operation for binding. Lubricate sliding parts and pivot points periodically with medium bodied oil.
NOTE:
Use care to avoid getting oil on Jaw Gripping Teeth.
For best results and maximum forming power, insert metal
only halfway into the Jaws.


