

4
5
6
●
Directly Access Through IE
450043000680 A1
③
Modify the IP address. The default IP address of this camera
is 192.168.226.201. Click the information of the camera listed
in the above table to show the network information on the right
hand. Modify the IP address and gateway of the camera and
make sure its network address is in the same local network
segment as the computer’s. Please modify the IP address of
your device according to the practical situation.
For example, the IP address of your computer is 192.168.1.4.
So
the IP address of the camera shall be changed to 192.168.1.X.
After modification, please input the password of the administrator
and click “Modify” button to modify the setting.
The default password of the administrator is “123456”.
④
Double-click the IP address and then the system will pop up the IE
browser to connect IP-CAM . IE browser will auto download
the Active X control. After downloading, a login window will pop
up as shown below:
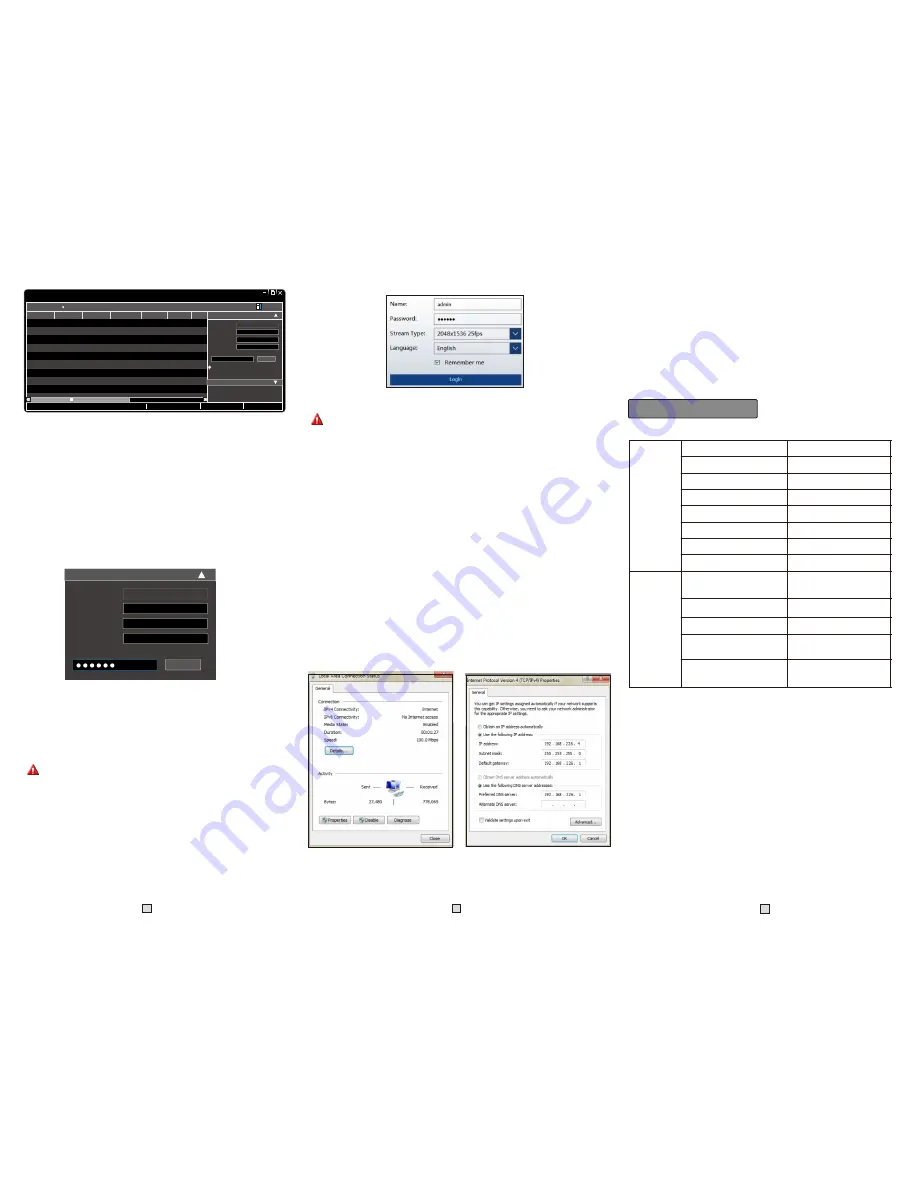
Input the user name and password to login.
The default username is
admin
; the default password is
123456
.
The default network settings are as shown below:
IP address: 192.168.226.201 HTTP:80
Subnet Mask: 255.255.255.0 Data Port:9008
Gateway: 192.168.226.1
You may use the above default settings when you log in the camera
for the first time.
①
Set the IP address of the PC and the network segment should be as
the same as the default settings of IP-CAM. Open the network and
share center. Click “Local Area Connection” to pop up the following
window. Select “Properties” and then select Internet protocol
according to the actual situation (for example: IPv4). Next, click
“Properties” button to set the network of the PC.
②
Open the IE Browser and input the default address of IP-CAM
and confirm. The IE browser will download Active X control
automatically.
③
After that, the login dialog box will pop up.
④
Input the default username and password and then enter to view.
Preset Description
Call Preset
Set Preset
Call No
.
90
Preset
Run track 1
Run cruise 1
Run cruise 2
Run cruise 3
Run cruise 4
OSD menu
Enable random scan
Enable P-PSCAN
Set left border of P-PSCAN
Set right border of P-PSCAN
Set the boundary value of the
near and middle infrared light
Set the boundary value of the
middle and far infrared light
Set random scan; Task auto
call the beginning point
Call No
.
91
Preset
Call No
.
92
Preset
Call No
.
93
Preset
Call No
.
94
Preset
Call No
.
95
Preset
Call No
.
97
Preset
Call No
.
99
Preset
Set No
.
91
Preset
Set No
.
92
Preset
Set No
.
93
Preset
Set No
.
94
Preset three times
Set No
.
95
Preset three times
Device
Network
Search
Immediate
Refresh
name
name
name
IPC
IPC
IPC
unknown
unknown
unknown
192.168.226.201
192.168.1.2
192.168.1.3
80
80
80
9008
9008
9008
255.255.
255.255.
255.255.
Modify Network Parameter
Mac Address
IP Address
Modify
CE :98 :23 :75 :35 :22
192
.
168
.
226
. 201
255
.
255
.
255
. 0
192
.
168
.
226
. 1
i
Tip: Enter the administrator password, and
then modify the network parameters.
Total Device: 3
Local IP Address:192
.
168
.
1
.
4
Subnet Mask:255
.
255
.
255
.
0 Gateway: 192
.
168
.
1
.
1
DNS
:
210
.
21
.
196
.
6
Device Name Device Type
IP Address
Http Port
Data Port
Subnet
Product Model
About
Subnet Mask
Gateway
Restore IPC Default Configuration
Mac Address
IP Address
Modify Network Parameter
Modify
CE :98 :23 :75 :35 :22
192
.
168
.
1
. 201
255
.
255
.
255
. 0
192
.
168
.
1
. 1
Subnet Mask
Gateway


